PMQ for two

Bold, Bright and Colourful Home Decor & DIYs

  • Home
  • About me
    • Press
    • Policies
  • Download Colour & Pattern Mixing Guide
  • Project Gallery
  • What is a PMQ?
    • The duplex
    • The Row House Tour

DIY EL Wire Neon Sign

October 18, 2016~ Decor, DIY and craft projects

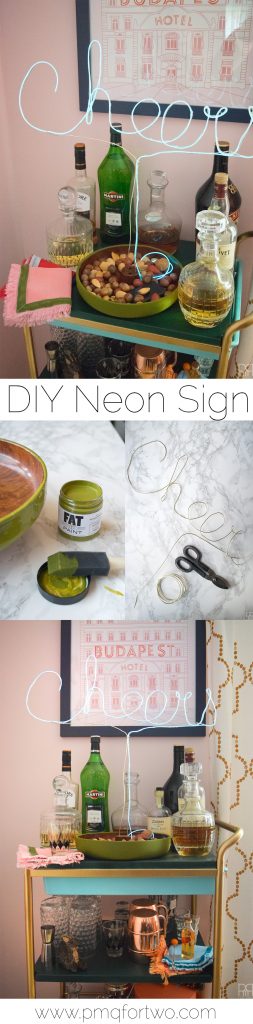
Another day, another dollar, another cool thing I made. But seriously, this time I made the coolest bar accessory ever – a DIY EL Wire Neon Sign in a nut bowl. Swap It Like It’s Hot is a DIY challenge that Charlotte from At Charlotte’s House hosts a couple of times a year. Bloggers send each other an item or collection of items from a thrift store (the uglier the better) and then we all have to make them over into something cool! I’m probably violating the rules of this challenge by using what I got for its intended purpose, but once you see it you’ll understand why.

diy-neon-bar-sign cheers

If you’re joining me from Maggie Overby Studios, ConfettiStyle, Confessions of a Serial Do-It-Yourselfer, Addicted to DIY, Restoration Redoux, I Am A Homemaker, or Reinvented – welcome

✨Are you signed-up for The Newsletter? ✨

* indicates required

Email Format

Now, you guys know that I normally have stellar images, so if any of these seem kind of grainy to you, please bear with me. The Purolator guy only delivered the crucial component to my DIY at 4pm yesterday, which didn’t leave me with a whole lot of time left to complete, style, and photograph my project. I’m usually more organized too!

DIY EL Wire Neon Light

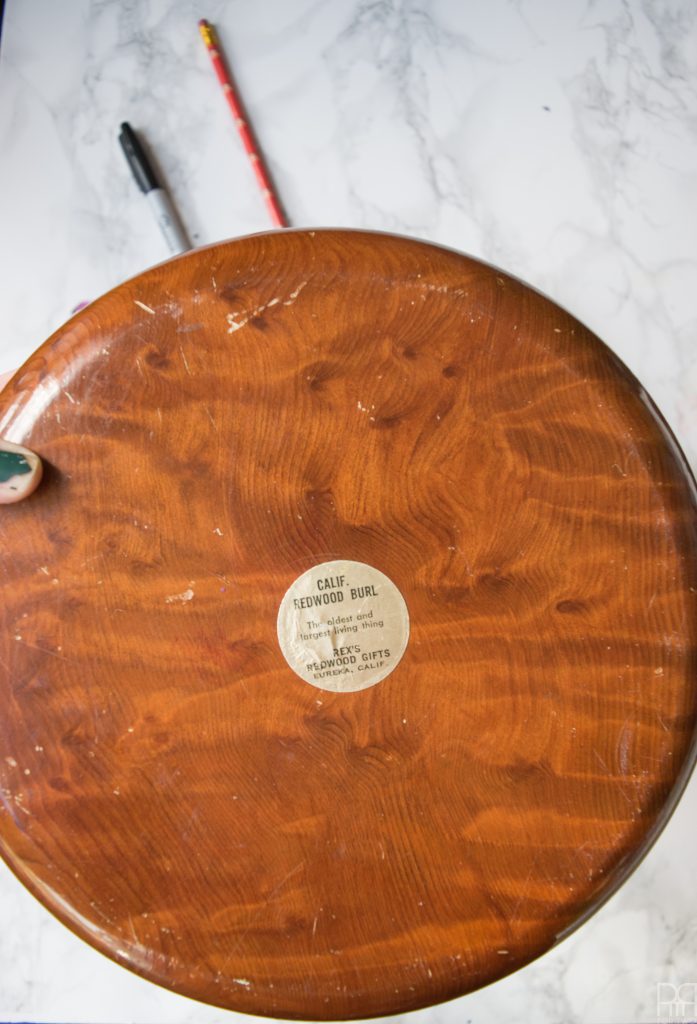
What did I receive? I received a beautiful redwood nutcracker bowl from Rex’s Redwood Gifts – a now defunct (?) store in Eureka, California. My friend Maggie from Maggie Overby studios stumbled across it in her thrifting journeys. I had originally intended to make this bowl into a Juju hat, but after staring at it for a few days I realized that I loved the grain of the wood too much! I just couldn’t completely cover it. This is where the idea of an EL Wire Neon Light comes into play.

diy-neon-bar-sign before pic

Instead, I opted to give it a bit of lipstick and add something to it. Although in its new form it is not completely unrecognizable, it is still tons of fun, and just different enough to make it feel like mine.

diy-neon-bar-sign supplies

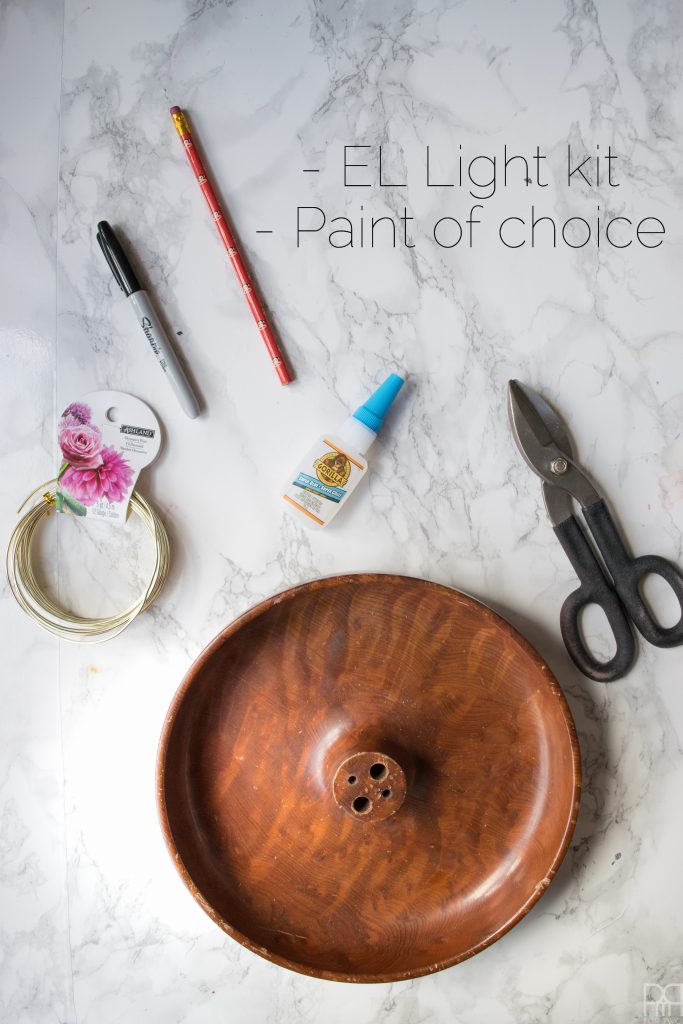
What do you need to make an EL Wire Neon Sign

*The following product links contain affiliate links. Thank you for supporting the brands that make PMQ for two possible.

  • Wood nut bowl – with holes for the picks and cracker
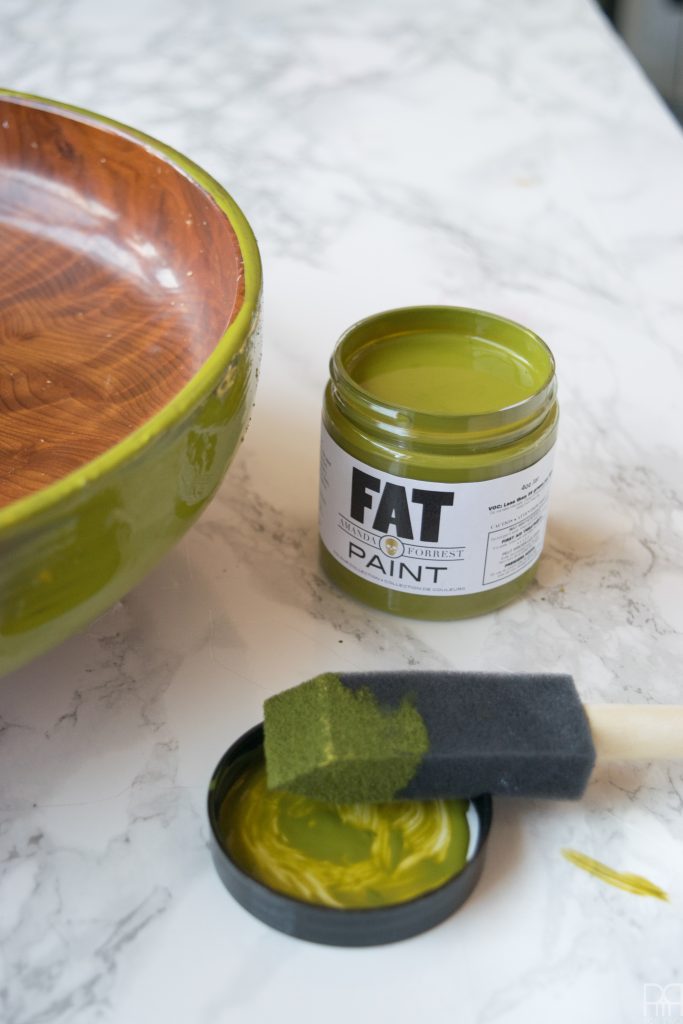
  • Paint – I used Fat Paint
  • 12 gage wire
  • EL Wire Kit –> Zitrades EL Wire Portable Electroluminescent wire 4 modes 15ft El Wire Blue Driver With Battery Pack Controller For Cosplay Dress
  • Super Glue – I used Gorilla Glue
  • Tin snips
  • Large sheet of paper
  • Marker or pencil
  • A willingness to glue your fingers together or to your desk

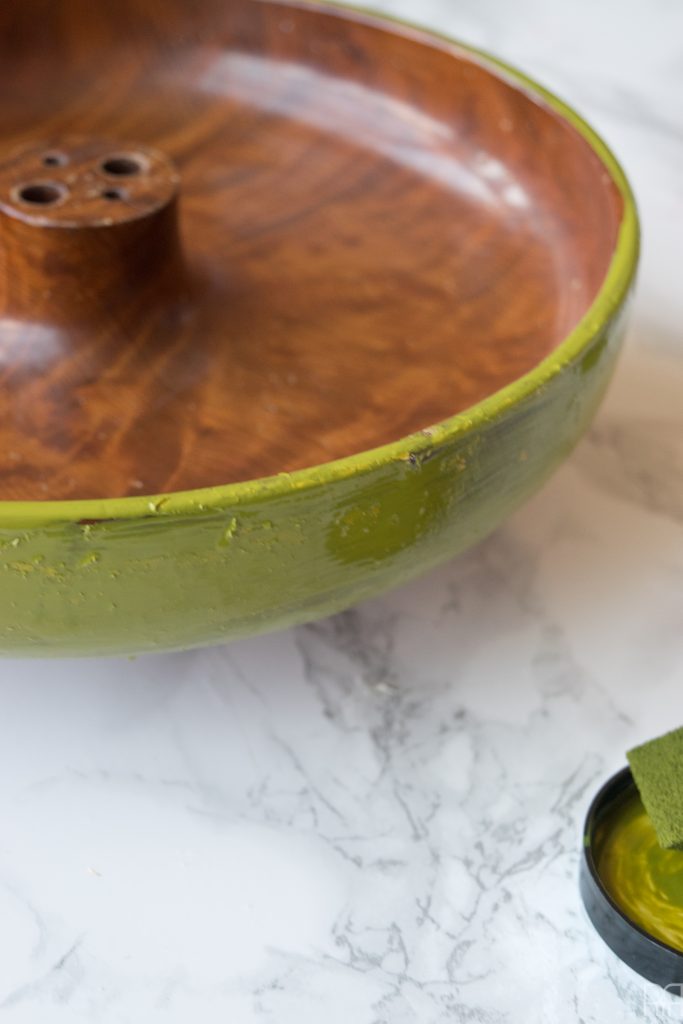
Make sure your bowl is clean and dry. I gave mine a good wipe down with a moist cloth to clean any dust or smudges.

diy-neon-bar-sign with fat paint

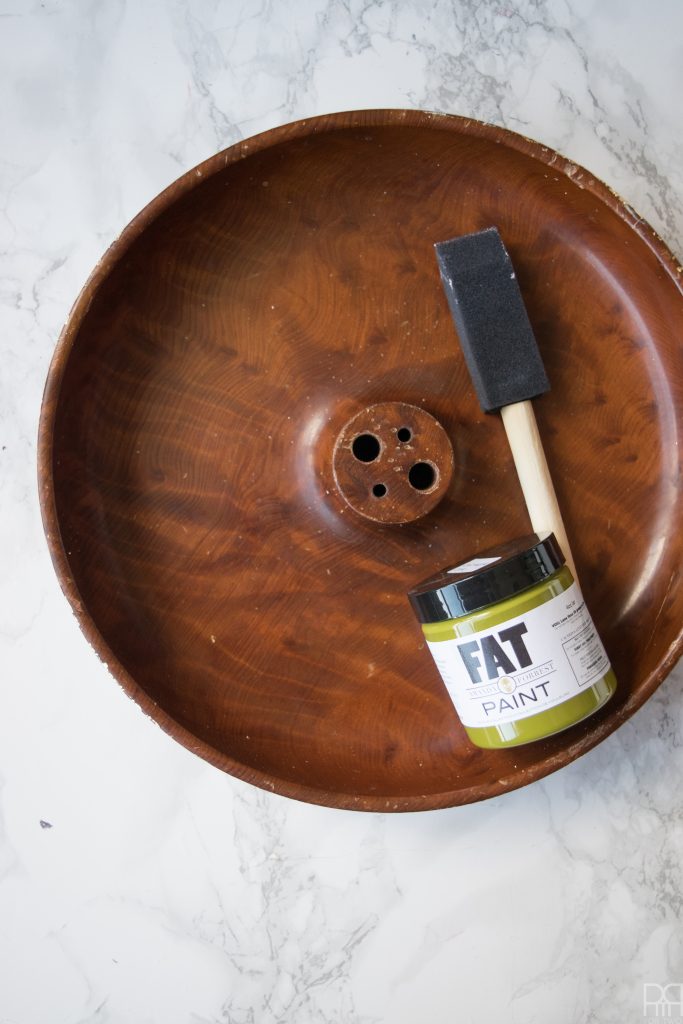
Step 2: Paint the outside of the bowl using the paint colour of your choice I used “Can’t see me camo” by The Fat Paint company, from the Amanda Forest line. Guys, this paint covers like no other, and comes in some great shades.

diy-neon-bar-sign

diy neon-bar-sign

How to Make a DIY Neon Sign

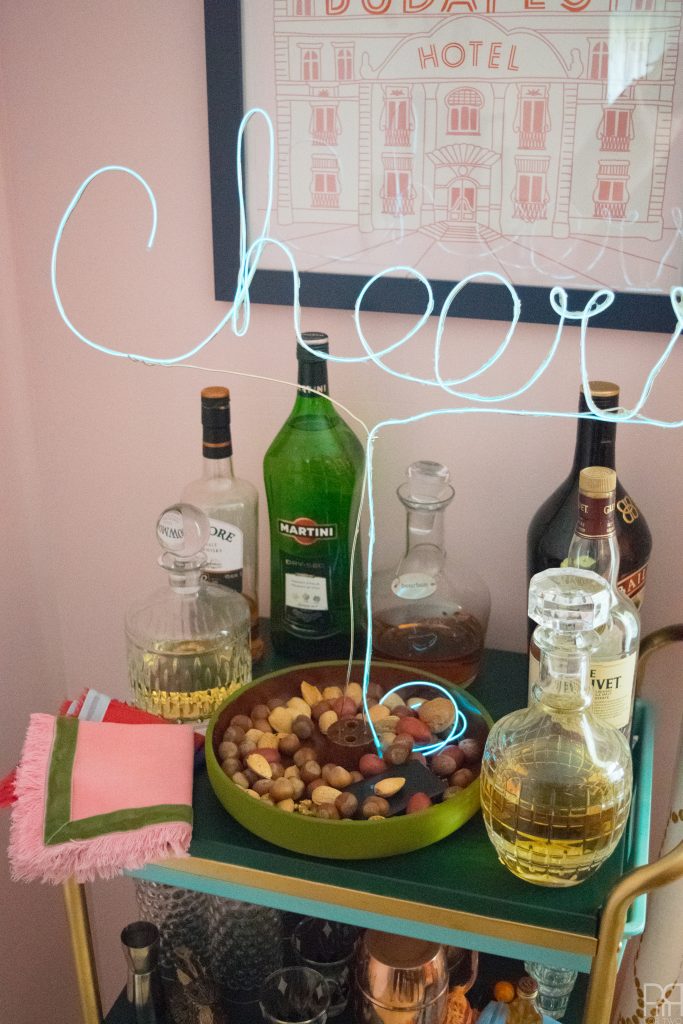
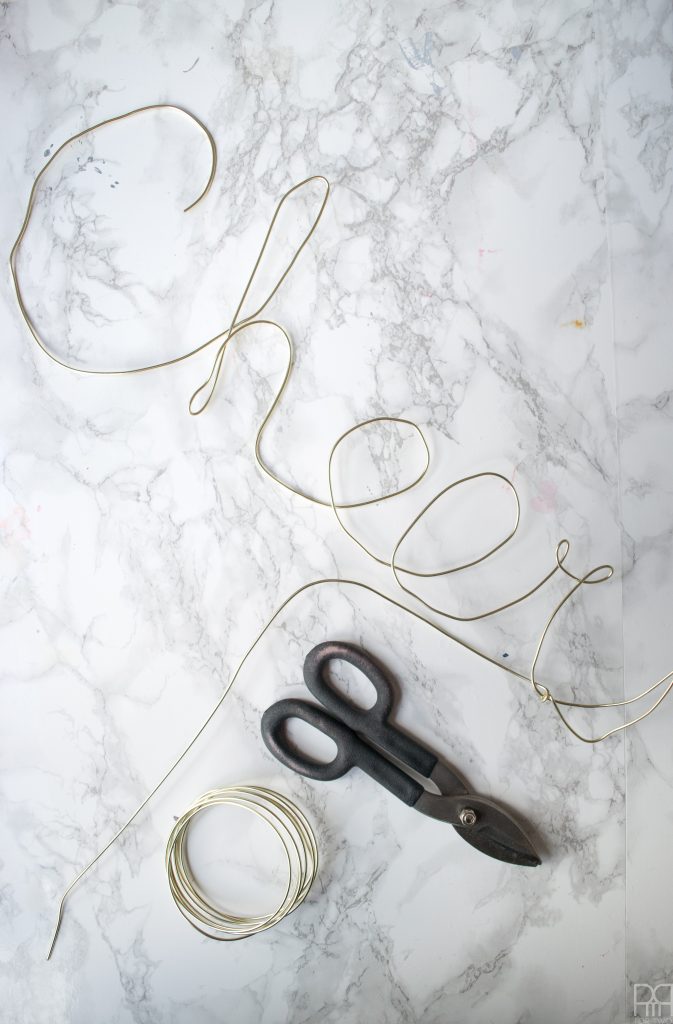
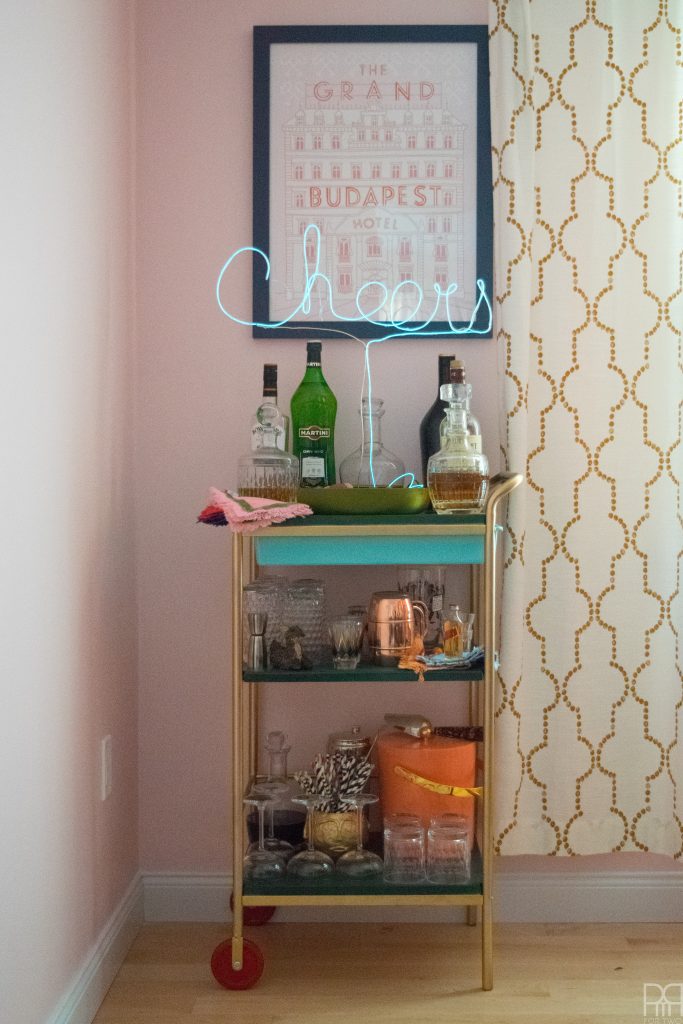
On a sheet of paper, write out the word or draw the shape you’ll be using for your sign. Because I wanted to place the nut bowl on our bar, I thought “Cheers” would be appropriate, so I traced-it out on a large piece of paper I had kicking around.

If you’re writing a word, don’t forget to write it in cursive, because it won’t work with block letters.

Open your wire, and start shaping it into the word or design. Because I was working with a word, I started by laying out the C in Cheers, and then moved on to the h from there.

Don’t forget to account for a “tail” of sorts, to that will allow your word to stand in the bowl and run the end of the EL wire down to the converter.

diy-neon-bar sign

Once you’re happy with how the word is laid-out, start gluing the EL wire to the word, the same way you laid-it out.

diy neon bar-sign cheers

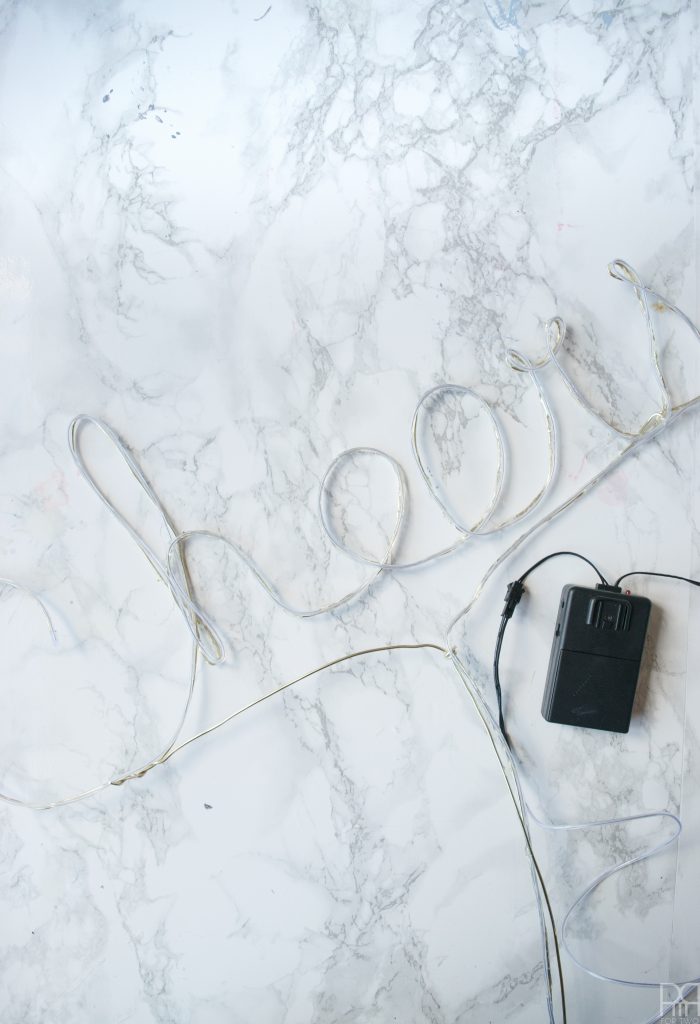
I used super glue to avoid the gunky look of hot glue, but about halfway through after having glued my fingers to my keyboard twice, I switched the hot glue. I would still recommend super glue if you have the time and patience.

Glue your word into the *now dry* bowl. This only really works with this bowl because there are a series of little wholes in the middle, where all I had to do was fill them with glue and insert the word.

If I didn’t have that option I would have drilled a few holes through the bowl and brought the wire for the word through the bowl and then glued it on the underside.

Assuming the bowl is dry and the word is solid and in place, you’re good to go! Fill the sucker up with nuts and let the party start!

P.S. if you’re looking for a good post on styling your home bar you can read mine // here //

diy-neon-bar-sign

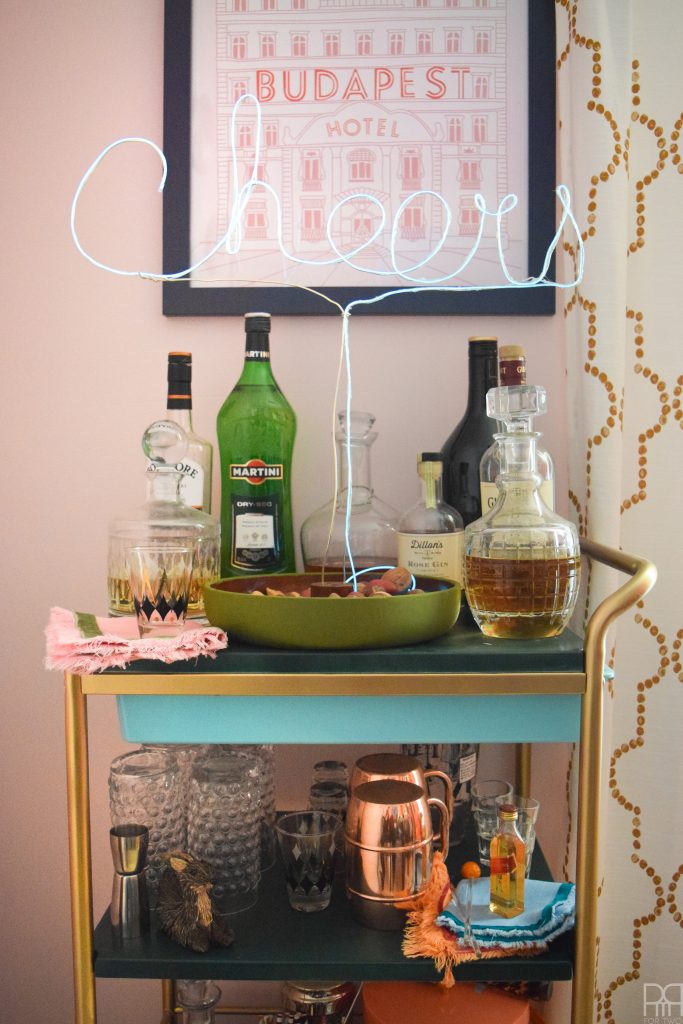
Remember when I gave my IKEA bar cart some life this summer with a fresh coat of paint? Well let me tell you how good it all looks together. Better yet, you can see for yourself. Adding the dark green shelves, the blue drawer and refreshing the gold was just what this old girl needed.

diy-neon-bar sign on bar 
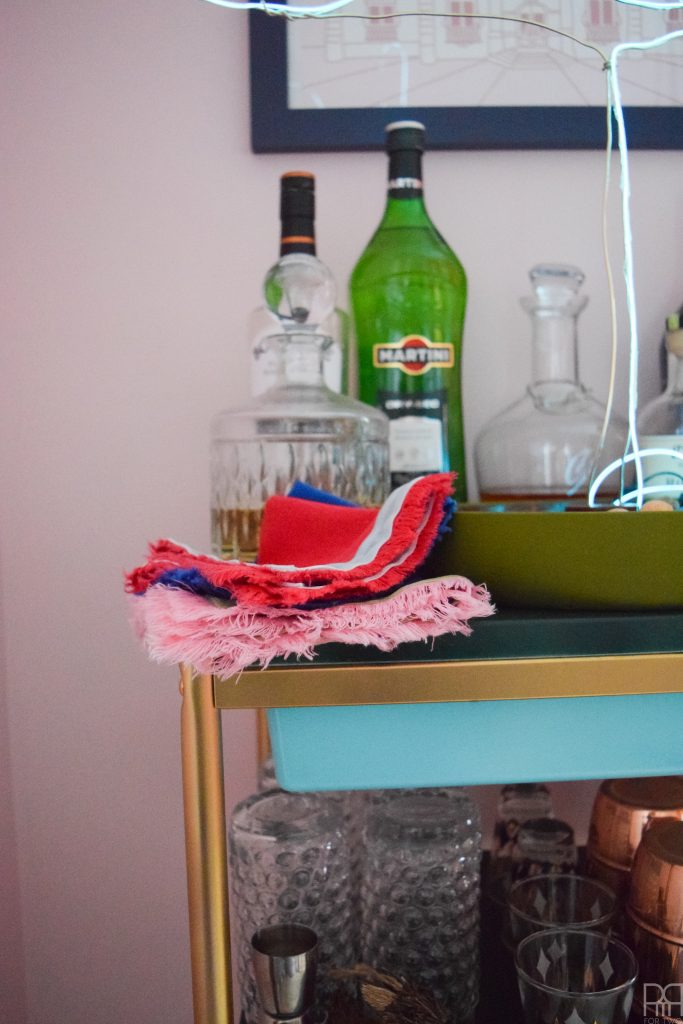
These cocktail napkins will be appearing in this month’s #12 months of DIY on Thursday, so make sure you circle back for that!

neon-bar-sign

diy-neon sign

diy-neon-bar-sign

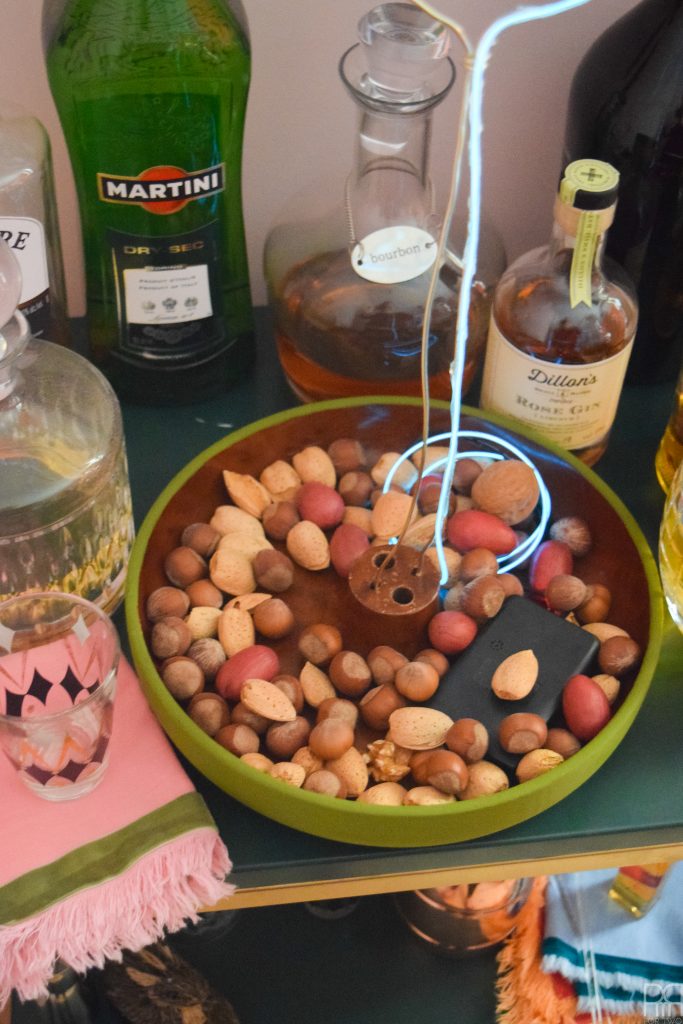
As you can see, the nuts sit very well in the bowl, and the converter isn’t hurting anything either.diy-neon-bar sign

pin-for-later

diy-neon-sign-pinterest-image

✨Are you signed-up for my new post updates? ✨

* indicates required
Email Format

56 Comments

DIY Grave Robbed Hands »
« Fall One Room Challenge – Week 3

Comments

  1. Maggie @ Maggie Overby Studios says

    October 18, 2016 at 6:07 am

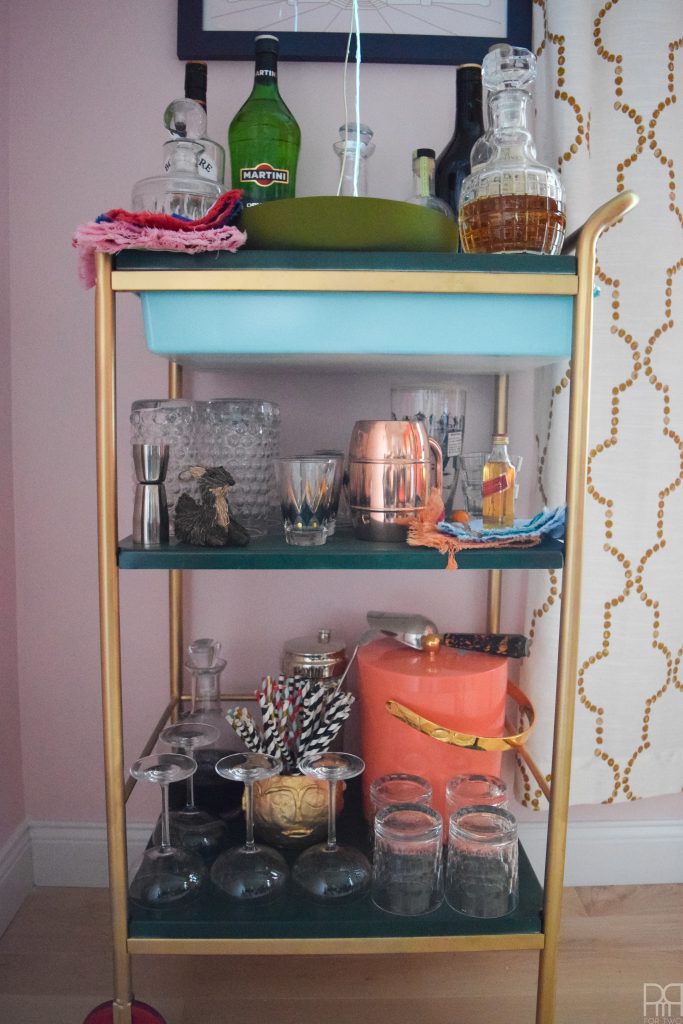
    Fun and there is still room to store the nutcracker! I have never seen that neon wire light before. What a cool product.

    Reply
  2. Maggie @ Maggie Overby Studios says

    October 18, 2016 at 6:09 am

    What a fun project and you still have room to store the nutcracker. I have never seen that neon wire before what a cool product.

    Reply
    • Ariel says

      October 18, 2016 at 8:56 am

      Exactly! I think it gets more use this way, and it’s something I’ll actually use

      Reply
  3. Jillian says

    October 18, 2016 at 7:25 am

    I never knew such a thing existed! What a fun project, I’m off to buy some of that wire 🙂

    Reply
    • Ariel says

      October 18, 2016 at 8:55 am

      it does! Electroluminescent wire is the bomb!

      Reply
  4. Laurie @ Vin'yet Etc. says

    October 18, 2016 at 7:26 am

    I LOVE the colour of that nut bowl, I think you made the right decision not modifying it too much! That neon sign is just fun!

    Reply
    • Ariel says

      October 18, 2016 at 8:55 am

      Isn’t it great?! And it goes with the bar cart colours so well! Agreed, the bowl was too pretty to completely cover up.

      Reply
  5. Charlotte Smith says

    October 18, 2016 at 9:55 am

    OK. THIS. IS. EPIC. I have never heard of that wire and I WILL be using it for something. SO. AWESOME. How in the world did you even THINK of something like that?!?!?!?!?!? I have no words. 🙂

    Reply
    • Ariel says

      October 18, 2016 at 1:15 pm

      You should! You could make a welcome sign for your work shed for the ORC?

      Reply
  6. [email protected] says

    October 18, 2016 at 10:38 am

    Ariel, this is truly brilliant. I would never have come up with such a creative idea. You did a great job and it’s the perfect statement piece for your bar. Awesome job.

    Reply
    • Ariel says

      October 18, 2016 at 1:16 pm

      Thanks girl! I agree, perfect statement piece all around. Now i just need to host more parties to make sure it gets used 😉

      Reply
  7. Amanda says

    October 18, 2016 at 12:33 pm

    Such a fun idea – I love how it turned out. You’re always so creative, I never would have thought to make something like that with a bowl!

    Reply
    • Ariel says

      October 18, 2016 at 1:17 pm

      It was the little holes up to that kinda sparked it!

      Reply
  8. Katie says

    October 18, 2016 at 1:09 pm

    LOVE the neon sign! I’m going to have to get one of those light kits!

    Reply
    • Ariel says

      October 18, 2016 at 1:15 pm

      Absolutely! Not too expensive, and tons of fun!

      Reply
  9. Stephanie says

    October 18, 2016 at 3:12 pm

    Wow Ariel! This is so fun, and the perfect addition to your bar cart!!

    Reply
    • Ariel says

      October 18, 2016 at 9:18 pm

      Thanks girl! I am already thinking of a couple other ways to incorporate this concept into my decor

      Reply
  10. [email protected] of a Serial Do-it-Yourselfer says

    October 18, 2016 at 4:48 pm

    This is SO cool! What a fun centerpiece for party snacks!! XO

    Reply
    • Ariel says

      October 18, 2016 at 9:18 pm

      Right?! I’m already thinking of uses for Christmas!

      Reply
  11. Bridget says

    October 18, 2016 at 6:47 pm

    Absolutely love it!! We need to get our bar carts together for a drink! 🙂

    Reply
    • Ariel says

      October 18, 2016 at 9:18 pm

      agreed!! ????????????????

      Reply
  12. Amber Oliver says

    October 18, 2016 at 7:16 pm

    I love it!!!

    Reply
    • Ariel says

      October 18, 2016 at 9:18 pm

      <3

      Reply
  13. Maria Brittis says

    October 18, 2016 at 7:40 pm

    Oh! how fun! So easy to make and such a wow factor for any party!
    Maria

    Reply
    • Ariel says

      October 18, 2016 at 9:19 pm

      exactly It’s WOW on a dime!

      Reply
  14. Karen @ Dogs Don't Eat Pizza says

    October 19, 2016 at 8:27 am

    That is TOO COOL! And I love the color of that paint – I’ll have to try it. Awesome project!!

    Reply
    • Ariel says

      October 19, 2016 at 8:57 am

      Isn’t it funky?! let me know how it turns out

      Reply
  15. Roxanne says

    October 19, 2016 at 8:41 am

    Wow, now that’s something I would have never thought of! Very creative!

    Reply
    • Ariel says

      October 19, 2016 at 8:58 am

      Thank you 🙂

      Reply
  16. Brynne | The Gathered Home says

    October 19, 2016 at 9:59 am

    Brilliant! I didn’t realize it actually lit up when I first saw it – this is amazing!!!

    Reply
    • Ariel says

      October 19, 2016 at 1:02 pm

      oh yes it does! I should have done a gif hahaha

      Reply
  17. Amanda @ Old House to New Home says

    October 19, 2016 at 10:28 am

    Such a creative idea!! I never would have thought to make that from a bowl!

    Reply
    • Ariel says

      October 19, 2016 at 1:02 pm

      right?! I was thoroughly pleased with it

      Reply
  18. Emily says

    October 19, 2016 at 12:45 pm

    Ariel, this is so clever!! I love how your neon sign turned out! I had no idea you could buy wire like that.

    Reply
    • Ariel says

      October 19, 2016 at 1:03 pm

      Me neither! I saw it on something on Pinterest and immediately did some research.

      Reply
  19. Amy @ My Life From Home says

    October 20, 2016 at 3:06 pm

    This is so creative and fun! I love it. I have never heard of that neon wire before. Great product!

    Reply
    • Ariel says

      October 21, 2016 at 8:46 am

      I hadn’t until Pinterest showed me the way! Now I need to figure out how I can incorporate it into EVERYTHING! muahaha

      Reply
  20. Stephanie @ Casa Watkins Living says

    October 21, 2016 at 11:18 am

    OMG so cute! That is such a cool idea! Great project!!!

    Reply
    • Ariel says

      October 25, 2016 at 7:07 pm

      Thanks girl 😉

      Reply
  21. Lynn Fern says

    October 21, 2016 at 1:05 pm

    Pure awesomeness!

    Reply
    • Ariel says

      October 25, 2016 at 7:08 pm

      <3 <3

      Reply
  22. Erin Spain says

    October 21, 2016 at 1:27 pm

    This is so creative and fun! I love it!

    Reply
    • Ariel says

      October 25, 2016 at 7:08 pm

      Thanks friend 🙂

      Reply
  23. Kati says

    October 23, 2016 at 11:51 am

    This is so cool! I had no idea such a thing existed to make your own neon signs. It’s the perfect accessory for your bar cart.

    Reply
    • Ariel says

      October 25, 2016 at 7:16 pm

      Right?! It’s super easy- everyone will be doing it now 😉

      Reply
  24. Sarah says

    October 23, 2016 at 3:42 pm

    What a fun sign! And the perfect addition to your cart. Love the color you painted the bowl, too!

    Reply
    • Ariel says

      October 25, 2016 at 7:17 pm

      I think so too 🙂

      Reply
  25. April R - Uncookie Cutter says

    October 24, 2016 at 7:00 am

    Haha, this is fantastic! Pinning!

    Reply
    • Ariel says

      October 25, 2016 at 7:19 pm

      woohoo! Thanks 🙂

      Reply
  26. April R - Uncookie Cutter says

    October 24, 2016 at 7:00 am

    Haha, this is fantastic! Pinning!

    Reply
    • Ariel says

      October 25, 2016 at 7:20 pm

      thanks!

      Reply
  27. Catherine William says

    April 4, 2019 at 5:30 am

    Hey Ariel, Absolutely loved this post! I appreciate your efforts for writing such a post which consist of all the relevant info about the topic. Having read this I thought it was very enlightening. Thanks for sharing valuable information and it such a very helpful for me. Keep Posting Similar articles.

    Reply
  28. Harry Seth says

    June 4, 2022 at 2:29 pm

    I have read this article and love the concept of neon wire. Thanks for sharing such an inspiring experience. I’m looking for a neon sign but haven’t known/experienced with such companies. One of my old friends suggested https://www.signsny.com/. Does anybody have experience with them?

    Reply

Trackbacks

  1. DIY Wood Carving on Stand - Casa Watkins Living says:
    October 18, 2016 at 3:22 pm

    […] PMQ For Two […]

    Reply
  2. DIY FAT Paint Holiday Wrapping Paper - Fat Paint says:
    December 6, 2016 at 10:46 am

    […] the face behind PMQ for two, has used FAT Paint for several projects now including this super cool DIY Neon Sign. She says she is particularly inspired by colours in The Amanda Forrest Collection, especially […]

    Reply
  3. Easy DIY Decor Projects You Can Make This Weekend - two purple couches says:
    February 15, 2017 at 7:01 am

    […] […]

    Reply

Leave a Reply Cancel reply

Your email address will not be published. Required fields are marked *

woman in red dress on counter

Hi! My name is Ariel and I'm the voice behind PMQ for two. I'm an internet rubbernecker, creative soul, and mom

  • Bloglovin
  • Facebook
  • Instagram
  • Pinterest
  • Twitter

PMQ for three

Time For A Cocktail

pmqfortwo

Ariel - PMQ for two
Someone asked if Bruce and Boots were still around Someone asked if Bruce and Boots were still around - yes they are! They’re just getting old, they’re tired of my antics, and honestly spend a good chunk of time sleeping. To be honest, who isn’t 😅 
Happy Friday? 

#wallpaperwednesday #wallpaperdirect #irishsettersofinstagram #lapofluxury #bhgstylemaker #bhghome
Excuse me, have you seen these floors?! AD: The Ch Excuse me, have you seen these floors?! AD: The Champagne Oak flooring from @goldenselect is the one element (other than paint) that runs throughout our house! It’s a unifying element, and brings depth to each space, especially the ones built around neutrals. It’s waterproof, exceptionally durable (to pets and kids!) and easy to clean. It’s also the flooring we installed in our last home, so you know we love it! 

#vinylflooring #goldenselectflooring #costcofinds #kitchenflooring #bhgstylemaker #springflowers #sodomino #kitchendecor #kitchendesign
Would like to further immortalize Dan’s epic pre Would like to further immortalize Dan’s epic pre-baby beard and moustache combo on the grid 👨🏻‍🦰 and remind you that I have a healthy offering of cocktail recipes on the blog. This Lemon 🍋 & Gin Champagne cocktail is a delightful spring recipe! 

#mancrusheveryday #gingerbeard #bhgfood #cocktailoftheday #cocktailrecipes #champagnecocktail
Because you can’t do just do photos or just do a Because you can’t do just do photos or just do a reel, you gotta do both! Anything you’re curious about price wise? Happy to do a reel and explain costs for this space in the context of the build! Here are the details - AD - @villalagoontile Zellige tiles in Iceberg for the shower walls, @officialmetrie casing and architrave on window and door, and baseboard. And the entire space is ultra pure white from @behrpaint. ✨ We purchased the following: mirrors through @homesensecanada, lights from @wayfaircanada, faucets from @kraususa through @homedepotcanada, sinks/toilet/bathtub/shower doors through our plumbing supplier, vanity is a custom build, floor tiles were from a local supplier, and plumbing fixtures in matte black are @deltafaucetcan, and the bath mats are from @urbanoutfitters 

#architecturaldigest #bathroomdesign #bathroomdecor #bathroominspiration #modernbathroom #midcenturymoderndesign
Spring is on the horizon, I swear! Only 5 more sno Spring is on the horizon, I swear! Only 5 more snow storms to get through. AD: in the meantime, I’ve got @mrsmeyerscleandaycanada’s NEW Rain Water detergent to bridge the gap between snow storms and rain storms. 🧺 I use the liquid detergent to keep our clothes clean, smelling fresh, and in ship shape for all that life with a toddler throws our way. Head to my stories for more details! 

#mrsmeyerscleanday #laundryroommakeover #laundryroomdecor #laundryroomgoals #bhgstylemaker #hgtvmagazine #potterybarn
Today is a weird one. So here’s a fun throwback Today is a weird one. So here’s a fun throwback to my Nancy Drew cover fun back in spring 2020. Funny how two years has gone by eh? 

#nancydrew #closetorganization #closetgoals #walkincloset #eclectichomemix #eclectichome #bhgstylemaker #wallpaperwednesday
June met Rupert, and immediately wanted to read to June met Rupert, and immediately wanted to read to him. These two have got a friendship based in love, snuggles, reading, and causing absolute chaos - they’ll get along just fine. 🐅 

#kittensarelikethat #welcometothefamily #kidsroomdecor #kidsroominspiration #houseofcats #kidsplayroom #eclectichome #collectedhome
Follow on Instagram

- THEME BY ECLAIR DESIGNS -