PMQ for two

Bold, Bright and Colourful Home Decor & DIYs

  • HOME
  • ABOUT ME
    • POLICIES
  • BUSINESS BABES
  • PROJECT GALLERY
  • PRESS
  • WHAT IS A PMQ?
    • THE DUPLEX
    • The Row House Tour

DIY Grave Robbed Hands

October 14, 2016~ DIY and craft projects, Halloween

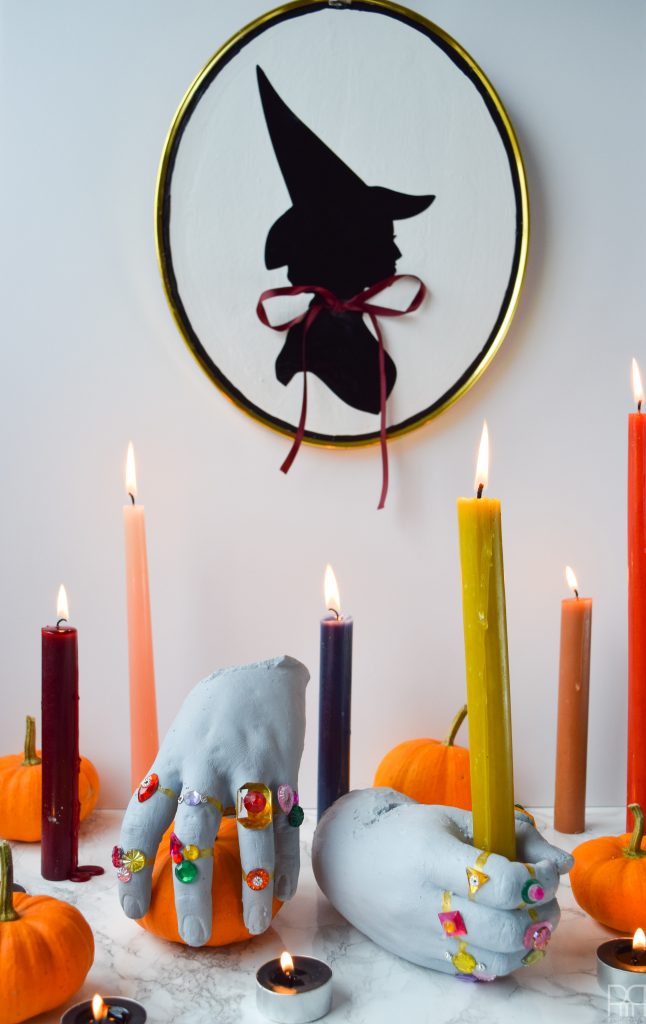
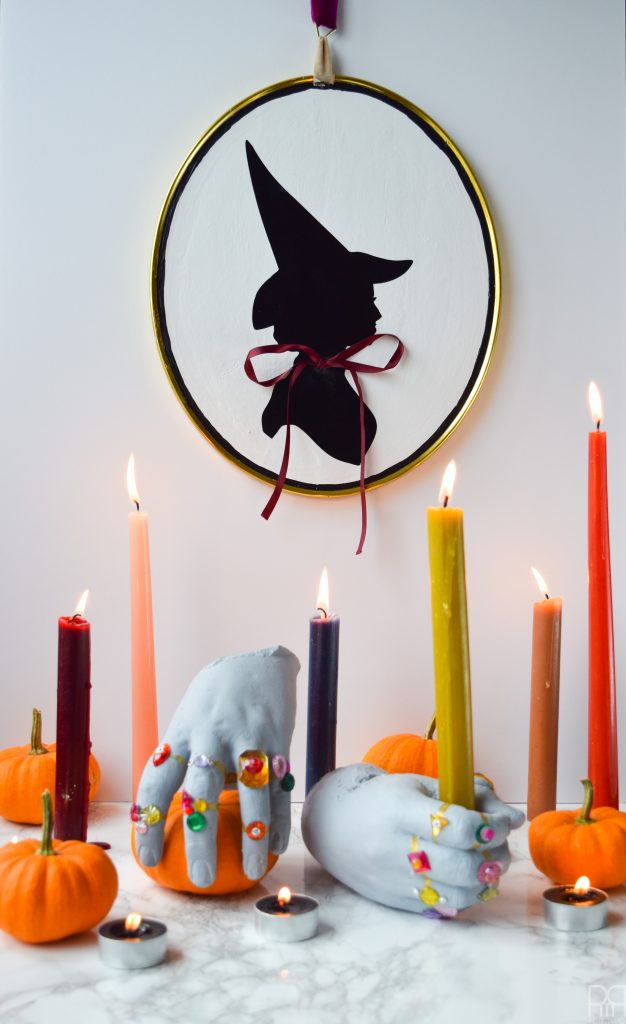
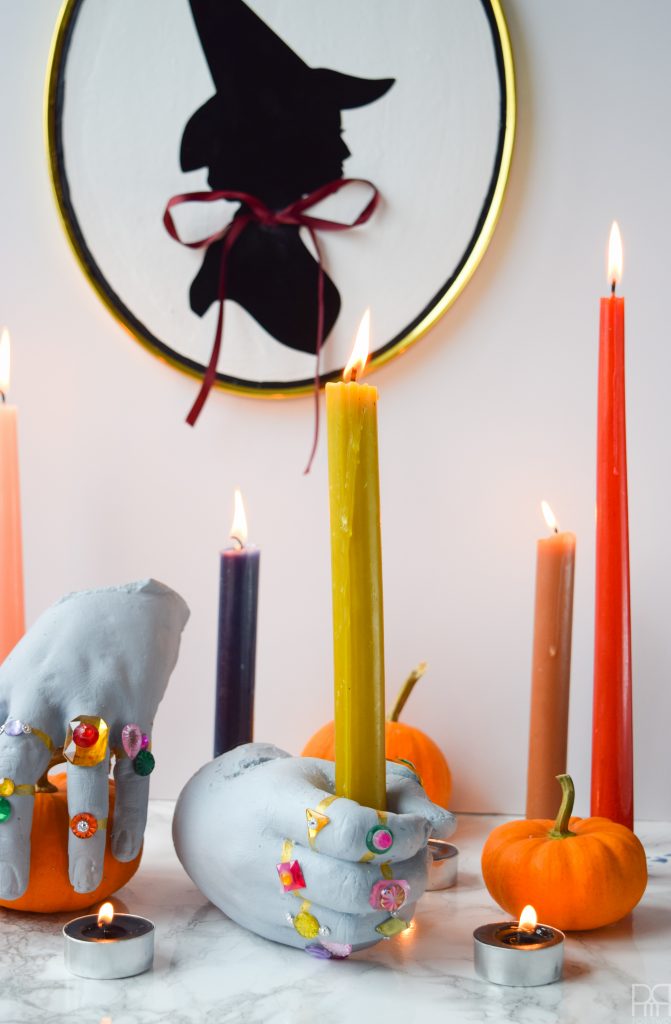
I’ve had this DIY on my mind since July when I first spotted it on Pinterest. Plaster hands contorted in awkward claws and holding candles. – perfect for my Halloween decor! This DIY is not wholly original, I found the original project on Martha Stewart // here // – so full credit to her.  I had originally intended to recreate them and then just style them differently, but at the last minute I decided to add some gemstones and rings. I didn’t quite like the grey on the hands, and thought they could use some colour. Now, adorned with precious gems and heirloom rings passed down from one spooky generation to another, the grave robbed hands are making an appearance in my Halloween decor.

DIY Grave Robber Hands for a spooky piece of Halloween decor. Using plaster hand casts, paint, and little gemstones you can make some spooky things!

Disclaimer: Depending on what kit you purchased to use for this, you’ll want to read the instructions carefully. The following instructions are based off the ones that came with the kit I purchased. Sadly, you cannot buy alginate powder easily in Canada (at least not the dental kind), so buying a kit is not only handy, but kind of the only way that I could find.

*The following product links contain affiliate links. Thank you for supporting the brands that make PMQ for two possible.
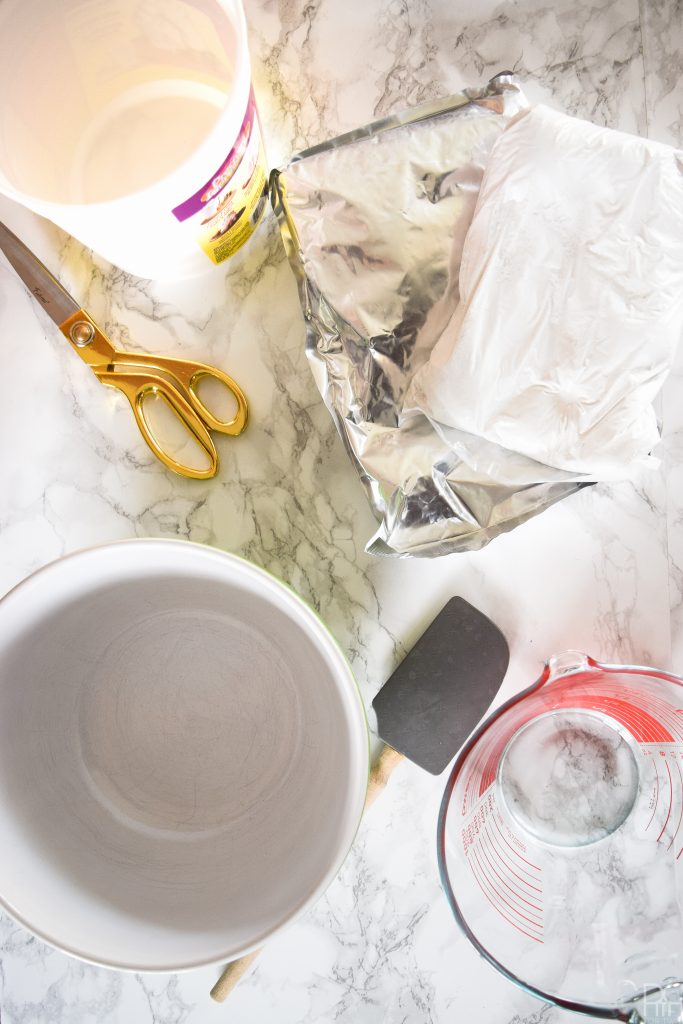
Materials

  • Darice Precious Impressions Memory Hands Keepsake Kit (includes the moulding gel and plaster)
  • Scissors
  • Large bowls
  • Measuring cups
  • Spatula
  • Black and white paint – or your favourite shade of grey
  • Fun Express – Jumbo 1″ Assorted Adhesive Jewels (1-Pack of 100)
  • Gorilla Super Glue Gel, 15 g

This DIY really happens in two distinct steps. The first is where you make the hands per the instructions in your kit, and the second is where you paint and adorn them.

Part 1: Making the plaster hands

Step 1: Lay-out everything you’ll need. There isn’t much time between mixing the powder and plunging your hands into it, so it’s best if everything is nearby.

Grave Robber Hands for a spooky piece of Halloween decor. Using plaster hand casts, paint, and little gemstones you can make some spooky things!

Step 2: Mix the alginate powder and water per the specifications. It said I needed really cold water, so I let the tap run for a minute to make sure I got the cold stuff. They said that the mixture will remain kind of lumpy, even if you’re mixing it well, kind of like cake batter.

DIY Grave Robber Hands for a spooky piece of Halloween decor. Using plaster hand casts, paint, and little gemstones you can make some spooky things!

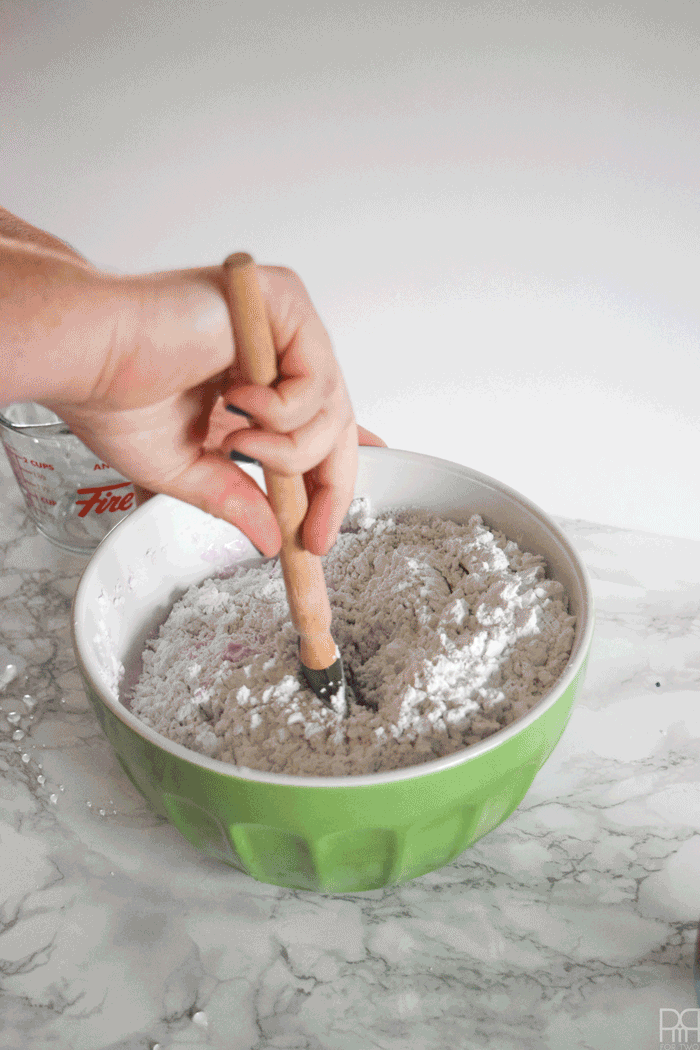
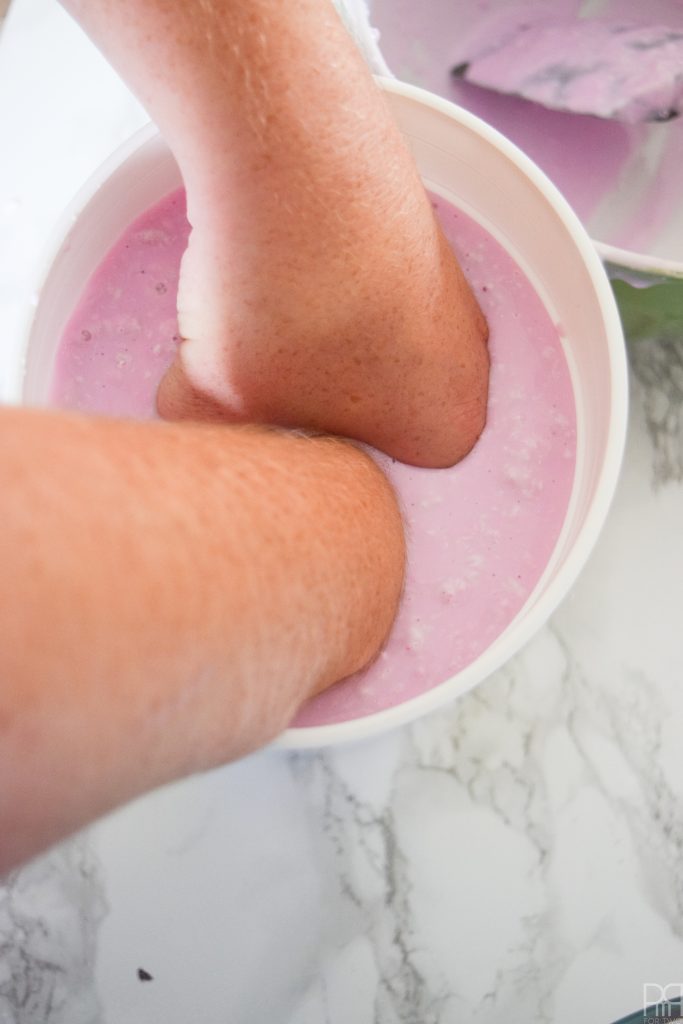
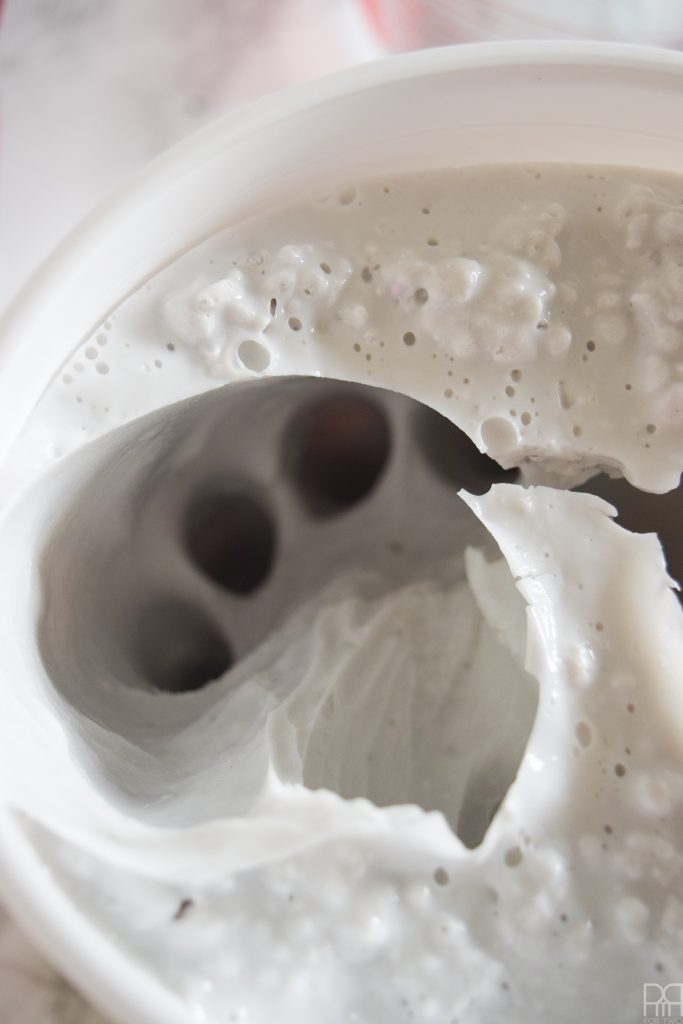
When it starts to turn pink, pour it into the tub you’ll be using. You only have a few second before it starts to solidify, albeit slowly.

Step 3: Hopefully you’ve done this beforehand, but determine what shapes you want your hands to be. I wanted one to hold a candle, and one like a claw! Keep in mind that both hands have to fit in the tub you use, they can’t touch the wall of the tub, or each other. You need separate and distinct molds so that when you pour the plaster you end up with two pieces.

Grave Robber Hands for a spooky piece of Halloween decor

*Mind the potato photo, I had DH taking these while my hands were immersed in goo.

Step 4: You’ll have placed your hands into a pinkish mixture – kind of like Pepto – and it will slowly turn grey while it hardens. Our instructions said it would take 3 minutes, but it was closer to 5-8 minutes. Once it’s solid, remove your hands! I found it relatively easy. You may need someone to hold the tub while you pull your hands out.

DIY Grave Robber Hands for a spooky piece of Halloween decor

DIY Grave Robber Hands for a spooky piece of Halloween decor

Step 5: Mix the plaster per the instructions and gently ladle it into the mold. Pick-up the tub and gently drop it on the counter every couple of ladles – you’re trying to release any air bubbles that may have formed. Otherwise you’ll end up with holes in your hands.

Grave Robber Hands for a spooky piece of Halloween decor. Using plaster hand casts, paint, and little gemstones you can make some spooky things!

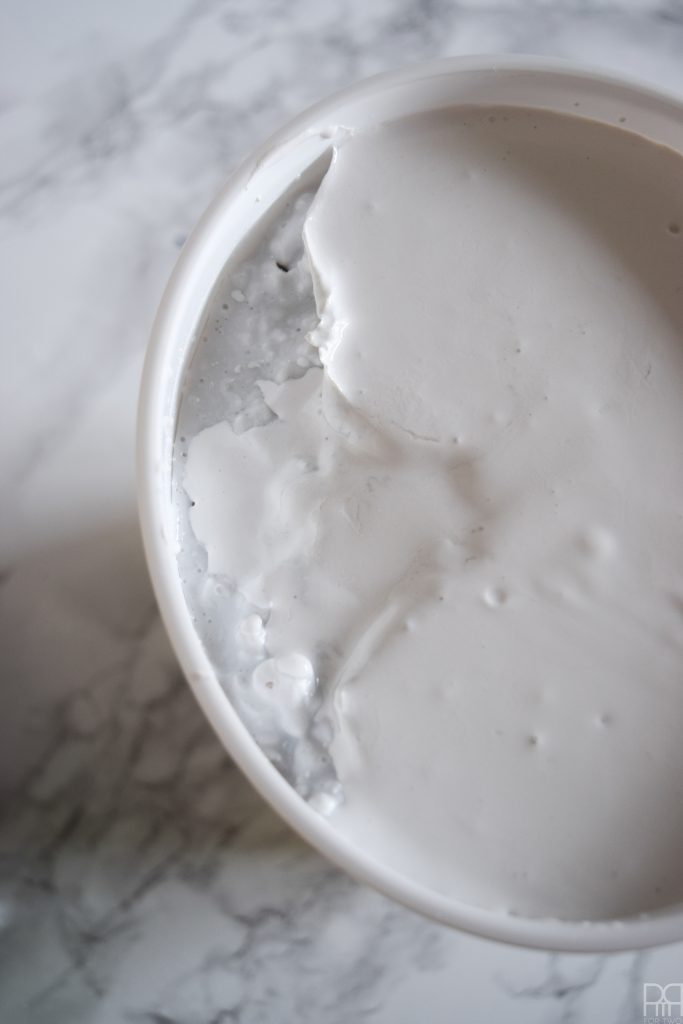
Step 6: Let ‘er sit for 24hrs.

Step 7: Once 24hrs have passed, flip the tub upside down and let the block slide down. Some water may come with it, so put a towel done! It’s water from the gel and from the plaster as they hardened. Nothing to worry about.

Step 8: Start cutting away – very carefully – at the gel until the hands are revealed. It’s kind of like an archeology dig, slowly peeling and scratching back wobbly bits of gel.

Step 9: if your cast broke at some point and your hands are fused together at some point, wait an extra day before using a dremel tool to separate them.

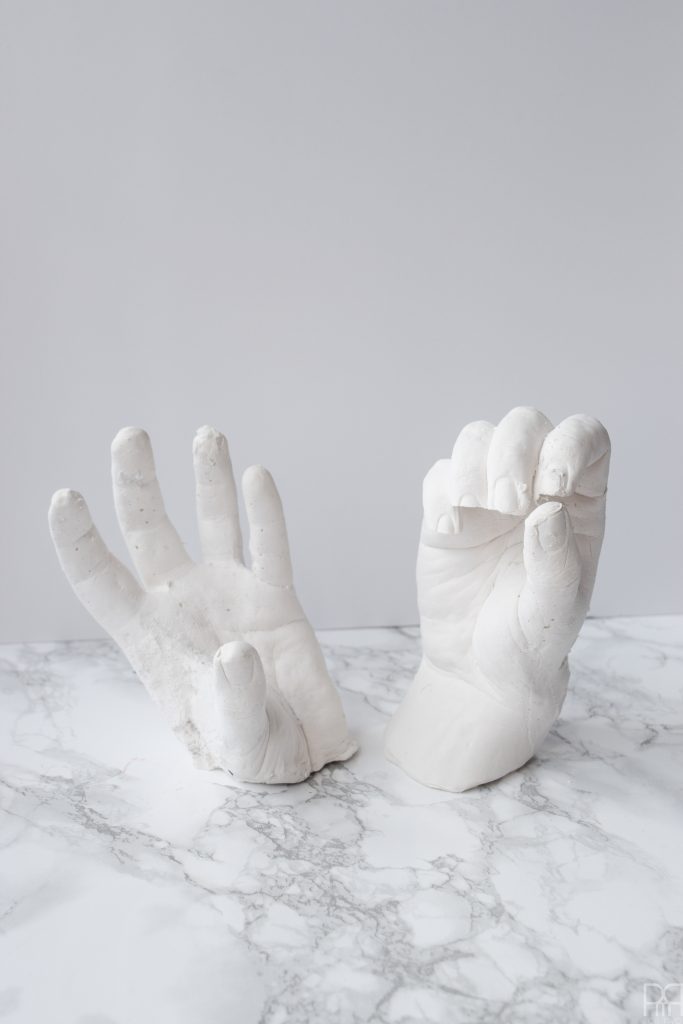
Once they’re free they should look like this

DIY Grave Robber Hands for a spooky piece of Halloween decor. Using plaster hand casts, paint, and little gemstone

DIY Grave Robber Hands for a spooky piece of Halloween decor. Using plaster hand casts, paint, and little gemstones you can make some spooky things!

????✨Are you signed-up for The Newsletter? ????✨

* indicates required

Email Format

Part 2: Decorating your plaster hands

Step 1: My instruction packet said to wait a week before “sealing” the hands as the plaster would continue to dry out, so I waited a while and you should too.

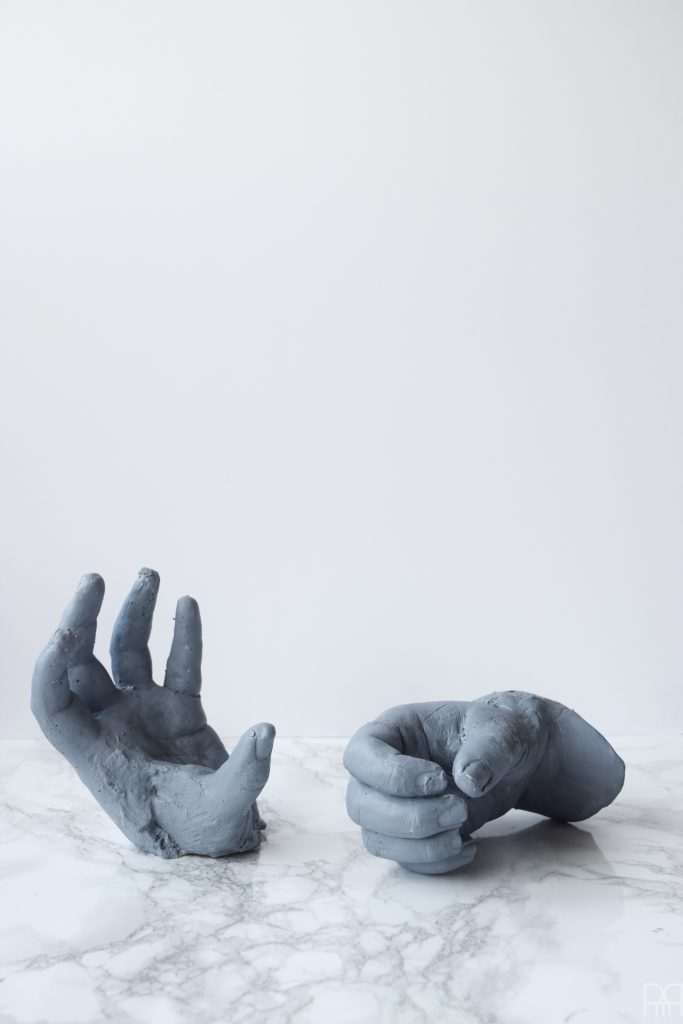
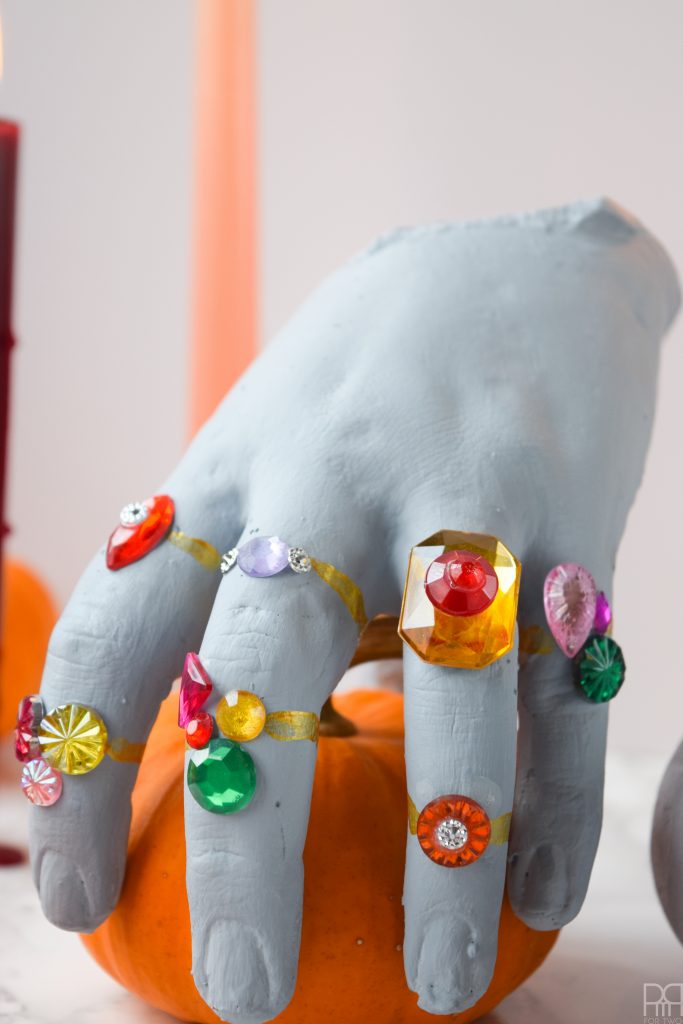
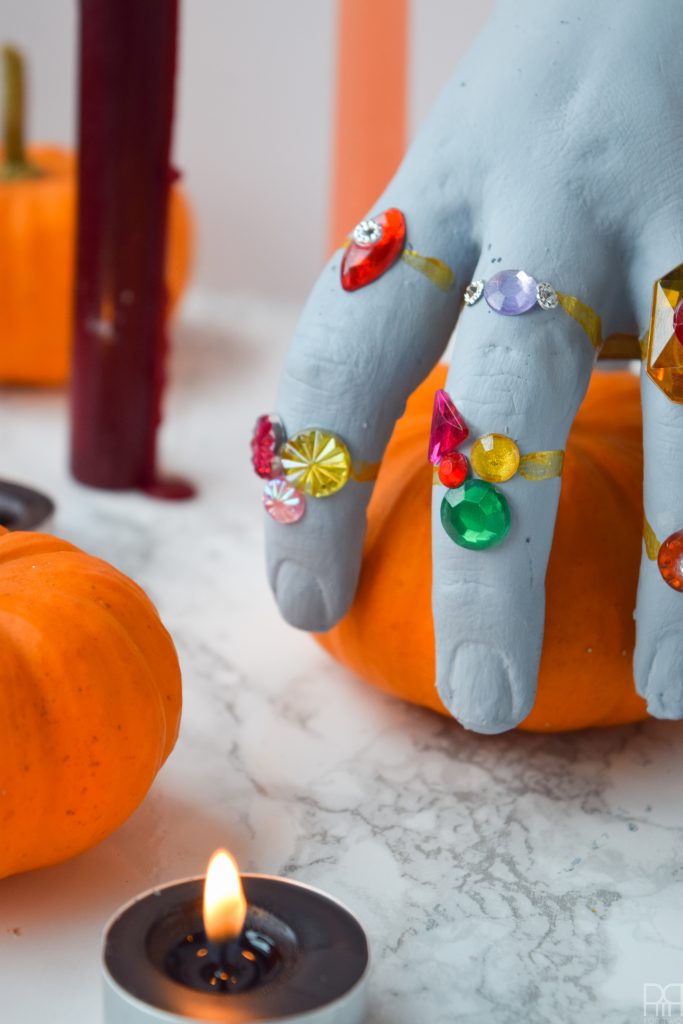
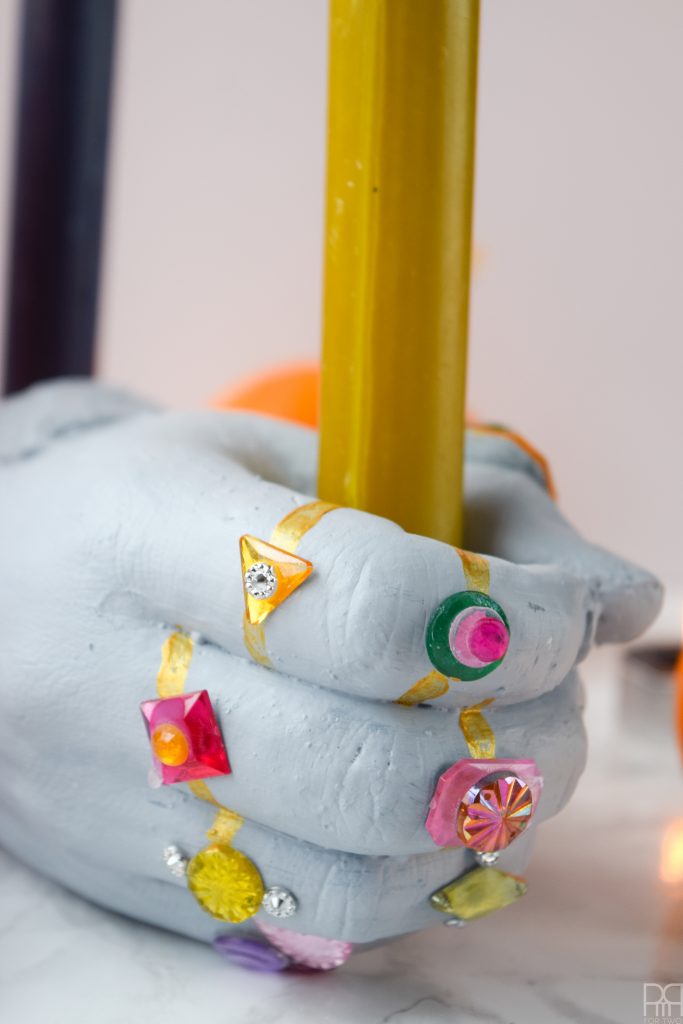
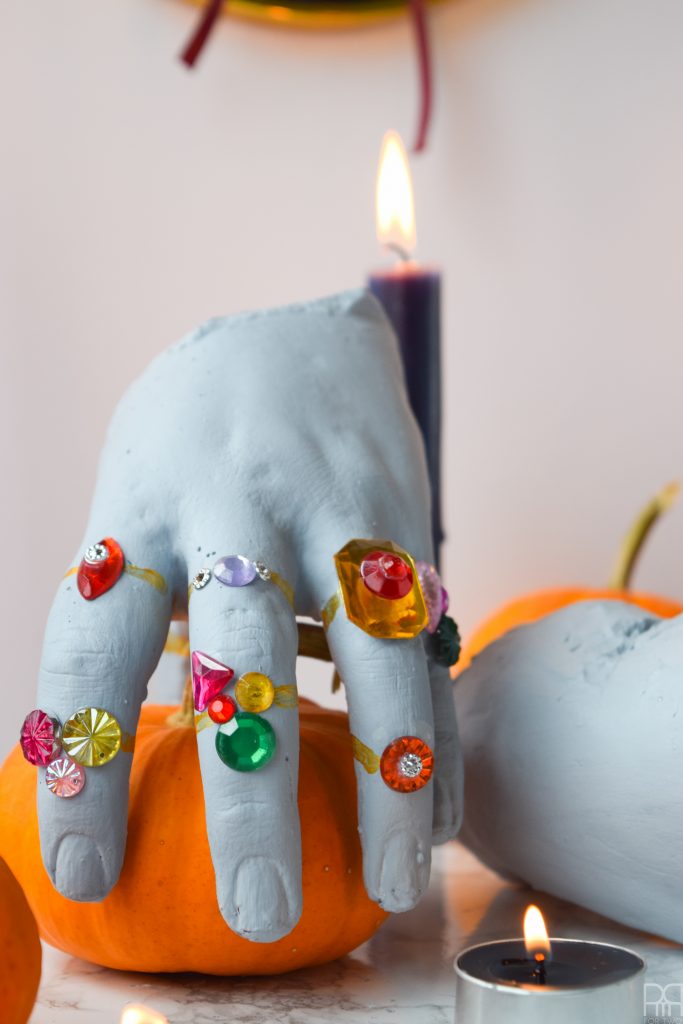
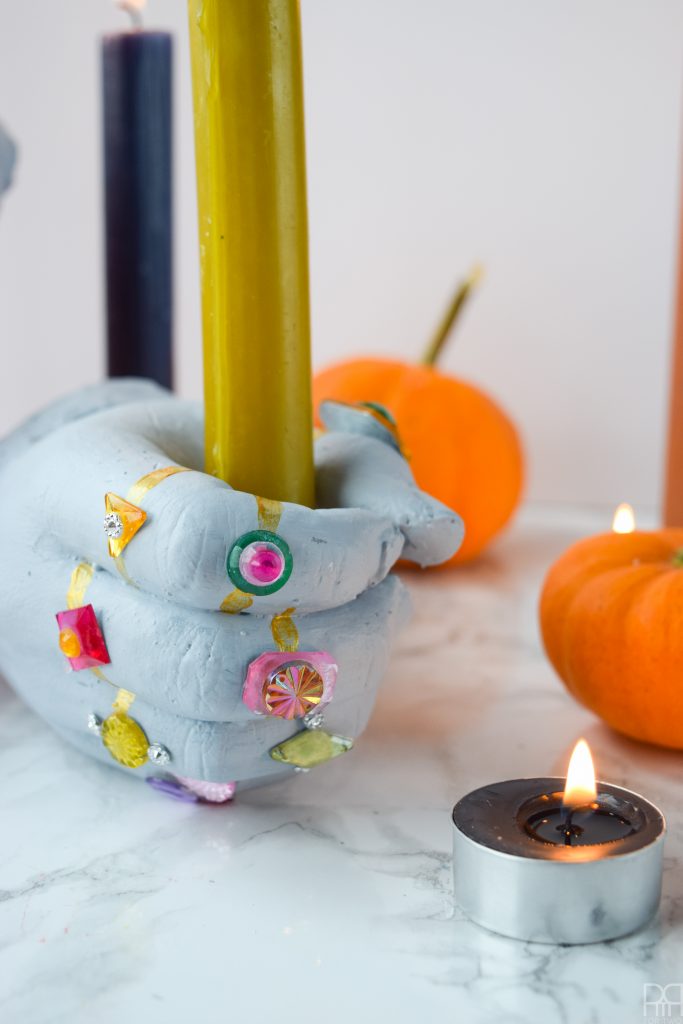
Step 2: Mix a paint colour, or just pick one! I mixed some cool white with a dark black and got an almost icy grey colour. I think it looks super un-natural – which is the whole point, I mean, this hand be dead.

DIY Grave Robber Hands for spooky Halloween decor. Using plaster hand casts, paint, and little gemstones you can make some spooky things!

Step 3: Once you’ve applied one or two coats to your hands, bust out the gems!

Step 4: Place gemstones in patterns and combinations you would see in a store. I placed large ones with small ones, stacked some, and made clusters for others. These hands are filthy rich!

I used gorilla super clue to attach them to the plaster. Like many of my more tedious steps, I put a podcast on and work away.

Step 5: Using some gold (or silver) paint, add a band to your gemstones to complete the illusion of rings! I need two coats.

Step 6: Style away! Like with previous seasonal decor, I’ve created the projects and styled them on their own, but you’ll see them all in my final Halloween tour  near the end of the month.

You’ll notice my DIY With Silhouette Decor in the styled shots. If you missed it, you can catch that project // here // and my DIY Jewelled Skulls // here //

DIY Grave Robber Hands for a spooky piece of Halloween decor. Using plaster hand casts, paint, and little gemstones you can make some spooky things!

Grave Robber Hands for a spooky piece of Halloween decor. Using plaster hand casts, paint

DIY Grave Robber Hands for a spooky piece of Halloween decor. Using plaster hand casts, paint, and little gemstones you can make some spooky things!

 Grave Robber Hands for a spooky piece of Halloween decor. Using plaster hand casts, paint, and little gemstones you can make some spooky things!

DIY Grave Robber Hands for a spooky piece of Halloween decor-Using plaster hand casts, paint, and little gemstones you can make some spooky things!

DIY Grave Robber Hands for a spooky piece of Halloween decor. Using plaster hand casts, paint, and little gemstones you can make some spooky things!

Grave Robber Hands for a spooky piece of Halloween decor. Using plaster hand casts, paint, and little gemstones you can make some spooky things!

DIY Grave Robber Hands for a spooky piece of Halloween decor. Using plaster hand casts, paint, and  gemstones you can make some spooky things!

DIY Grave Robber Hands for a spooky piece of Halloween decor. Using plaster hand casts, paint, and little gemstones you can make some spooky things!


✨Are you signed-up for my new post updates? ✨

* indicates required

Email Format

22 Comments

Fall One Room Challenge – Week 2 »
« DIY EL Wire Neon Sign

Comments

  1. cassie bustamante says

    October 14, 2016 at 7:38 am

    these are SO amazing!!!!! i love creepy halloween decor!

    Reply
    • Ariel says

      October 14, 2016 at 1:58 pm

      Thank you!!! I’ve been keeping them as my secret weapon of halloween decor for a while now.

      Reply
  2. Pascale says

    October 14, 2016 at 9:30 am

    That’s really creepy – and I say that in the most complimentary way! Happy Halloween!

    Reply
    • Ariel says

      October 14, 2016 at 1:58 pm

      Excellent! You could have also said it was just plain old creepy and I would have been OK with that 😉

      Reply
  3. Haley says

    October 15, 2016 at 11:29 am

    These are awesome! What a great and creepy idea for Halloween!

    Reply
    • Ariel says

      October 16, 2016 at 8:47 pm

      Thank you so much Haley! They’re currently sitting on my desk and creeping me out 😉

      Reply
  4. Roxanne says

    October 17, 2016 at 7:41 pm

    These are crazy cool!

    Reply
  5. Kim @Hunt & Host says

    October 17, 2016 at 11:16 pm

    What a cool Halloween project! I am loving this!

    Reply
  6. Amanda says

    October 18, 2016 at 12:27 pm

    These are adorable! Love it!

    Reply
    • Ariel says

      October 18, 2016 at 1:16 pm

      I was hoping for “spooky” and “weird” but I’ll take adorable 😉

      Reply
  7. Amanda @ Old House to New Home says

    October 18, 2016 at 1:13 pm

    These are so fun! My daughter would get a kick out of making and displaying these!

    Reply
    • Ariel says

      October 18, 2016 at 1:15 pm

      You should pick one up! They’re very easy to incorporate in different ways

      Reply
  8. Sara Syrett says

    October 18, 2016 at 1:14 pm

    Ah! These are so great!!

    Reply
    • Ariel says

      October 18, 2016 at 1:17 pm

      thanks 🙂

      Reply
  9. Emily says

    October 21, 2016 at 11:01 am

    This is sooooo creative! I have never seen something like this, love it!

    Reply
  10. Sarah says

    October 21, 2016 at 9:10 pm

    love the bedazzling rings on the hands! such a cool project.

    Reply
    • Ariel says

      October 25, 2016 at 7:13 pm

      Thanks – I like to bedazzle 😉

      Reply
  11. Kati says

    October 23, 2016 at 12:59 am

    These are so much fun! They would be awesome coming out of the ground in a flower garden too 🙂

    Reply
    • Ariel says

      October 25, 2016 at 7:16 pm

      YES! If only I had large urns in the front that I could create a vignette with!

      Reply
  12. April R - Uncookie Cutter says

    October 24, 2016 at 6:27 am

    They turned out so cute! I love the jewels, amazing! pinning!

    Reply
    • Ariel says

      October 25, 2016 at 7:18 pm

      thanks girl!

      Reply
  13. Amy @ My Life From Home says

    October 24, 2016 at 9:27 am

    What a cool DIY project! I can even see my kids wanting to do this. Fun!

    Reply

Leave a Reply Cancel reply

Your email address will not be published. Required fields are marked *

woman in red dress on counter

Hi! My name is Ariel and I'm the voice behind PMQ for two. I create bright, bold, colourful, and eclectic home decor, DIYs and lifestyle content.

  • Bloglovin
  • Facebook
  • Instagram
  • Pinterest
  • Twitter

PMQ for three

Time For A Cocktail

pmqfortwo

Ariel - PMQ for two (she/her)
Packed-up the bulk of my closet this weekend. It’s funny, with less in there I can see the beautiful wallpaper and lighting more easily. You guys, I am seriously considering a more minimal lifestyle after sorting through WAY TOO MUCH stuff in our storage room. Anyone else a maximalist turned minimalist after a move? 
•
•
•
#walkincloset #walkinclosetdesign #walkinclosets #maximalism #maximalistinteriors #moreismoredecor #wallpaperdecor #riflepaperco #ikeahack #bedroominspo #bedroomdesign #kitschydecor #wallpaperwednesday #glamdecorating #southernlivingmag #bhgstylemaker
This living room has been so many things to us sin This living room has been so many things to us since we moved in (including the distinction of being the first space we made over, and over). It’s also been a space that evolved with us as our needs changed. And now, while we plan what the next one will look like, I wonder if it’ll have a marble fireplace... probably not. 
•
•
•
#livingroomdecor #livingroominspo #atomicranch #bhgstylemaker #bhghome #midcentury #oneroomchallenge #behrpaint #eclectichome #eclectichomemix #eclectichomedecor #maximalism #maximalistinteriors #moreismoredecor
My boo @tmoorehome has been sharing and uplifting My boo @tmoorehome has been sharing and uplifting people around her for years. It’s one of the many reasons we’re real life friends. Her design is clean, bold, and evolves with each house they make a home. If you know exactly who you are and what you’re about, she is one very worthwhile follow. Her meme game is pretty strong too. 
•
•
•
#nashvilletennessee #nashvilleblogger #bhgstylemaker #bhghome #schoolhouseelectric
It’s not #nationalpetday unless everyone you fol It’s not #nationalpetday unless everyone you follow tells you about it #doingmypart I present to you the only photo shoot where I have all 3 critters in the same space. #smallspaceliving #smallspacesquad #diyhomedecor #behrpaint #rugsusa #irishsettersofinstagram #adoptedcats #adoptedcatsofinstagram #bhgstylemaker #bhghome #maximalistinteriors #moreismoredecor
Remember when this was our bedroom? This was our l Remember when this was our bedroom? This was our last PMQ bedroom, and I 100% do NOT miss how hot it was in there in summer. Tell me, which bedroom do you miss the least? 
•
•
•
#bedroomdecor #bedroominspo #smallspacesquad #smallspaceliving #smallspacedesign #eclectichomemix #eclecticdecor #maximalism #maximalistinteriors #eclecticinteriors #anthropologiehome #bhghome #southernliving
JB in her happy place✨ AD: JB LOVES her @wiwiurk JB in her happy place✨ AD: JB LOVES her @wiwiurka_toys triangle (in sunset) and ramp. From the moment we assembled it, she was all over it. We use it to make blanket forts, set obstacle courses, entertain Tina 🐓 , and just hang out on it. It’s kinda the perfect toddler toy. 
•
•
•
#piklertriangle #wiwiurka #pikler #montessoriathome #montessoritoddler #montessoriactivity #montessoritoys #montessoriplayroom #toddlermomlife #toddlersofinstagram #toddlerplay #bhghome #spoonflowerfabric #chickensofinstagram #maximalistinteriors #familyroomdecor #familyroomdesign
You know what I’ll miss?! Going pee with this vi You know what I’ll miss?! Going pee with this view. The next house better have amazing pee views. 
•
•
•
#bathroomrenovation #bathroomdecor #wallpaperdecor #wallpaperwednesday #maximalistinteriors #maximalist #maximalistdecor #powderroomdesign  #powderroom #bathroominspo #bhgstylemaker #bhghome #southernliving #anthropologiehome
Load More... Follow on Instagram

- THEME BY ECLAIR DESIGNS -

Cookies ????

This site uses cookies: Find out more.