PMQ for two

Bold, Bright and Colourful Home Decor & DIYs

  • Home
  • About me
    • Press
    • Policies
  • Download Colour & Pattern Mixing Guide
  • Project Gallery
  • What is a PMQ?
    • The duplex
    • The Row House Tour

Breakfast In Bed Tray

August 4, 2016~ bedroom, DIY and craft projects, painting, upcycle project

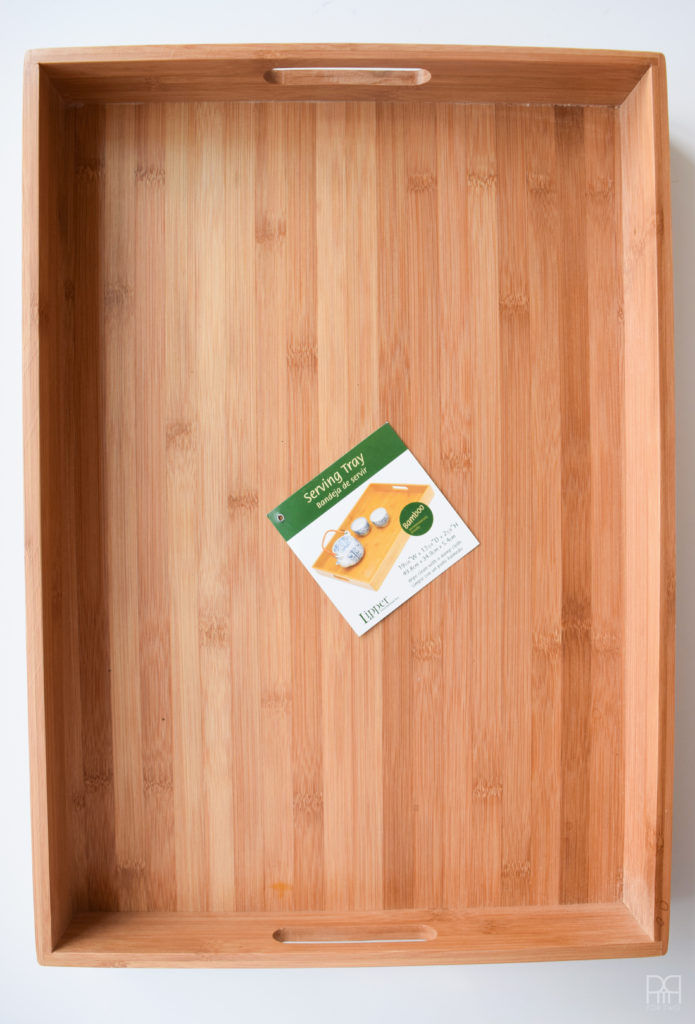
As you may or may not know I am an official Wayfair Homemaker! What what! That means I get to partner with them on all kinds of cool projects and campaigns that are bursting with creativity. For my first campaign I’m doing the #DIYMyWay serving tray challenge. This month we were challenged to turn this bamboo serving tray into something amazing. Challenge accepted. I decided to make a breakfast in bed tray!

600x200_DIYMyWay

I’ve been jonesing for a breakfast in bed tray. Sadly, there aren’t a whole bunch of super cute and affordable ones. To make up for this, I’ve turned the bamboo tray into my own MCM breakfast in bed tray!

Breakfast In Bed Tray

I had originally wanted to do something cool with acrylic sheets (which are surprisingly affordable on Amazon), but the shipping was too costly for the amount I needed. I wanted to do something funky, something interesting, and I wanted to paint!

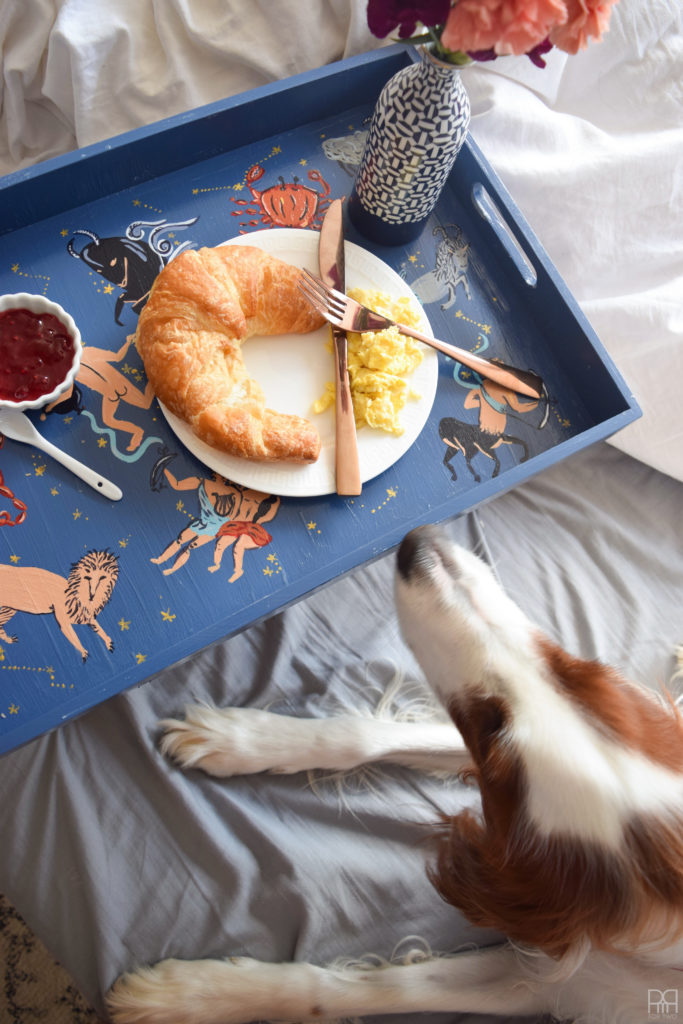
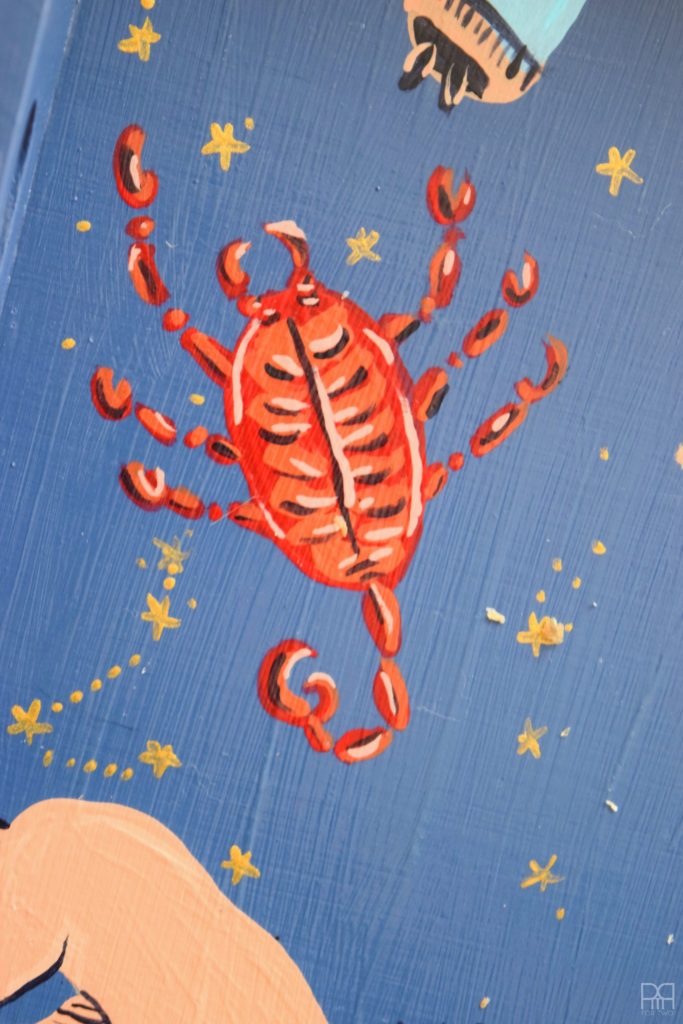
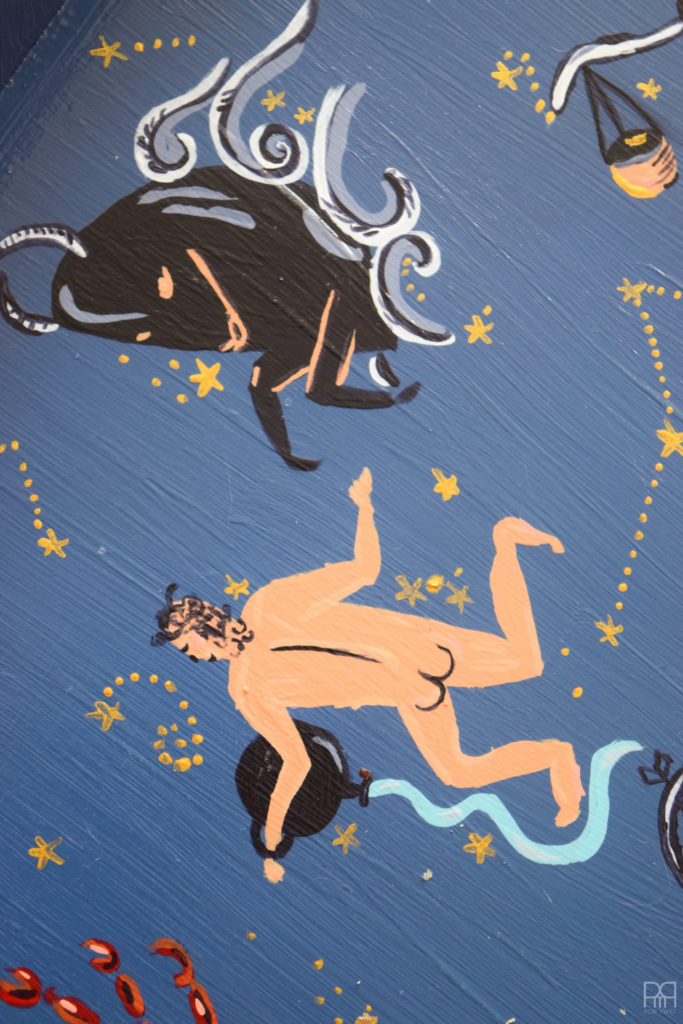
So I painted 12 constellations on the tray!

The following product links contain affiliate links. Thank you for supporting the brands that make PMQ for two possible. For my full policies click // here //

Materials

  • Spray paint – I could have easily used normal paint, but I wanted a more seamless coverage so I chose spray paint.
  • Paints in as many colours as you need for the design – we have quite the extensive collection of colours to chose from so it’s less of an issue. I use DecoArt’s acrylics which you can shop online // here //
  • Acrylic Paint Brush Set
  • High gloss sealer // here //
  • 4 table leg anchors
  • Round Taper Table Leg
  • Quick-Setting Epoxy Syringe
  • Bamboo serving tray from Wayfair.ca

Step 1: Make sure your tray is clean and dry before you spray paint it.

DIY My Way serving tray

Step 2: Spray paint at will! It will take two to three coats to ensure even coverage and a good hue.

DIY My Way painted tray

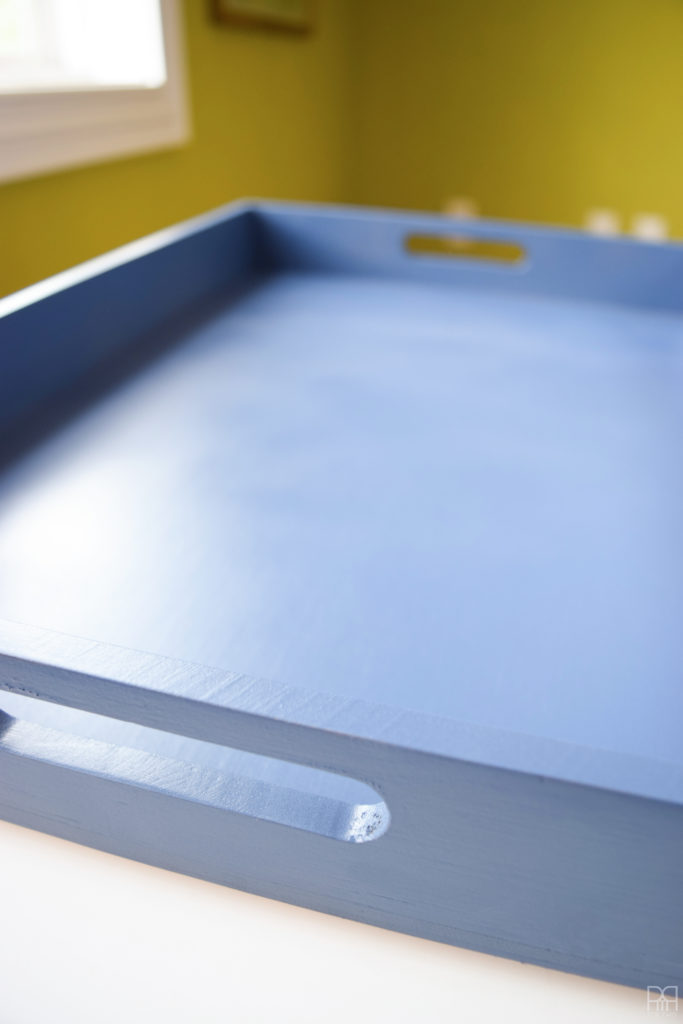
Remember to spray from about 20cm away and in a sweeping motion to avoid pooling paint and splotches.

Step 3: Stain your furniture feet, spray paint the metal portion, and seal.

DIY My Way legs

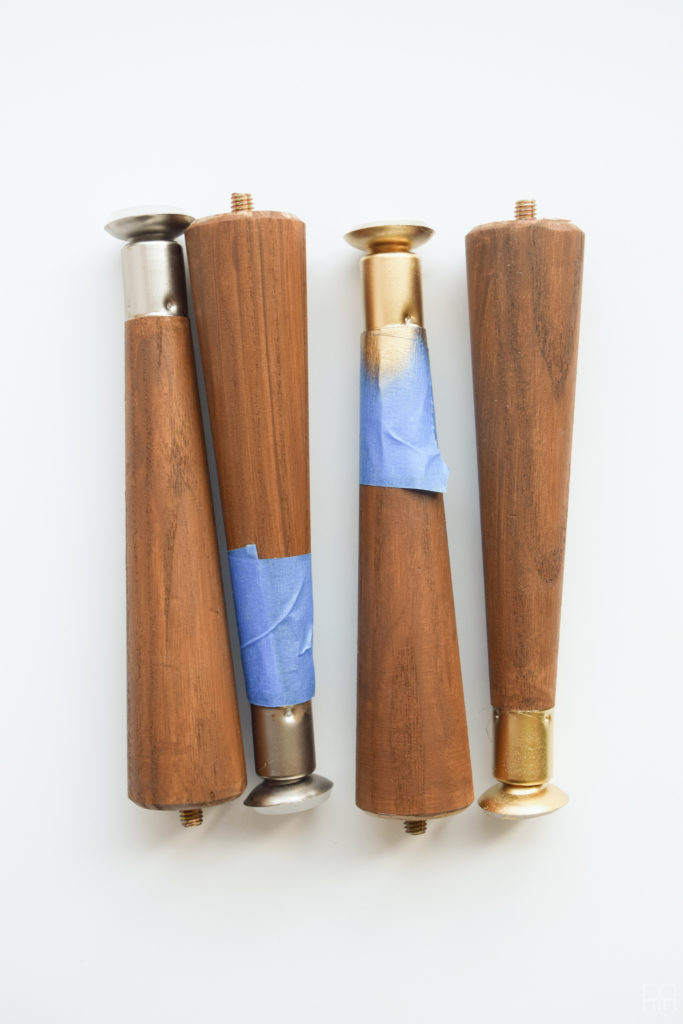
When I bought the feet they were untreated wood, so I used some stain we had kicking around the house to cover them up nicely. I then used some gold spray paint to transform the feet from brushed nickel to gold, and then I coated them with a seal to ensure their longevity.

Step 4: Glue the furniture anchors to the bottom of your dry tray. You’ll be using a wood/metal epoxy, likely in a double syringe injector that requires mixing on the surface, so make sure you have a stick near by to mix them on the back of the tray.

Breakfast In Bed Tray legs

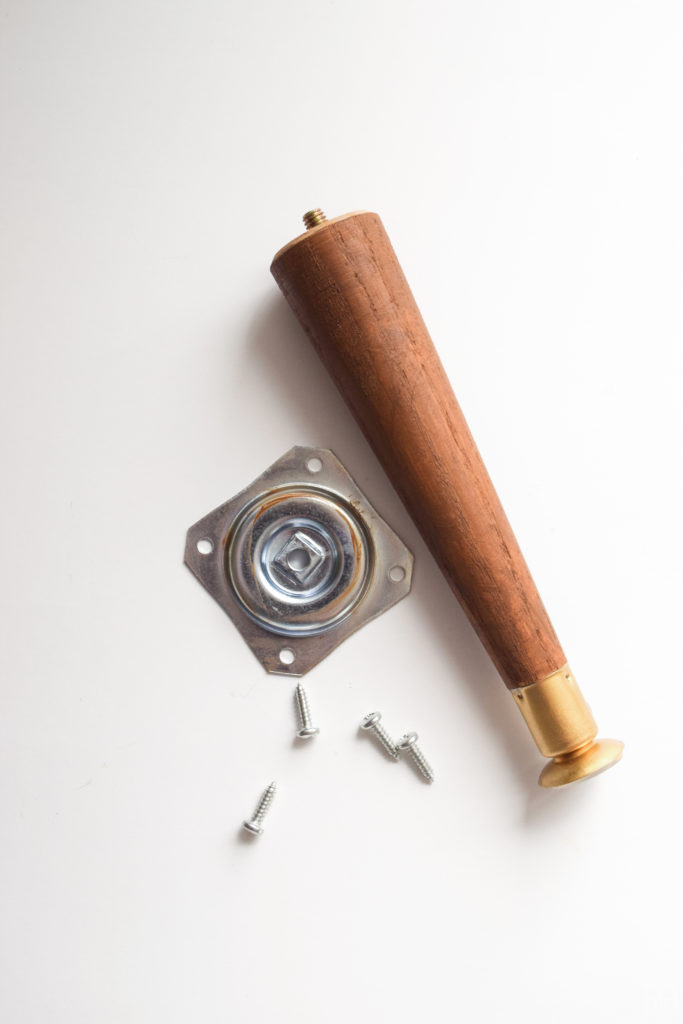
P.S. I use a website called This to That to help me figure-out what adhesives to use when doing projects.

The drying time on the epoxy I used was about 10 minutes, so I glued them and went off to the gym!

Step 5: Paint your design on the surface of the tray. I used a couple of constellation artistic renderings to inspire me in my choices. I like the more gamine images since they’re easier to recreate without looking like a hack-job. I did the same with my Painted Florals on Glassware.

DIY My Way paint

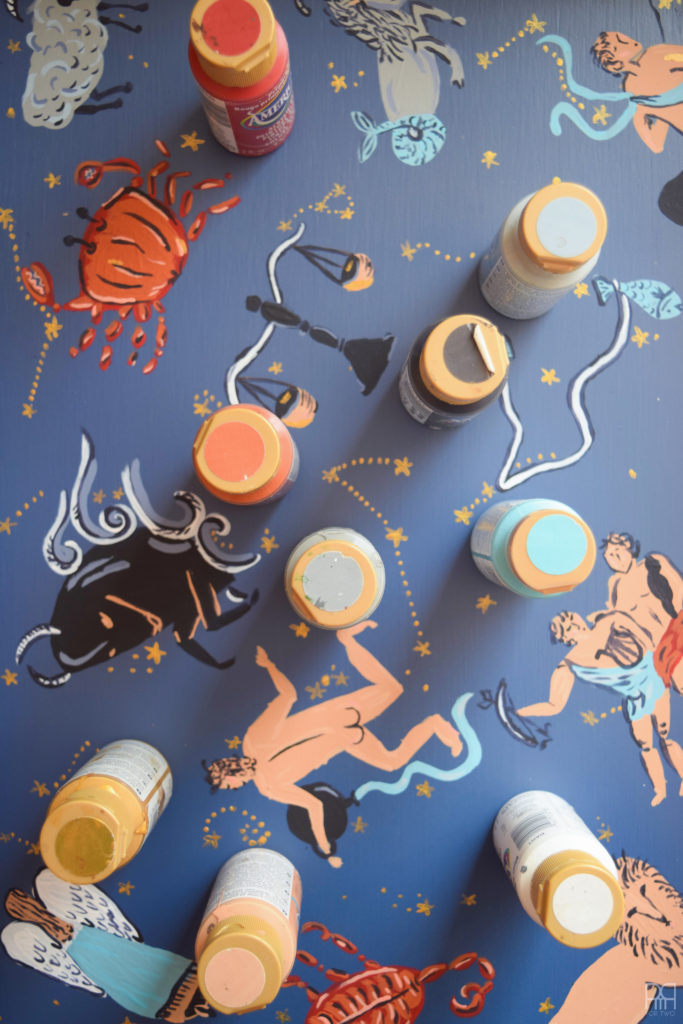
Pinterest is a great place to look for inspiration, but you could also just paint little stars and gold dots, call it a day, and it would still look fabulous! FA- BU-LOUS I tell you!

Step 6: Once your masterpiece is dry – and I mean bone dry – coat the surface, sides, handles, etc. with Mod Podge to seal the tray and prevent damage while using it. You can lightly sand between coats to erase any ridges (like in my pictures), but I honestly don’t mind them. If I was working with polyurethane I would be sanding, but not Mod Podge.

DIY My Way mod podge

Step 7: Screw-in the feet to the anchors under the tray, and you’re off to the races!

What I like about the screw-in feet is that you can easily take them off for easy storage in your cupboards.

Step 8: Enjoy!

Breakfast In Bed Tray finished

Breakfast In Bed Tray next to bed

Breakfast In Bed Tray in bed

Breakfast In Bed Tray close up

What I love about painting is the layering process that goes into creating life-like renderings. Building colours on top of colours, with finer and finer lines is complex and completely mesmerizing. I love it. When I did this breakfast in bed tray I was working with a very paired-down palette, so it was a question of lightening one or two colours for added detail.

Breakfast In Bed Tray with bruce the dog

DIY my way tray

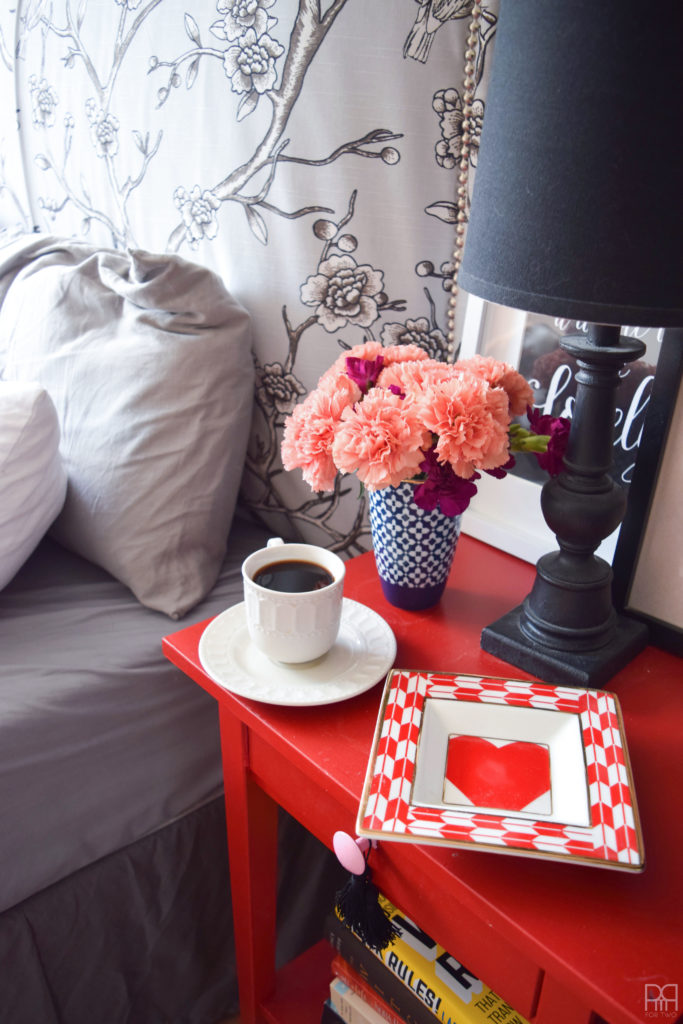
I’ve never been a huge fan of carnations, but the colours on these ones caught my eye. I must say, I am a convert! Done are the days of primary colour carnations that just look cheap – let’s embrace beautifully dynamic colours.

painted tray

diy tray

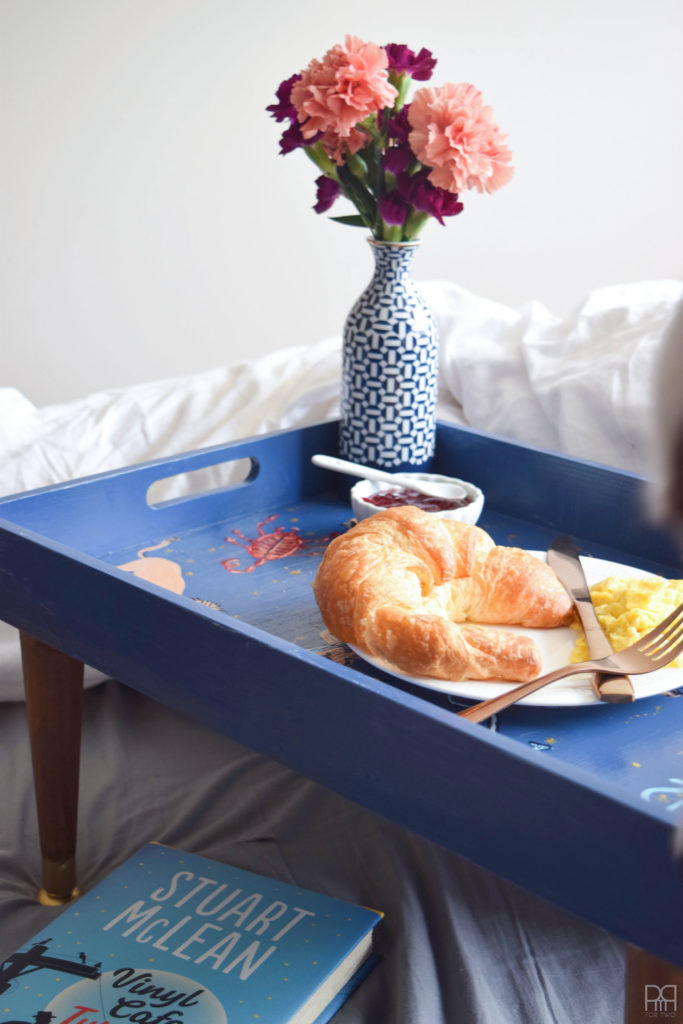
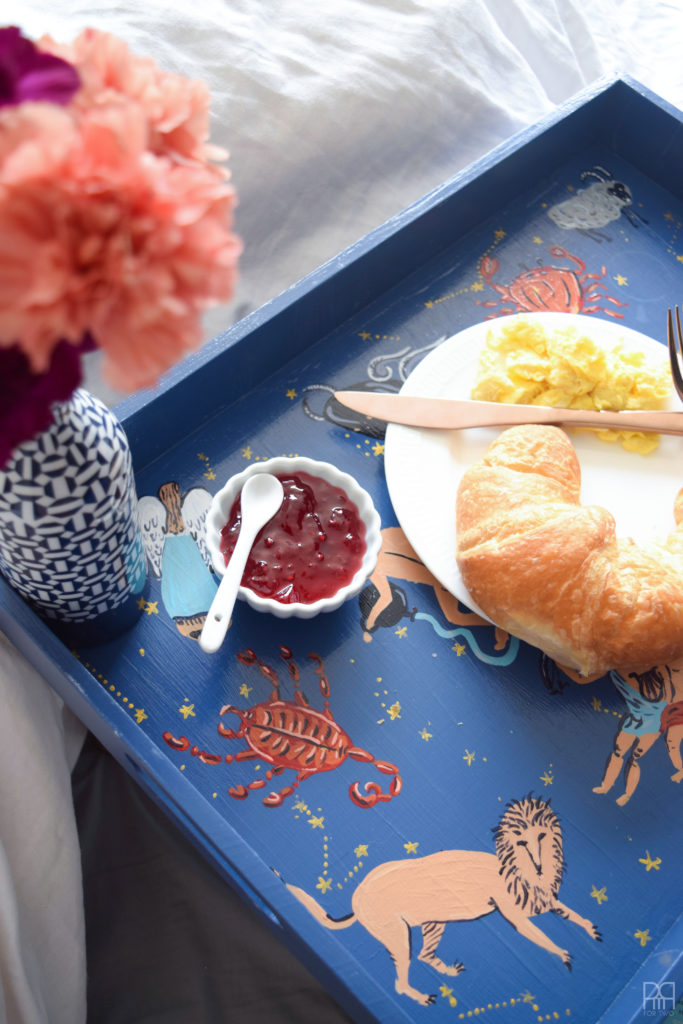
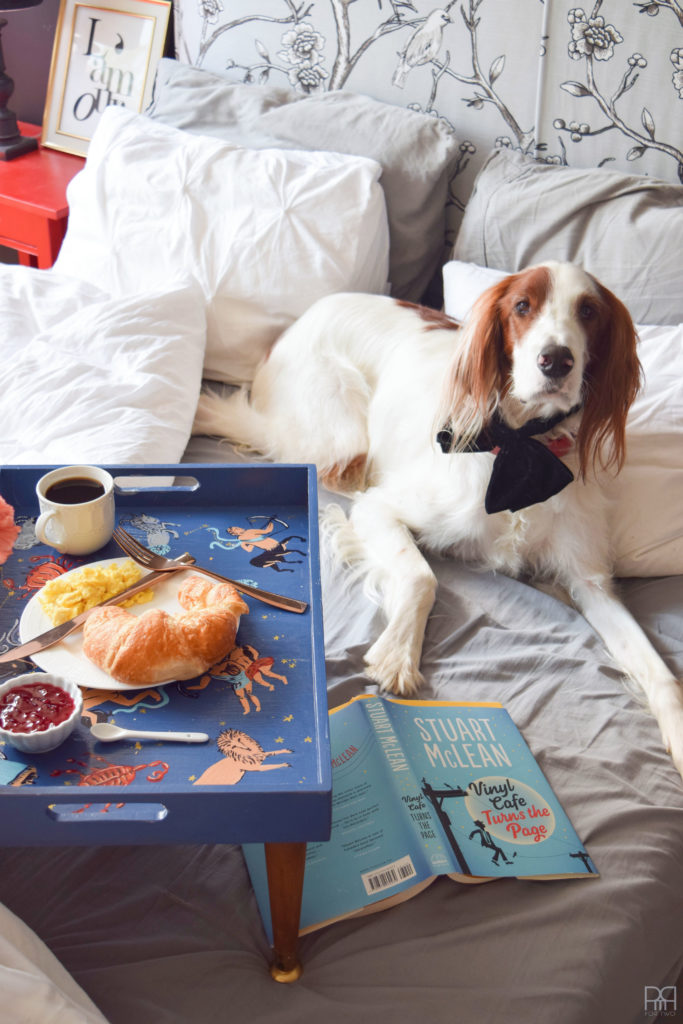
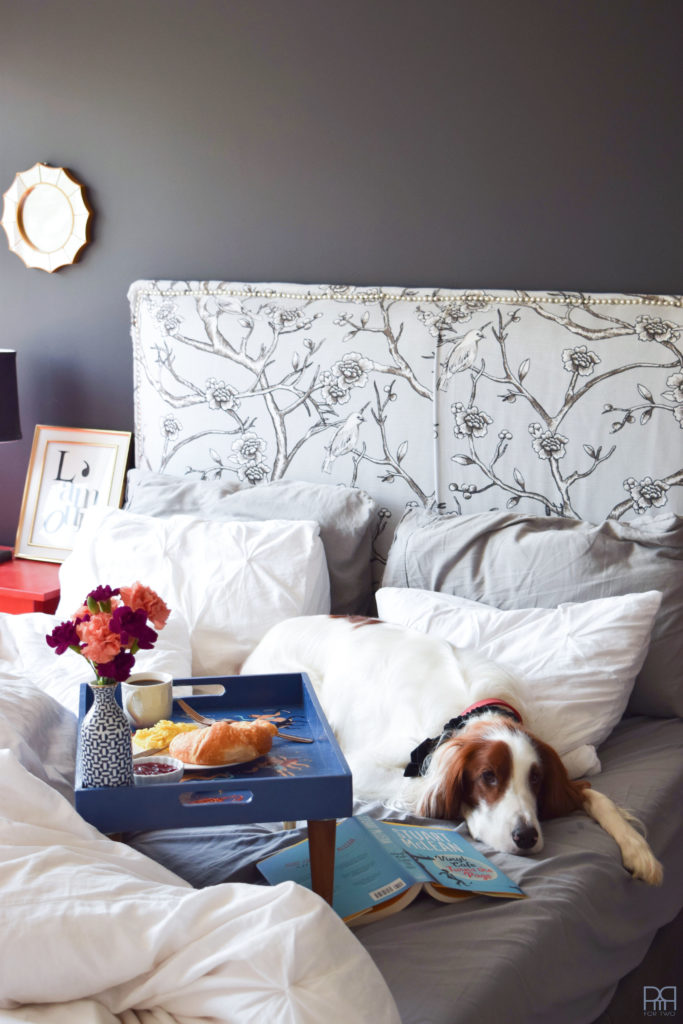
What breakfast in bed tray is complete without a little bowl for jam and cute spoon to go with?! I don’t know, but you can find cute alternatives on Wayfair.

Breakfast In Bed Tray finished

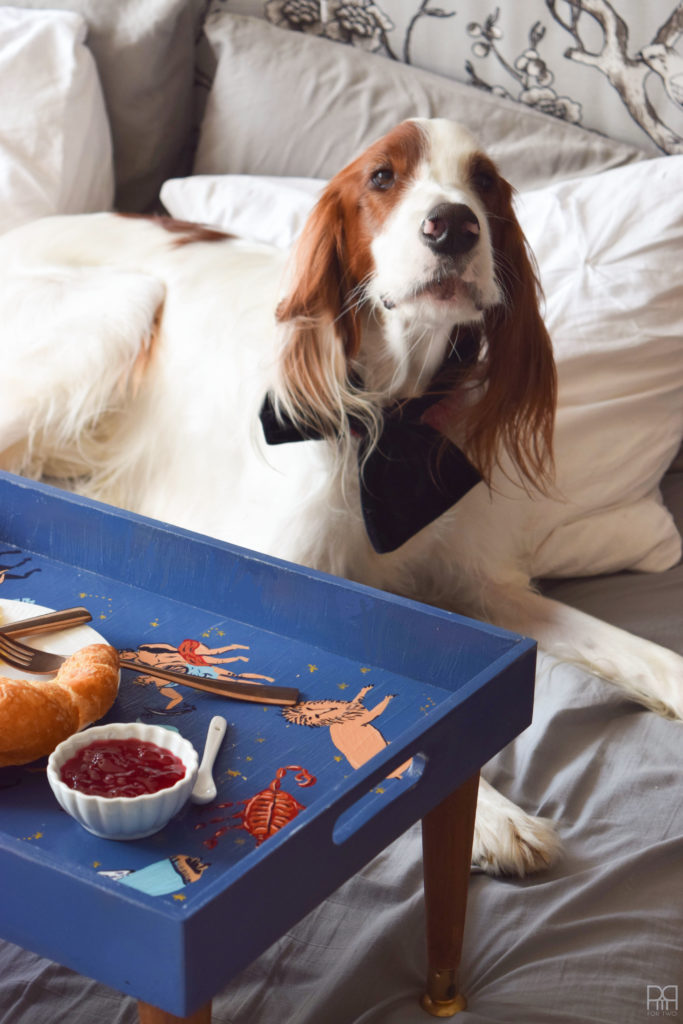
Bruce was my very handsome and cooperative model for this shoot. The space looked empty without him, and since he’s almost always in bed with us, I figured I’d let him into the room for the shoot.

DIY my way 19

Those bum cheeks! hehehehe

flowers on tray

tray in bed with bruce the dog

I love the taper on the legs – I think they’re the perfect addition to this tray.

And yes, we don’t sleep with curtains. We don’t have eastern exposure in the bedroom so we don’t get the sun in our eyes each morning, and there’s something to be said for sleeping under the stars out here.

If you need me, I’ll be enjoying breakfast in bed tomorrow ✌????

new-signature


✨Are you signed-up for my new post updates? ✨

* indicates required
Email Format

15 Comments

The Family Room Realized »
« Making Canning Jar Labels With Your Cricut

Comments

  1. Shauna says

    August 5, 2016 at 11:42 am

    Super cute! I’ve never thought of adding legs to a tray- brilliant!

    Reply
    • Ariel says

      August 5, 2016 at 11:27 pm

      Thanks Shauna! I love the mcm tapper, and the legs made the tray that much more useful!

      Reply
  2. Meagan says

    August 5, 2016 at 2:59 pm

    You are so good at painting… me? Nope! This turned out beautifully and along with the perfect model? Perfect!

    Reply
    • Ariel says

      August 5, 2016 at 11:28 pm

      Thank you! It’s so hard to write a post about it, but I love doing it!

      Reply
  3. Colleen says

    August 8, 2016 at 8:46 pm

    Ariel, this is adorable! I love the patterns you chose, and those gorgeous midcentury legs!

    Reply
    • Ariel says

      August 8, 2016 at 8:53 pm

      Thanks girl 😉

      Reply
  4. Melissa says

    August 9, 2016 at 4:28 pm

    So clever to use the MCM legs on the tray!

    Reply
    • Ariel says

      August 9, 2016 at 8:57 pm

      Thanks Melissa!

      Reply
  5. Kyla @HouseOfHipsters says

    August 10, 2016 at 4:00 pm

    Love the legs!

    Reply
    • Ariel says

      August 10, 2016 at 4:31 pm

      Mine? or the tray’s? 😉

      Reply
  6. Dena says

    August 14, 2016 at 8:58 am

    So cute! And Bruce is super handsome!

    Reply
    • Ariel says

      August 14, 2016 at 9:18 am

      Thanks 🙂 Bruce, Boots and Toby are my best models! They bring all the life into the photos.

      Reply
  7. Lesley Metcalfe says

    August 13, 2018 at 8:22 am

    You’re an amazing artist!!
    Love the tapered table legs.

    Reply
    • Ariel says

      August 14, 2018 at 5:30 pm

      Thank you 🙂 This was such a beautiful project, but I sold it two winters ago to make space for it!

      Reply

Trackbacks

  1. DIY Painted Fall Pumpkin • A PMQ for two (and three pets) says:
    September 30, 2016 at 9:34 am

    […] the past I’ve done a few hand-painted projects –> here <– and –> here <– but they all kind of hinge on you having talent… I accept this is a major flaw in […]

    Reply

Leave a Reply Cancel reply

Your email address will not be published. Required fields are marked *

woman in red dress on counter

Hi! My name is Ariel and I'm the voice behind PMQ for two. I'm an internet rubbernecker, creative soul, and mom

  • Bloglovin
  • Facebook
  • Instagram
  • Pinterest
  • Twitter

PMQ for three

Time For A Cocktail

pmqfortwo

Ariel - PMQ for two
Someone asked if Bruce and Boots were still around Someone asked if Bruce and Boots were still around - yes they are! They’re just getting old, they’re tired of my antics, and honestly spend a good chunk of time sleeping. To be honest, who isn’t 😅 
Happy Friday? 

#wallpaperwednesday #wallpaperdirect #irishsettersofinstagram #lapofluxury #bhgstylemaker #bhghome
Excuse me, have you seen these floors?! AD: The Ch Excuse me, have you seen these floors?! AD: The Champagne Oak flooring from @goldenselect is the one element (other than paint) that runs throughout our house! It’s a unifying element, and brings depth to each space, especially the ones built around neutrals. It’s waterproof, exceptionally durable (to pets and kids!) and easy to clean. It’s also the flooring we installed in our last home, so you know we love it! 

#vinylflooring #goldenselectflooring #costcofinds #kitchenflooring #bhgstylemaker #springflowers #sodomino #kitchendecor #kitchendesign
Would like to further immortalize Dan’s epic pre Would like to further immortalize Dan’s epic pre-baby beard and moustache combo on the grid 👨🏻‍🦰 and remind you that I have a healthy offering of cocktail recipes on the blog. This Lemon 🍋 & Gin Champagne cocktail is a delightful spring recipe! 

#mancrusheveryday #gingerbeard #bhgfood #cocktailoftheday #cocktailrecipes #champagnecocktail
Because you can’t do just do photos or just do a Because you can’t do just do photos or just do a reel, you gotta do both! Anything you’re curious about price wise? Happy to do a reel and explain costs for this space in the context of the build! Here are the details - AD - @villalagoontile Zellige tiles in Iceberg for the shower walls, @officialmetrie casing and architrave on window and door, and baseboard. And the entire space is ultra pure white from @behrpaint. ✨ We purchased the following: mirrors through @homesensecanada, lights from @wayfaircanada, faucets from @kraususa through @homedepotcanada, sinks/toilet/bathtub/shower doors through our plumbing supplier, vanity is a custom build, floor tiles were from a local supplier, and plumbing fixtures in matte black are @deltafaucetcan, and the bath mats are from @urbanoutfitters 

#architecturaldigest #bathroomdesign #bathroomdecor #bathroominspiration #modernbathroom #midcenturymoderndesign
Spring is on the horizon, I swear! Only 5 more sno Spring is on the horizon, I swear! Only 5 more snow storms to get through. AD: in the meantime, I’ve got @mrsmeyerscleandaycanada’s NEW Rain Water detergent to bridge the gap between snow storms and rain storms. 🧺 I use the liquid detergent to keep our clothes clean, smelling fresh, and in ship shape for all that life with a toddler throws our way. Head to my stories for more details! 

#mrsmeyerscleanday #laundryroommakeover #laundryroomdecor #laundryroomgoals #bhgstylemaker #hgtvmagazine #potterybarn
Today is a weird one. So here’s a fun throwback Today is a weird one. So here’s a fun throwback to my Nancy Drew cover fun back in spring 2020. Funny how two years has gone by eh? 

#nancydrew #closetorganization #closetgoals #walkincloset #eclectichomemix #eclectichome #bhgstylemaker #wallpaperwednesday
June met Rupert, and immediately wanted to read to June met Rupert, and immediately wanted to read to him. These two have got a friendship based in love, snuggles, reading, and causing absolute chaos - they’ll get along just fine. 🐅 

#kittensarelikethat #welcometothefamily #kidsroomdecor #kidsroominspiration #houseofcats #kidsplayroom #eclectichome #collectedhome
Follow on Instagram

- THEME BY ECLAIR DESIGNS -