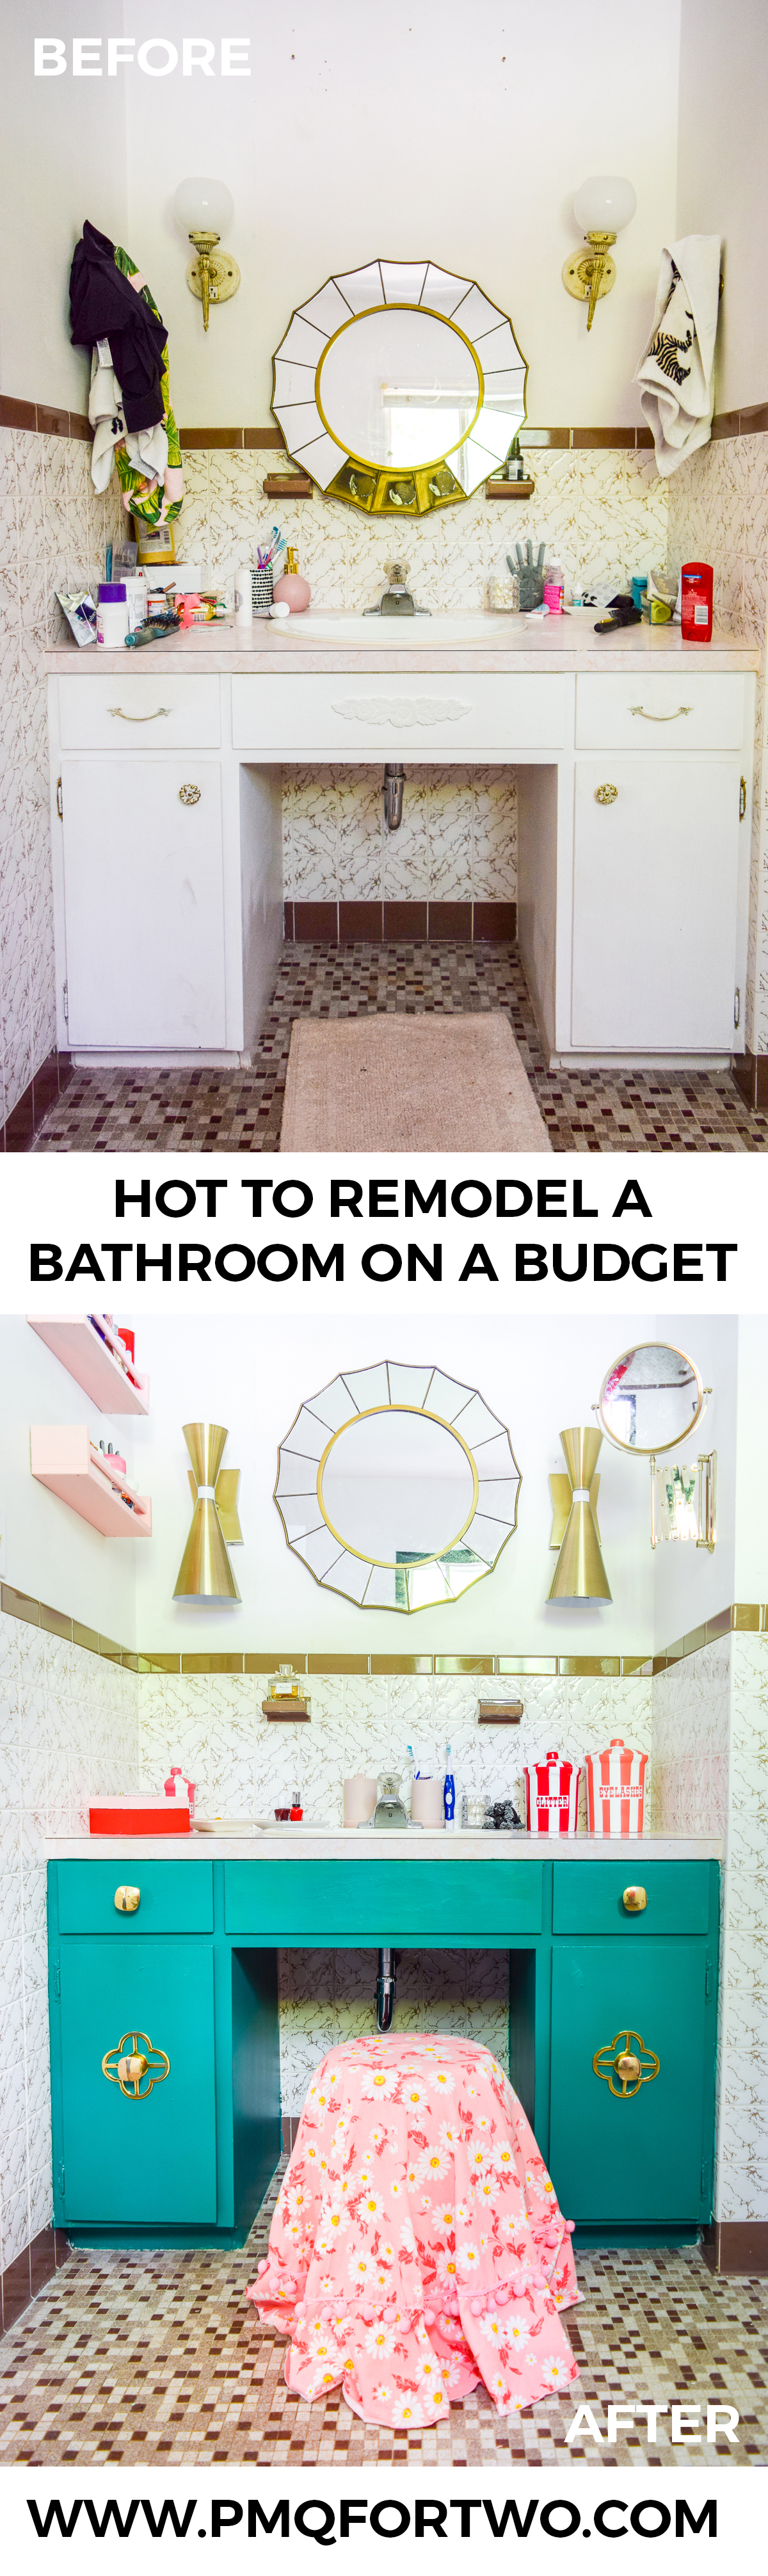
With the flurry of activity happening before baby girl arrives, I decided that I needed to add one more thing to my to-do list and want to show you how to remodel a bathroom on a budget. We had planned to do renovate this bathroom over the summer, but sponsorship and timelines didn’t line-up. And while it’s all fun and games to add new decor and lighting, the biggest change came from updating our bathroom by painting the vanity.
Check out my Kate Spade Inspired Powder Room Budget Makeover
*Behr & Addison Weeks Hardware sponsored this post, but all thoughts are my own. Thank you for supporting the brands that make PMQ for two possible.


How to Remodel A Bathroom On A Budget
Given all the projects on the go I wasn’t looking to spend much money, unless it was on items that I could use in our renovated bathroom next summer. And because of that, when it came to finding paint for the vanity, I went looking through my paint samples and almost empty cans to see how far I could stretch them. Let me tell you! I got pretty far on a paint sample and two almost empty cans of BEHR Paint.
This is what we’re starting with! I haven’t done a thing to it since moving in, a year ago, so it was about time we bring a little colour into the space.

What Kind of Paint To Use on A Bathroom Vanity
As I mentioned above, I used existing cans of paint and sample sizes to paint the vanity. Did you know that BEHR sells sample sizes at the Home Depot in various finishes? It’s a great way to test out a color and finish without committing to a pint or gallon. I used Soapstone MQ4-14 by BEHR on our bathroom vanity.
Check out my post full of home painting tips from an expert

In a bathroom, you want a paint finish that will stand-up to water and condensation, and heavy use. I recommend using BEHR’s Marquee paint line in eggshell, or a color in their Alkyd solution (like we used on the kitchen cabinets).
Check out my Retro Pink Bathroom DIY, using BEHR’s Premium Plus Paint
Because I was using the end of some cans, I also used an indoor/outdoor finish from BEHR’s Premium Plus line in a high gloss, to paint the remaining trim and accents on the cupboard door. We originally bought this can to do the baseboards and trim in the Glam Master Bedroom, and I’ve since used it to do a few small projects around the house.
How to Paint A Bathroom Vanity
Much like any paint project where there’s existing paint coverage, you’ll want to start by sanding the surface lightly. By roughing-up the surface you’re not only removing any surface dirt, but you’re also removing the protective finish, making it easier for new paint to adhere.
After sanding, wipe down with a wet rag and let dry before painting. I used a foam roller to paint the vanity doors, drawer fronts, and frontage. It took the entire paint sample (minus what I used for sampling on the wall), and I got two coats out of it. Perfect!

Updating Your Bathroom Vanity Hardware
While I can’t do anything about the tragic brown tiles in our master bathroom – for the moment – I can paint the vanity and add new hardware to spruce up the space. I used Addison Week’s Jones Backplate with Benson Pull in brass on the door fronts, and the Benson pulls in brass on the drawers and cupboard door.


Using Wallpaper Scraps as Drawer & Shelf Liners
Since the goal here was a “no spend” makeover, I went rummaging through my wallpaper scraps for my Yellow Peony wallpaper from the Rifle Paper Co. x Hygge & West collaboration that I used in our floral glam master closet.

By using the wallpaper scraps, I added an unexpected pop of color to the inside of the drawers, and save myself a few bucks on revamping the drawers.
Retro Wall Sconces
I originally bought these at Homesense back during the winter when we had plans to update the basement game room, but they’ve languished in the basement until now. The wall sconces that were in here were NOT up to code and had some pretty funky wiring, so we used the swap as an excuse to remedy at least one dangerous part of the space.


How to Decorate A Master Bathroom On A Budget
With all those things done, I rooted around the house to find some decor that I already owned. Shopping the home is the best way to revamp a space on a budget, and boy did I score big time!

I found: the shelves on the wall (which I painted pink), my DIY Jonathan Adler Jars, the expandable mirror on the wall was from our last master bathroom (and hadn’t been put up yet), I glued the missing pieces back on the mirror above the sink, repurposed a tablecloth and sewed a skirt for a garden stool to serve as a vanity poof (found the pom trim in my box of ribbon), and assembled a cute collection of knick knacks for the back of the toilet.
I’m very proud of myself, because the only purchase I made here was the new bath mat from Homesense.

What I love the most about the updates, is that the trims now match from room to room, and the green vanity matched my green bed skirt. While I haven’t unveiled our updated master bedroom, here’ s a little sneak peek!


The green glam shell is one of those pieces that moves around from room to room, use to use. Here its on my side table, but shortly you’ll see it in the bathroom.


I really don’t like all the brown, but until we’re ready to knock it all out and start from scratch, I’ve got to live with it.


Boots doesn’t like it either!


Because it’s such a small space, it’s kind of trick to photograph, so I’m doing my best to show you how it flows together at the moment.