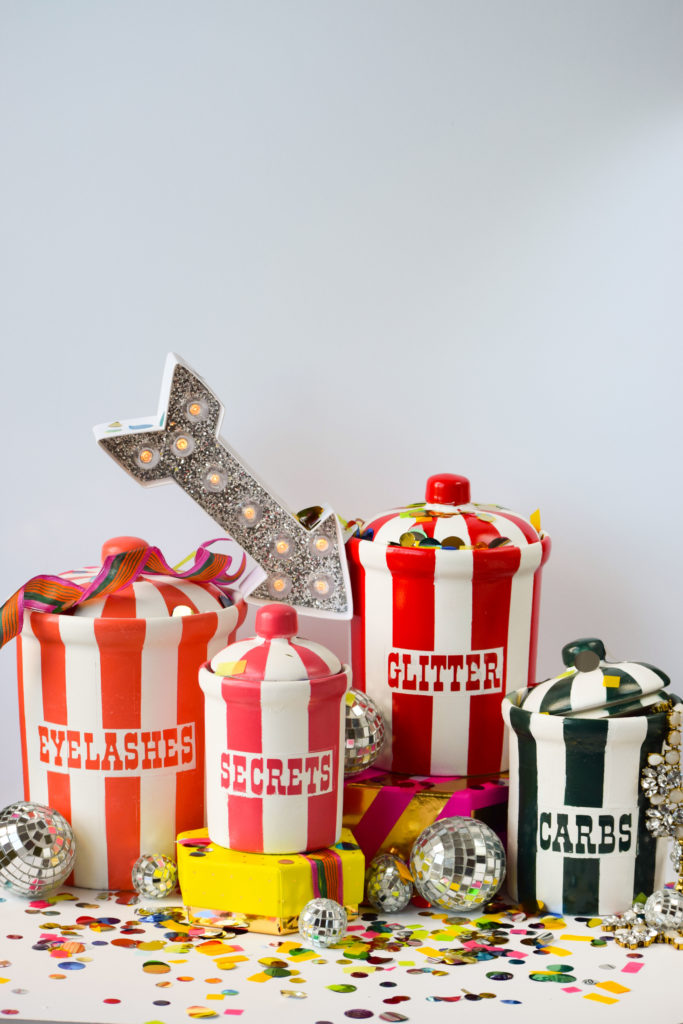
This project has been the single-handed most complicated and labour intensive DIY I’ve ever done, and I nearly gave up like twice. Who would have thought that the Jonathan Adler Vice Jars would have caused my near downfall?! There’s a reason this month’s Inspired by DIY series is a week-late; no one could get their project to stick in time, so we gave ourselves a grace period after a very exhaustive and frustrated discussion on Facebook. But hey, five of us we made it, and so did the projects.
P.S. the Inspired by DIY series wouldn’t be possible without the amazing and talented Jess from Domicile 37 – so if you like what I’m doing, you’ll love what she’s doing.

This project was supposed to be easy as pie. I was going to knock-it out of the park in an afternoon using some spray paint and vinyl. Wrong.
Let me tell you about my mistakes:
I had originally planned on just spraying the jars, and then adding the stripes and words in some vinyl I had leftover from my Vinyl Otomi Chargers, but then it all went to hell with the first coat of spray paint.
*** Spray paint and regular spray-on primer will not stick to glazed ceramics. I should have known this.***
Like an ass, I persevered and kept spraying coats of it onto the jars in the hopes that it would stop running and actually stick. Next layer right? Mistake no 2.
After realizing this wasn’t going to work, I should have put the jars aside and called it quits for the day. Instead I tried applying the vinyl to see if I could put lipstick on a pig. Nope. It’s still a pig.
That’s when I knew I wasn’t going to make the deadline. Instead, I did some research and realized it was all because of the wrong primer. I should have been using something meant for tile. I wasn’t wholly surprised when the Zinser 1-2-3 spray primer was the answer. That stuff has been my secret weapon for some tough to paint projects like my IKEA nightstand // and my // patio umbrella.// I swear, the stuff is like magic.
After spending two million years an hour scraping the spray paint off the jars the next day in the kitchen sink, I got down to the business of properly doing this craft.
Materials
- 1 can of Zinser 1-2-3 spray primer
- 4 colours of spray paint in complimentary colours
- 1 roll of Frog Tape – I mention them by brand, because you want that tight and clean line. Trust.
- Ziplock bags
- Circuit Machine (or other cutting machine)
- Old Tyme Font installed on your computer
- Vinyl for stencil (scraps will do since we’re spraying over it anyway)
- 3 oz of patience and enough gas to make it to Home Depot 4x
Step 1: Clean and dry your jars. I snagged the set of jars at Value Village for 4.99$ + tax. They were exactly what I was looking for, if a little dirty.
Step 2: Prime your jars and lids with the Zinser primer. Once they’re dry, spray-paint them a high-gloss white spray paint.
Step 3: Once dry, using a 1 inch tape, alternate vertical stripes along the jars and lids. You’ll be spray-painting the exposed area in your selected colours.
Step 4: Spray paint each jar in its own colour. I chose coral, pink, red, and forest green.
As always, spray about 20-25cm away from your target and use controlled bursts in a sweeping motion. You’ll find you have better control over the paint and it won’t pool and drip down. You see that when you hold the can too close and are just letting’er rip.
Step 5: Tape off the area where you’ll put the wording. I was trying to get it centered on the jar, but you can see on some of them that I aimed a little too high or a little too low.
I waited a full day for the paint to be dry before putting tape down so that it wouldn’t pull it all up. To help protect the rest of the jar that’s not being spray painted white (since there are already stripes), tape a ziplock bag along the edge of where your stencil goes. The plastic will protect the area well.
Step 6: Once the freshly painted white area is dry, apply your vinyl stencil. I chose vinyl because it would provide an air-tight seal for the spray paint in the lettering. Make sure you wait at least an hour before pealing it off, otherwise you might pull the freshly applied paint with it.
It appears Jonathan Adler has a long list of vices (uppers, downers, Viagra, glitter, eyelashes, carbs, white lies, fibs, secrets), but I chose a couple I thought might be applicable to me 😉
***I did not wait long enough for one of the jars, and when I pulled-up the vinyl stencil it took all the layers of paint with it. Not cool****
Step 7: Do any necessary touch-ups where paint may have bled or if lines aren’t clear. Depending on the quality of tape and vinyl you use, things may bleed a little with all the paint.
Step 8: Enjoy!
PMQ for Two | Maggie Overby Studios | Up to Date Interiors | Sharon Joyce Interiors | Monica Wants It
Want to be in the know and get exclusive content that doesn’t appear on the blog? Join my decor gang! Instead of ninja stars we carry atomic starburst stars.
