

So the nursery is coming together! slowly but surely. I feel like I take one step forward and two steps back. I’ve never designed a kids’ space, but I have worked with faux florals, and if I know anything it’s how to make faux floral wall art. Using Fiskars’ Powercut Snips, some paint and faux florals, I created a series of small pieces to place around the nursery while I fidget with decor.
*Fiskars sponsored this post, but all thoughts are my own. Thank you for supporting the brands that make PMQ for two possible.

As you can see, things are still a work in progress in here. I’ve got the basic colour palette, but I’m working on integrating all the small things that make a nursery feel like home. My DIY Faux Floral Wall Art is exactly one of those things, and if you were following along on IG stories this past week, you’ll know that I spent quite a bit of time deciding where to hang these.
I ended-up splitting them up, instead of hanging them as a series of 9 – as I had originally planned – and I think this looks much better. PLUS I have more creative freedom in where I place them, which is helping me plug some holes in my colour story.
Crafting with Faux Florals
If you’ve been around the blog for a minute, you’ll know that I love faux florals. In fact, my first project with Fiskars this past fall was about creating a fall floral arrangement using the Powercut Snips. So using them again with this project was a no-brainer.
Check out my other faux floral DIY projects
When it comes to working with faux florals, you’ve gotta make sure you’ve got the right tools like the Powercut Snips, as well as the right adhesives. I find hot glue to be perfect because of the strong bonding agent. I would not recommend school glue or super glue.


What I love the most about crafting with faux florals, is that you can mix stems and florals that you would not otherwise be able to find locally as real clippings, or because they’re not in season. And these days, the faux florals look as good as the real thing.
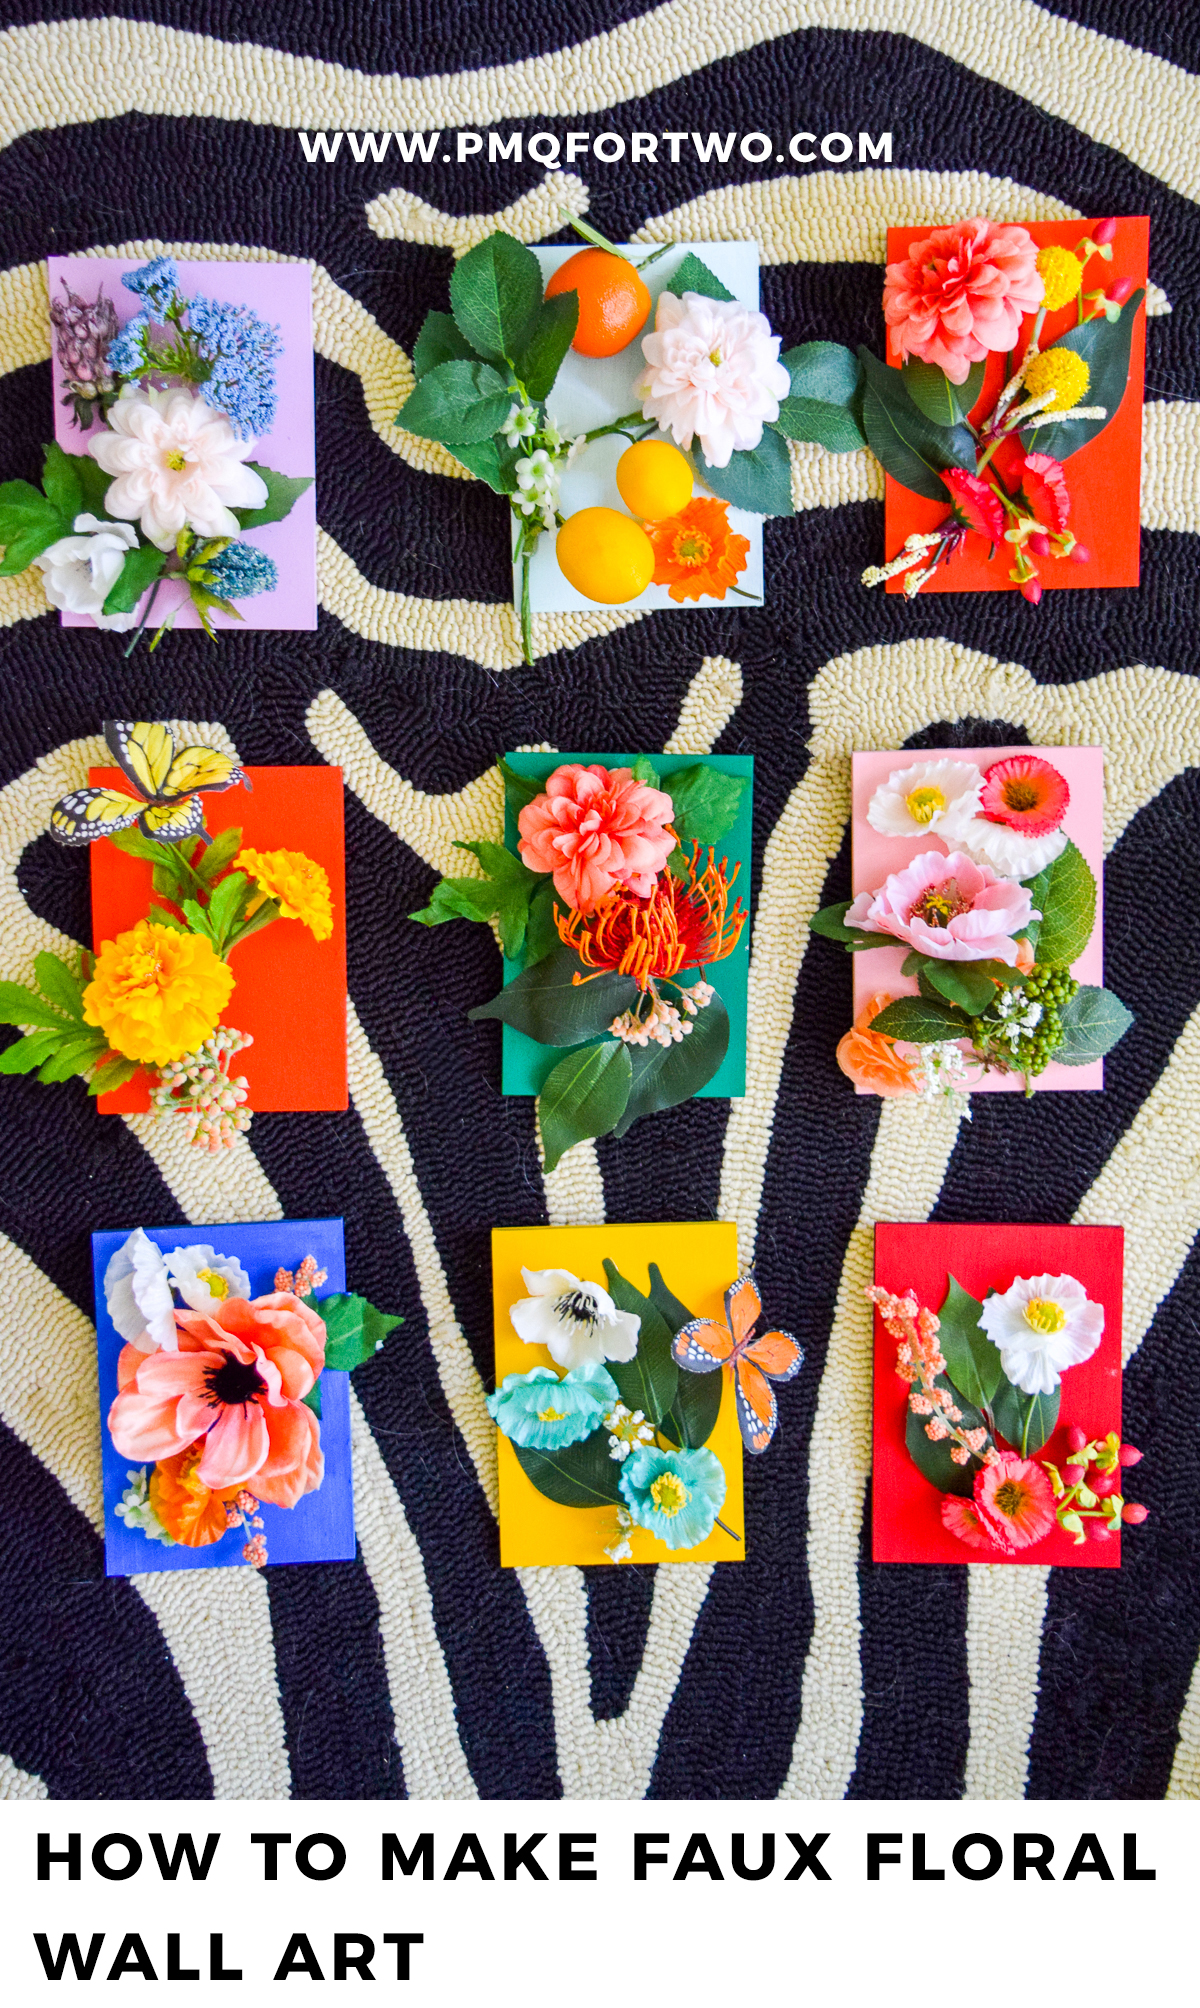
Rifle Paper Co. Inspired Faux Floral Wall Art
Have I told you guys how much I love Anna Bond’s designs? Ok good. It’s not enough to have her work sprinkled throughout the house as art or fabric, or wallpaper – I create my own versions sometimes. And in the nursery, this was the perfect occasion to bring some of my fave prints to life with 4D faux floral wall art.
Check out my Rifle Paper Co. Inspired DIYs: Painted Fall Floral Pumpkins, Spring Felt Art, Painted Florals on Glassware, Painted Christmas Ornaments
I started by picking 9 prints/patterns I loved, and colour matching the background colour to my paint collection. If you’re curious, I used:

I then painted 9 little postcard sized pieces of MDF from the craft store. You could do this with any piece of wood or canvas, but I found these little pieces affordable and easy to acquire.
While they dry, make your floral selections! I have an extensive collection of faux floral stems and bushes, so i just had to go digging through my collection to find the buds I liked.

Using my Powercut Snips, I cut them down to manageable sizes to fit.

They cut through each and every stem with ease, and I didn’t have to fight with anything.
Next, I used my hot glue gun to glue each arrangement to the piece of MDF. Take your time to create little moments of colour, you’ll appreciate them later.
How to Hang your Faux Floral Wart Art
Because I made my own canvases – so to speak – none of them had easy to hang backings. I did however have some floral wire left, so I used my Powercut Snips to create little Vs. I glued them to the back of each piece, and voila! easy to hang wall art.

Of course, the next step here is actually figuring out where you’re going to hang things. As I explained near the top of the post, I spent WAY too long trying to find a place to hang all of them together, before realizing I should break them up into smaller sets.

DIY Faux Floral Wart Art
I tried a few configurations in the beginning, but in the end I’ve settled on two collections on either side of the built-ins, and then a few sprinkled in on the shelves.


They look fantastic grouped together, but I think I should have done them a big bigger if I wanted to group them together on the wall.


As you can maybe tell, the theme here is animals. But I’m using a strong colour story to back the whole scheme and bring some cohesion to baby girl’s very colourful stuff.


