


Now that the snow has melted, the trees are green, and it is warmer than 20c outside, we are finally working on the outdoor spaces. Our DIY MCM trellis panel is the first of many outdoor projects in our “new to us” backyard, and we are pleased as punch with how it’s turning out.
Check out my DIY Potting Bench & my DIY Sun Loungers
* The Home Depot & BEHR Paint sponsored this post, but all thoughts are my own. Thank you for supporting the brands that make PMQ for two possible.


I’ve been dying to make some sort of privacy screen or trellis panel, that would serve as a way of diving our outdoor spaces, provide some privacy, and create a backdrop for our entertaining.
I’ve wanted this since our first PMQ, but it took Dan and I finally figuring out how to make it work for us, to actually get it done. THAT, and a little help from The Home Depot’s lumber section, and of course, BEHR’s outdoor paint.
How to build an MCM Trellis Panel
To make a 96″ x 72″ MCM trellis panel, you’ll need 12 of the 1″x2″x8′ Pine Select, wood glue, clamps, Ryobi Air Strike with 1 1/4″ brad nails, a miter saw, and a table saw – as well as a large space to lay it out as you build it.
*We attached ours to two U-Post fence poles, in order to secure it in place in the ground. If you wanted to hang the trellis from a balcony or roof line, you would need C hooks or another system.
Here’s the cut list for this size and design (all cut from 1″x2″ Pine Select)
- 48 x 12″ with both ends cross bevelled at 45* – A
- 2 x 72″ with both ends cross bevelled at 45* – B
- 2 x 96″ with both ends cross bevelled at 45* – C
- 6 x 6 1/16″ notched 90* on one end (see diagram) – D
- 8 x 4 7/8″ notched 90* on one end (see diagram) – E
- 17 x 4 7/8″ notched 90* on both ends – F


Start by assembling the outer frame that’s going to hold the design. Use the 96″ and 72″ pieces (B & C) to create the frame, using wood glue, clamps, and the air strike.

Next, assemble 12 squares using the 12″ pieces (A) with clamps, wood glue, and the Air Strike. We made a jig to make assembly easy, and to ensure your corners were straight.
Once all the squares as assembled, attach the 6 1/16″ pieces (D) along the inside of the short side of frame, and the 4 7/8″ pieces (E) along the inside of the long side of the frame.

These will anchor your squares for easy installation, which you’ll attach using wood glue (in the notches) and then the nail gun on the inside corners.
From there, using the remaining pieces (F) to secure the pieces to each other.
If all of this is confusing, see the diagram below.

How to Paint your DIY MCM Trellis Panel
Once it’s all assembled, it’s time to paint! You can’t leave un-treated and un-sealed wood out in the elements (and expect it to last), so this is where the BEHR paint Marquee outdoor paints come into play.

Based on the intricacy of the MCM trellis panel, and the small width of the wood used for construction, I thought this might be the perfect occasion to try out a paint sprayer. I’ve had it for about a year, but haven’t had a place to use it properly (with ventilation, a big driveway, and the right project) until now.
Check out my Painting Tips From An Expert – including tips for choosing & using outdoor paint.
I used BEHR’S Marquee line of outdoor paints in Pure White for this trellis.

I had never used a paint sprayer before, and wasn’t sure about thinning the paint, but the Marquee solution worked in this electric sprayer no sweat. I did not need to thin it, or do anything other than put the paint in the sprayer reservoir. EASY!
I upped the intensity of the flow on the sprayer, to ensure I was getting bigger coverage, and then — much like with a spray paint — I used sweeping motions, about 12″ away from the surface, with multiple passes, to cover the trellis.

One the first side was complete and dry, I flipped it over to do the other side.
The sprayer, coupled with the quality of the paint, made it really easy to get the coverage I wanted in the nooks and crannies of the design.
The whole thing dried overnight (vertically) in our garage, and was ready for installation the next day.
Installing your MCM Trellis Panel
While all this was going on, we also painted two U-Post fence poles white, so that they would blend with the trellis seamlessly.
We drove the U-Posts into the ground 96″ apart, placed the trellis panel between them, and then using wood screws, attached the panel to the posts.


You can barely tell they’re there, and they’re easy enough to remove if we need to expand the space available, or remove them for landscaping purposes.
Creating an Outdoor Space with your DIY MCM Trellis Panel
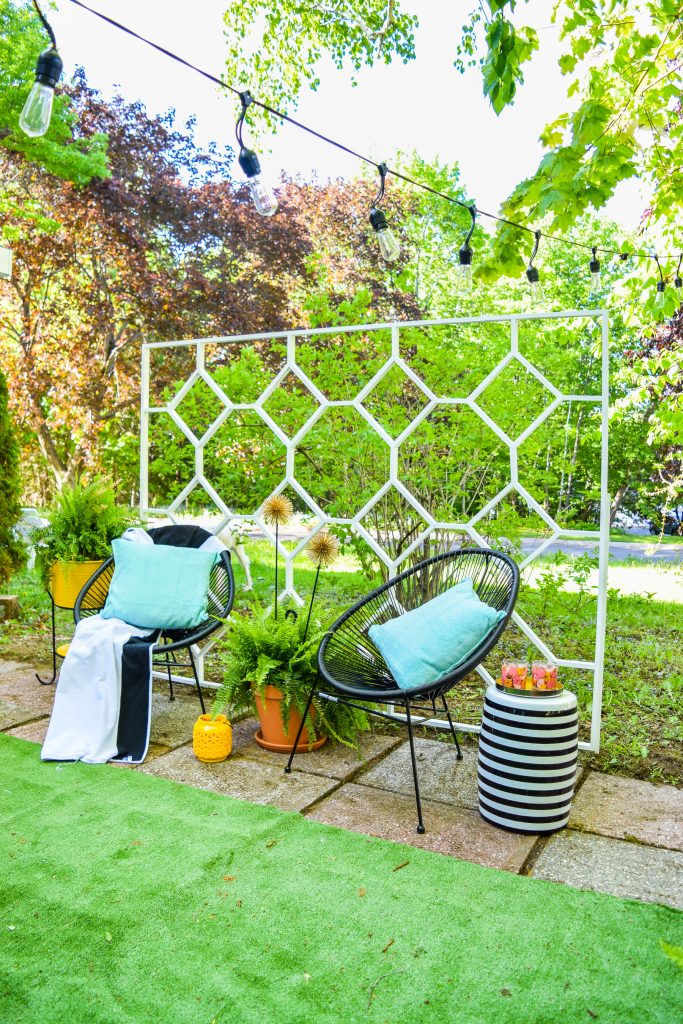
I’ll be unveiling our completed backyard space next week, but in the meantime I’ve created this little scene for you, showcasing the trellis panel in all its glory. Because of where we placed it, it acts as a privacy wall as well.

Once the bush behind has filled in for the season, you’ll get the complete effect. I filled the scene in with some chairs, DIY pillows, and a few finds from The Home Depot’s seasonal aisle, like the yellow ice bucket (serving here as a plant stand), and some lovely great big ferns.

We chose a white paint — Ultra Pure White from BEHR’s Marquee line to be specific – because of the crisp contrast it provides against all the green.
In looking to create a separate outdoor space, we wanted a breathable wall, and the this trellis panel does the trick beautifully.


