

We are here for the another round of the One Room Challenge. This will be my 5th time participating, and now that we’re in a home we can reno, we took the plunge and are doing the kitchen! My Retro Glam Kitchen Renovation Plans are exactly what this space needs, and a great chance for me to flex some design muscles that have heretofor been constrained by locale or budget.
Check out my Mid Mod Eclectic Living Room, my Eclectic MCM Dining Room, my Colourful and Eclectic Backyard, and the Coastal Canadiana Living Room.
*Polycor, Velux Canada, Emtek, Metrie, BEHR Paint, Blanco Canada, Hygge & West, Hudson Valley Lighting, and Villa Lagoon Tile sponsored this post, but all thoughts are my own. Thank you for supporting the brands that make PMQ for two possible.


In case you’re new around here, a quick recap of how the One Room Challenge (ORC) works! The featured designers, and the rest of us, get 6 weeks to makeover a space from start to finish. The budget is up to us, how we go about it is up to us, and we’re encouraged to go big or go home! Each week we’ll all link-up to share our progress, our success and our failures, and cheer each other on.
I’ve rounded-up some stellar sponsors for our Kitchen. Everything from lighting, to paint, hardware, tile, countertops, trim, wallpaper, hardware and more!


The Kitchen Before
You’ll remember from previous shoots and IG Stories, that our kitchen is dated. The size is fabulous, the footprint is deal, but everything else is kind of old – and not in a good way. This was one of the few spaces that was slowly updated throughout the previous owners’ time, so there were many “layers of bad” to undo, many of which we didn’t find out until we were well under way with the demolition process.
You’ll have seen our kitchen in DIY Retro Light Reflectors, Deep Cleaning with Bona, and Baking My Pregnancy Cravings (although in this one we sorta cheated by testing the paint colour on the cabinets)


As you can see, it’s honestly not that bad. It just does nothing for the house. Kitchens sell homes, and if we run the chance of being posted each year, we need to make our reno money count, and that means investing heavily in the landmark spaces.
To do that, we chose a few key areas to splurge, and more than a few to DIY. Along the way we also found a few where a little razzle dazzle never hurt anyone.
The Retro Glam Kitchen Renovation Plans
Our list of things to renovate in the kitchen is extensive, and we’ve gotten quite a ways through the list just from the demo process alone. We got a head start on that to allow for the fact that Dan has a crazy work schedule during this edition of the ORC, and the fact that we’re hiring out for some parts, so to accommodate the timelines we had to get things ready ASAP.
Here’s out to-do list now that the kitchen is gutted (of counters, old sink + stove, cupboard, AC unit) and new subfloor has been laid:
- Paint kitchen cabinets inOpal Silk PPU12-8m by BEHR Paint.
- Lay Tugboat pattern cement tile from Villa Lagoon Tile
- Install Velux Canada skylights in the kitchen
- Install new stovetop to match retro wall oven
- Hang new Livingston doors from Metrie, and new door handles from Emtek (assuming they arrive in time! eek!)
- Instal new cupboard/drawer hardware from Emtek
- Install new light fixtures from the Mark D Sikes x Hudson Valley Lighting Collab
- Install newWhite Cherokee Marble countertops & backsplash from Polycor
- Chose & hang Rifle Paper Co. x Hygge & West. (likely the Peony print from Rifle Paper Co. – still unsure on colour)
- Build seating corner bench
- Create cushions for the bench
- Install crown molding and trim from Metrie
- Build floating shelves
- Install new BLANCO IKON Silgranit Sink + Faucet
- Accessorize

As you can tell from my mood board, I’m pulling together quite a few elements to create this space. While it was tricky to get every element and sponsor represented (some samples just haven’t arrived yet), I’ve done my best to create a representation of the space. I’ll have more concrete examples of everything next week once we start rolling through the big steps and processes.

The counters and backsplash will be pieces of solid White Cherokee Marble from Polycor, in a honed finish. I’ve wanted marble countertops for a while now, and although they’re super trendy, they’ve stuck around this long for a reason. They look timeless! And with a few visually complicated elements, I wanted simplicity where it counted. We’ll have more on the selection process, design, inspiration and more later.
For the sink, we’re updating our tired old double sink with leaky faucet, in favour of an apron sink from BLANCO. We went with the Silgranit IKON in White, because of how the durability, quality and finish. But also because it wouldn’t interfere with the visuals of the countertop, or clash with any other elements.

For the flooring, we’re going with a major upgrade. We removed 3 layers of old linoleum flooring (one of which we had initially thought was tile), and laid new subfloor, all in anticipation of our marvellous new tiles! I’ve wanted to do a checkerboard in black and white for AGES, and this is finally the place it’s happening in. We partnered with Villa Lagoon Tile for the Tugboat tile pattern. I can’t wait to share what the space looks like with the tiles in place.

For cabinet colours, after much hand wringing and extensive testing, we’re painting them in Opal Silk PPU12-8m in BEHR Paint’s Alkyd formula. Don’t worry, there will be a FULL tutorial on how we went about this next week. I’m in the middle of painting and prepping them now, so I should it all done by the weekend.
For wallpaper, we’ll only be doing one of the walls in the kitchen (in the corner where the seating nook will go), and we’re pretty sure it will be the peony pattern from Rifle Paper Co. x Hygge & West. We’re just waiting on some samples to arrive so that we can make a final decision re colour selection.
In terms of hardware, we’re getting new cupboard and drawer hardware from Emtek, as well as new handles for the new doors we’re installing from Metrie. I’m waiting for those to arrive before I go into detail about them. Needless to say, they’re going to be showstoppers. See, we may get these at the very last minute, so we’re hoping everything lines-up.

We’ve got plans to install skylights from VELUX Canada! Can you believe it? Our big dark kitchen is going to get an infusion of natural sunlight, and I cannot wait to see how it all turns out. We should have installation happening in the next few weeks, so I’ll update with details as they roll out.
In terms of lighting, we’re also simplifying, and enhancing the lighting situation in the kitchen with some new fixtures from Hudson Valley Lighting and the Mark D. Sikes collaboration. Kinda hard to fit those on a mood board, so you’ll have to wait and see on those!
Inspiration for the Retro Glam Kitchen Renovation
Because this house has beautiful features, and lots of charm, we’re trying to keep as much as we can. This means choosing designs that are complimentary to the era of the home, our style as a family, our lifestyle, and will create value for re-sale.
With a lot of these updates, we’re making capital upgrades to the house, and are creating value where we’ll see the greatest return. We chose features that inspired us, and went from there.
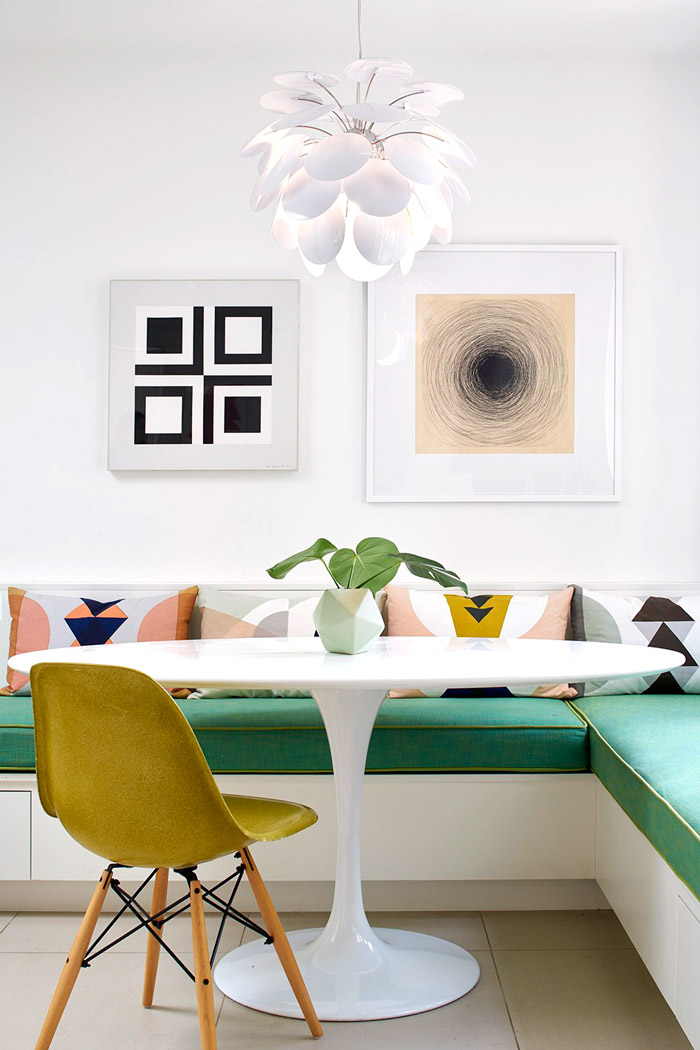

This kitchen corner seating banquette, with bright patterns and colours – from Chic Deco Blog – it such a great feature, and one that we’ll be building into our kitchen. The corner we have is perfect for it, and it will eliminate the need for many chairs, while serving us well once our baby arrives.
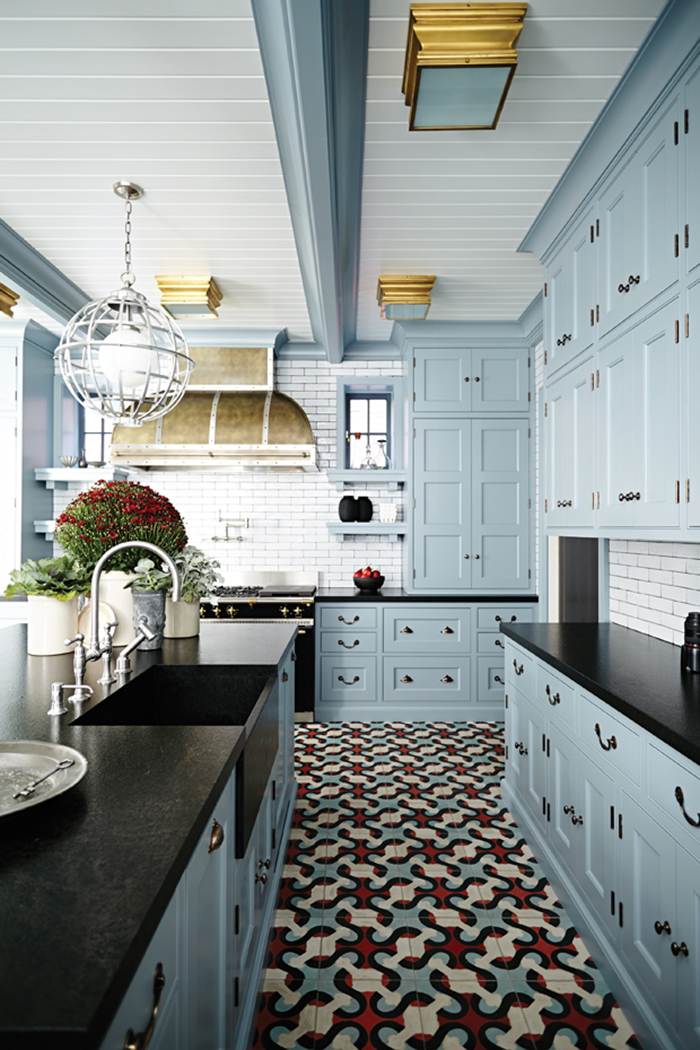
The blue cabinets from this kitchen – image from House & Home – are what dreams are made of! The colour is playful, yet mature, and will serve our cabinet fronts well. I can’t wait to see it on a grand scale in our kitchen.
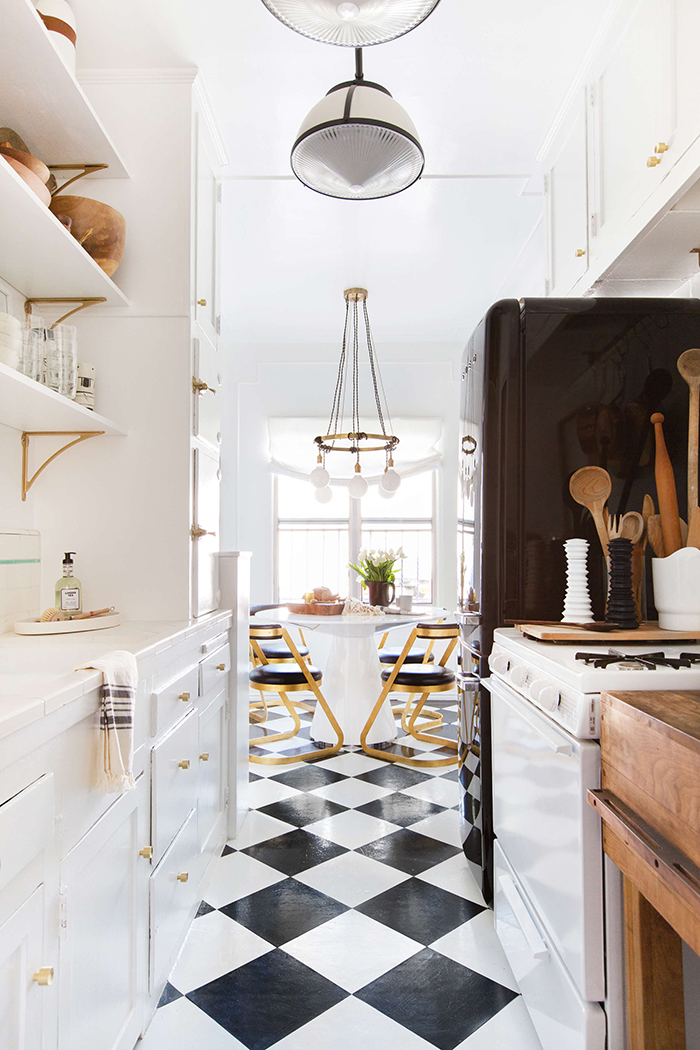
As for the flooring – image from EHD – nothing says retro glam to me, like a well done black & white checkerboard. In our case, choosing cement tile is how we’re bringing things up a notch from roll linoleum. Ya hear me?
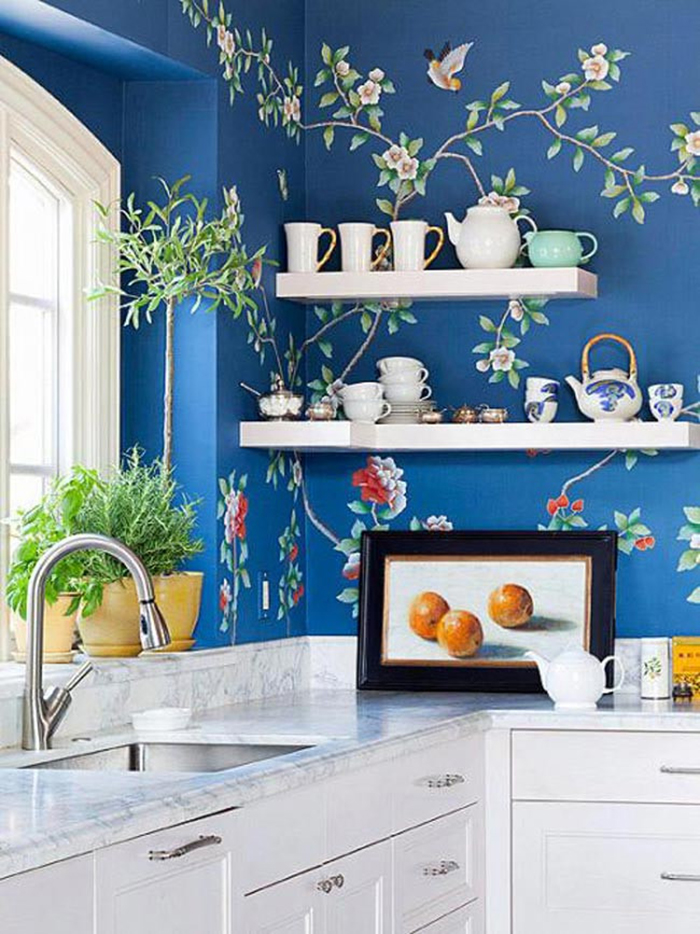

As for wallpaper & floating shelves -Emily Minton Redfield for Andrea Schumacher Interiors – what’s not to love?
Think I can marry all these elements and more? Tune in next week to see what progress we’ve made!

