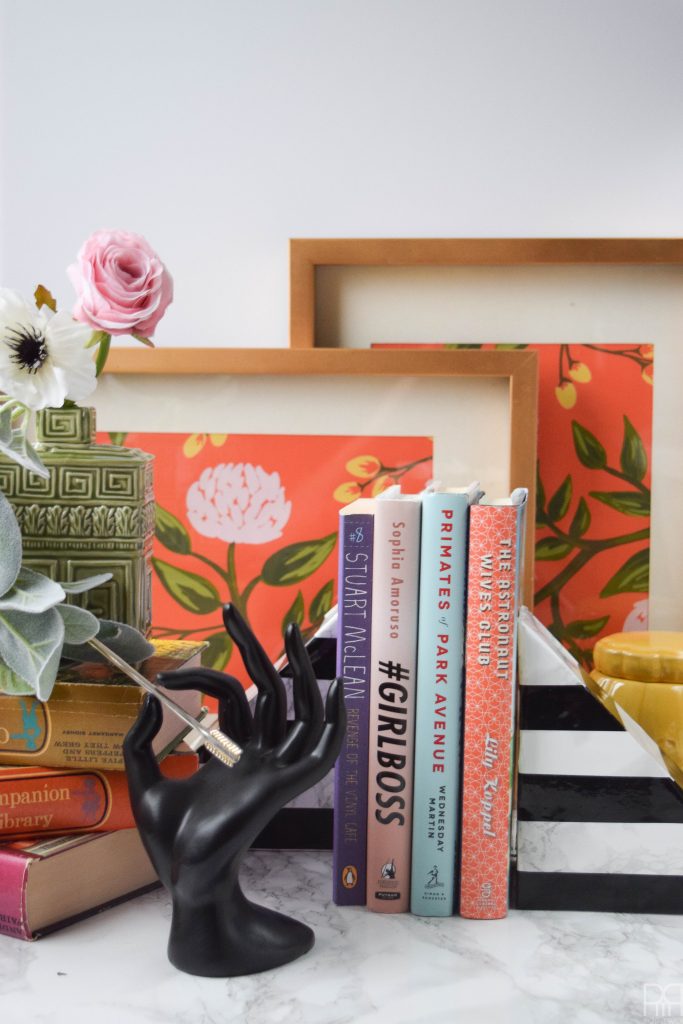
It’s time for this month’s Inspired by DIY! If this week seems jam packed from a content perspective, it’s because it is! I don’t normally share three posts in a week, so make sure you tune in on Wednesday and Thursday to catch all the goodness! It’s like Christmas in September! For this month’s challenge I’m making Faux-Marble Bookends, inspired by // these marble bookends from West Elm // using contact paper, vinyl, and wood!

I have a nice collection of books. I mean sure, we have a ridiculously large collection of military history and analysis books (we could probably open a library), but it’s only been in the past year that I’ve revived a passion for reading again. You know in university when you had to read hundreds of pages a week/night for classes? I learned how to speed read and essentially traverse a page diagonally.
Once I had left the classroom this habit of scanning a page didn’t exactly translate into peaceful afternoons reading. Instead, I’d be done a book within a day and not remember half the plot points. I gave myself a year where I did’t read anything more than a magazine, and then one day I picked up a book (Gone Girl by Gillian Flynn) and haven’t looked back since. I love the chic noir genre, and have a penchant for military spouse memoirs. I particularly enjoyed The Astronaut Wives Club. Now, of course, I have a far too many books and not enough shelves or way to show them off. Enter this project.
I don’t normally buy bookends, in fact I only own one other pair and they’re in // the family room // so making a set for my desk collection makes perfect sense!
Nice marble ones would be hard to come by out here in Fredericton, even considering HomeSense! But, we do have a big bin of leftover bits of wood, so I wondered if I might be able to start there.
Materials
- Four 2″ x 4″ scraps – these are wood scraps, but you could conceivably buy one 2″ x 4″ and then cut it.
- Wood Glue (not No More Nails – actual wood glue)
- Mitre Saw
- Wood filler
- Putty paddle (scientific term?)
- DC Fix 346-0306 Adhesive Film, Grey Marble
- Black outdoor permanent vinyl – I got mine from Expressions Vinyl
- Scissors
- Vinyl Applicator tool
Step 1: Start by gluing your pieces of wood together, stacked vertically, one on top of another. I weighed mine down with a concrete foot, and left it overnight.
Step 2: After waiting for the dry-time, I cut my wood twice:
- Once, to make it a square. I measured the height of my wood stack, and then cut that length on the horizontal.
- And then once, to cut the wood square from end to end on a diagonal.
P.S. what do you think of my gifs?
Step 3: I applied wood filler to all the gaps so that when I apply the contact paper and vinyl, it won’t be wrapping around the curve of the wood. Make sure you respect dry times
Step 4: Sand-down any excess filler left, so that you have two smooth triangles.
Step 5: Make sure you wipe any sawdust off the wood before applying the contact paper! I also spray-painted the bottom of the wedges so that I knew which part to not wrap.
Using my vinyl applicator tool, I wrapped each triangle in marble contact paper. I was able to wrap each triangle in one continuous piece of paper.
I find it best to apply the paper from end to another. I start by getting a good straight line at one end (like an anchor). I don’t fully peel back the backing on the paper right away because I don’t want it sticking while I’m getting a good clean line. Once I’ve got the contact paper properly anchored to one end, I slowly peel the backing off the paper, while applying it with the tool. This can be time consuming, but it ensures there are no pockets or air bubbles.
Step 6: Using my scissors, I cut the black vinyl into 1″ stripes. The vinyl you cut for three of the sides will be 1″, but on the sloped side (the side facing outwards when up against the books) you’ll need to measure the width once the other sides are applied.
Because you’ll have cut the black vinyl on an angle, the width of that piece will actually be longer because in bisecting it we get into some math (a+b=c kinda thing). I somehow don’t have the words to properly explain this part, so take my word and measure this piece separately.
Step 7: Using the same method as with the contact paper, I apply the stripes horizontally across the bookends, leaving a 1″ gap between each stripe.
Step 8: I was making these bad boys in our garage, hence the un-even lighting – don’t hate me – so I made sure to wipe them down before bringing them inside because sawdust was clinging to every inch of them! Style and enjoy!
I think they look fantastic with all my desk accessories!
And now, for the other ladies from the Inspired by DIY series, and their amazing projects!
Iris Nacole // This is Our Bliss // PMQ for Two // Maggie Overby Studios // Up To Date Interiors // Domicile 37
