


For the first time ever, I made a Christmas tree skirt, and you can too! I used Santa’s Workshop in velvet from Spoonflower to create my skirt, and it looks amazing! So if you’ve ever wondered how to sew a Christmas skirt, this is the post for you (hint: it’s super easy)
Catch my guide on how to throw an epic gift wrapping party, or my DIY upcycled pom pom tree skirt
*Spoonflower sponsored this post, but all thoughts are my own. Thank you for supporting the brands that make PMQ for two possible.


What you need to sew a Christmas tree skirt
As I mentioned above, all you need to sew a Christmas tree skirt is 2yrs of fabric (in velvet) – I chose Santa’s Workshop – a sewing machine, fabric wheel + mat, or fabric scissors, and a measuring tape. Those little pins help too, but I’ve managed so far without them.

How to sew a Christmas tree skirt
Start by measuring how big it needs to be! If you’re sewing one for a fake treen, measure from the base to the end of the stand, and then add as much as you need or want (usually about 5-10″).
Fold your chosen piece of fabric in 4 (in half, and then in half again). It’s easier to cut a quarter instead of a full circle, so folding the fabric makes that easy.

From the innermost folder corner, measure 2″ in, and then draw a small arc – this is to allow for the tree trunk.
From that arc, measure the length you need for your skirt. In my case (and likely yours) I measured 24″ and drew an arc using a marker on a string.

Then, cut the fabric along both arcs using a fabric wheel, or scissors. I find the wheel is simpler and often makes for a cleaner result, but hey! You need a cutting mat for those, so don’t just start cutting on your table.
Once you’re done cutting and unfold the fabric, you’ll find the basic outline of your skirt! You could technically call it quits there, but that’s no fun, so next, I added 3 sets of straps to allow for a tighter close at the back.

To hem or not to hem your handmade Christmas tree skirt
Because you used a lovely heavy velvet from Spoonflower, the ends of the tree skirt don’t technically need to be finished. As long as the cut was clean, it’s not going to fray and the material won’t pill. Adding a hem is entirely up to you. An alternative would be adding a pom pom trim, or a fun series of tassels.
I think that because the pattern I chose (Santa’s Workshop) is so busy and colourful, that it doesn’t need anything else, so I left it simple.
Adding fabric ties to your Christmas Tree Skirt
Using your remaining fabric, cut 6 strips of 3″x 10″ fabric. These will be the basis of the scraps!
Fold the strips in half along the vertical (with the two patterned sides facing inwards), pin them along the open edge, and sew closed. Once you’ve done that, flip the fabric noodle right side out (super technical term), and sew both ends closed.
Repeat this for all 6 strips, and then sew them to the skirt on alternate opposite sides of the open tree skirt. Voila! You now have 3 ties for your skirt that will allow you to keep it closed and in place, during all the hubbub of Christmas morning.

Using your handmade Christmas tree skirt
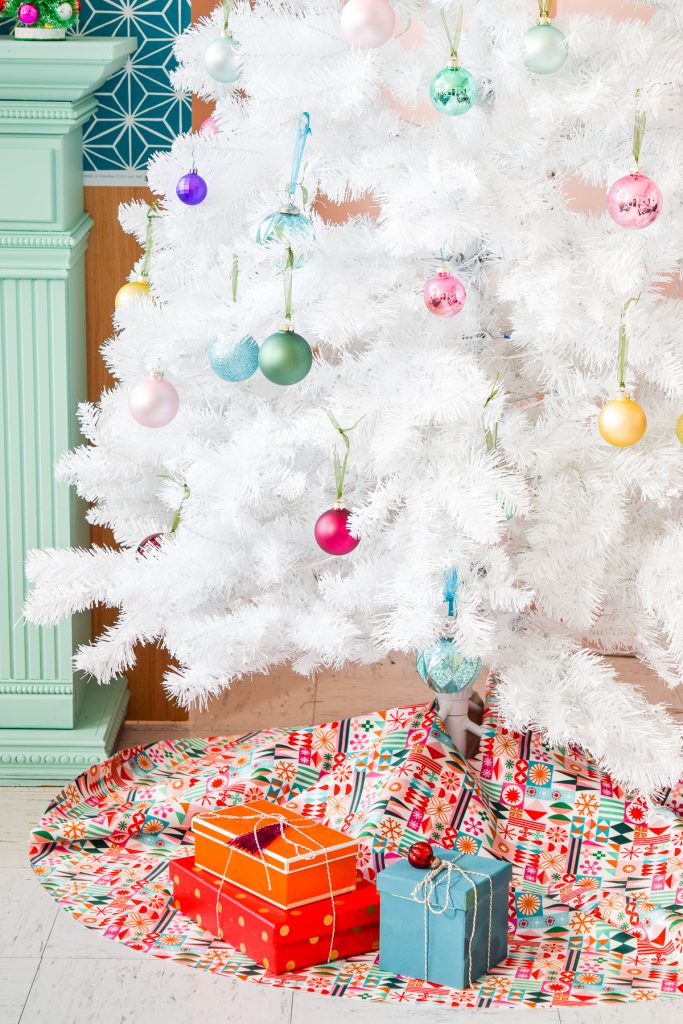
Phew! That took a whole 30 mins to do (at most), and now you can add it to your tree, and display gifts on it! That tree is looking mighty bare ain’t it?!

As you can see, it looks amazing with all the coordinated Penny Candy wrapping paper, so if you chose a different pattern, make sure you chose complimentary gift wrap patterns for ‘gram worthy Christmas scene.
Check out my Gift Wrapping Party Essentials


and because Christmas trees are not just for gifts, but also for decorating and admiring, don’t forget to dress your tree to capture your imagination!

