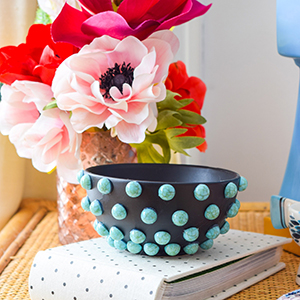
Remember how I said I was gonna try my hand at 10 DIYs in 10 days? Well here’s day 1! My DIY Turquoise Beaded Jewelry Dish is not only quick, easy, and made with clearance isle finds, but the end product is stylish AF, and looks like something you’d find in a slick boutique.
Check out my DIY Kelly Wearstler Lamp & my DIY Holly Golightly Sleep Masks

Turquoise Beads
I love the earthy and opulent look of natural turquoise, but since I definitely don’t have the budget for that many natural stones, I was more than pleased to find a box of faux ones on clearance in Michael’s. Turquoise blue is so striking, so I knew I needed to find some bowls that would look equally good in contrast.
Everything You Need to DIY a Beaded Jewelry Dish
For starters, you’ll need some turquoise beads, but if that’s not possible, looking for a bead that strikes your fancy. You’ll also need some bowls. You can make your own, but who has time for that?! I found these black ones in my local grocery store for a good price, but I did go thrifting for some in case the perfect vessel was waiting for me. Don’t forget the glue! I used a hot glue gun, but you could easily use super glue.

Assembling your DIY Beaded Jewelry Dish
Ready for this? Start gluing. You can make the beads as far apart, or as closer together as you want. I left about a pinkie’s width between each of them, so that as I added more rows of staggered beads, they wouldn’t be too close together.

Once you complete the first row (should be pretty quick), go for the second! Stagger the start so that they fill the space.

I got about four rows of beads on each bowl, but the bigger the bowl, the more you’ll need. (obvi)

DIY Beaded Turquoise Jewelry Dishes – in the wild
I made these bowls with a purpose in mind. I needed something to store my rings in when I take them off at night. So far they’ve just been sitting there, and one or two often go flying in my blind search for my glasses and phone in the AM.


DIY Turquoise Beaded Jewelry Dish
This DIY Turquoise Beaded Jewelry Dish is not only quick and easy, but it's made with clearance isle finds. Plus, the end result is so stylish!
Materials
- Turquoise beads
- Small bowl
Tools
- Hot Glue Gun
Instructions
- Start hot gluing the beads as far apart, or as close together as you want in a row.
- Repeat with another row and continue until the bowl is full.


Supe cute dish Ariel!! Ill be following you closely for the next 10 days. ????
Aww thank you! I was SO pleased with how quickly it came together too. I’ve been doing such big projects, that something small is plenty fun
I love a good crafting challenge! Cant wait to see what else you e got up your sleeve!
Hi Ariel! I came to ur site because i saw you in origin magazine. U have wonderful taste! I too love color. I have to telll u that what really caught my eye in the article were your green dining room chairs!!! They are gorgeous! Green is one of my colors & i love mid century as well. Keep my email ’cause if you ever decide to let them go, i’m ur girl! I live in virginia usa but i would find a way to get those chairs! I love ur style!!
hey! So sorry I’m only seeing this NOW! I’m actually gearing up to sell them and table. Are you interested?