

I love an easy project. Most of my tutorials are hacks or easier versions of something that someone has made complicated. And every now and then I throw something complex at you, but today is not that day. Today I’m sharing my super easy to make DIY Trick-Or-Treat Bags! They’re so easy to make in fact, that I’m only really going to share how I did the fun part, that is embellishing them.
Check out my other applique & sewing projects:
Gucci Inspired Tea Towels, Easy Sew Halloween Apron, Applique Bee Clutch
*Expo International sponsored this post, but all thoughts are my own. Thank you for supporting the brands that make PMQ for two possible.


The plastic buckets are a childhood staple, but so was the pillow case until my mom made us these fantastic bags. I no longer had mine (obviously) but I thought I’d whip up a few to give to my friends’ kids. p.s they loved them.
BTW – you know I love a good trim & applique project, but the good stuff is getting harder and harder to find at a good price. So when my friends reached out about Expo International I was super interested. They’re a website that wholesales trims, fringes & appliques (and so much more)! The prices are unbeatable, the selection is fab, and I’ve already got my Christmas projects planned using some of their stuff.
Sewing Your Trick-Or-Treat Bag
I made three differently sized trick-or-treat bags using fabric scraps I had in the studio. see, when you use fabric as much as I do, you end up with a stash of things!
In case you’re wondering though, I used Spooky Vintage Cats & Pumpkins (leftover from my Easy To Sew Apron), Buffalo Plaid 2″ Check and Rifle Paper Co.’s Celestial Metallic. They were just scraps, so I can’t provide exact measurements.


Fold the fabric in half, and pin it so that it’s inside out (with the printed sides facing each other). If you’ve done this correctly, the bottom of your bag is the line where you folded the fabric.
Pin a 1″ seam, and sew. It will look like a simple pouch once completed. Leave it inside out! Next, you’ll make the handles.
Cut two pieces of fabric about 3″ wide, and as long as you want the handles to be. I made them proportional to the size of the bag, so measurements vary.
Fold each piece along the length, so that the patterned sizes are facing each other. Pin with a small seam, and sew. Once completed, flip it inside out by using a pencil to push one end through on itself until it comes out the other side.
Sew each handle onto the bag, along the inside of the bag (aka the side facing out). Once complete, turn your bag right side out and voila!
Using Trim to Embellish Your Trick-Or-Treat Bag
I kept this next part simple as well. Out of the 3 bags, I only embellished two, but that’s because the third was already pretty busy on its own with the patterns on the fabric.
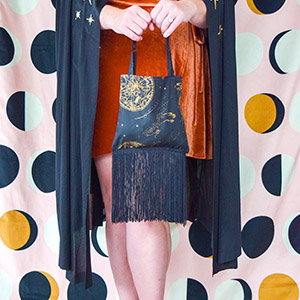
I used 6″ Chainette Fringe in Black to adorn the bottom of my smallest bag. I sewed it on along one side, wrapped it around to the other, and sewed that side as well. Easy peasy!

I fell in love with the bubblegum pink of the Alice Classic Woven Braid Trim (and the price point too!). It’s the perfect match for the big buffalo check print. I wasn’t going to trim out the bag though, I used it to create some text!
“Boo” spelled in trim is kind of adorable, and it pink it really pops against the black. I added a big icy blue bow just for contrast. I just my hot glue gun to attached the woven braid trim because it gave me more flexibility in maneuvering the letters.

Once everything was done, you can be sure that I had a blast playing dress up to show them off! Which one is your fave? I love them all for different reasons, but how easy (and affordable) they were to make was a huge plus too.
What would you do with 10$ of product from Expo International?


DIY Trick-Or-Treat Bags

Learn how to make your own super easy DIY Trick-Or-Treat Bags! They’re so simple and fun to embellish.
Materials
- Fabric Scraps
- Trims, fringes and appliques
Tools
- Sewing Machine
- Pins
Instructions
- Fold the fabric in half, and pin it so that it’s inside out.
- Pin a 1″ seam, and sew.
- Leave it inside out.
- To make the handles, cut two pieces of fabric about 3″ wide, and as long as you want the handles to be.
- Fold each piece along the length, so that the patterned sizes are facing each other.
- Pin with a small seam, and sew.
- Once completed, flip it inside out by using a pencil to push one end through until it comes out the other side.
- Sew each handle onto the bag, along the inside of the bag.
- Once complete, turn your bag right side.
- Embellish your bags with fun fringe, trim or appliques.

