

I hope you caught my live play-by-play of the design and production of these DIY plate racks, over on Instagram. If you did, it all kind of came together before your eyes, and you got to watch me make mistakes and correct them.
* BEHR sponsored this post, but all thoughts are my own. Thank you for supporting the brands that make PMQ for two possible.


I made these using wood scraps from our cast-off pile, so the dimensions are a reflection of what we had on hand, and my cupboards. Feel free to tweak things according to what you’re dealing with.
How to make Plate Racks
These bad boys are usually seen in stores, or in really cool grandiose kitchens in one fashion or another. There are all kinds of variations on the design, but I think these modular ones are just what we needed.
What do you need to make plate racks?
I used 1″x 2″ and 0.25″ dowels to make these. You’ll also need wood glue, a mitre saw, a drill with corresponding bits, and of course BEHR® Chalk Decorative Aerosol Paint. I also suggest things like a pencil, a measuring tape, and the dimensions of your cupboards and tallest plates, to make sure everything fits.

DIY Plate Rack Instructions
I drew up a simple sketch for what I wanted them to look like. Each rack is two parallel 1″ x 2″ pieces with dowels inserted along the top at matching intervals, held together by two small pieces of 1″ x 2″.

I started by laying everything out to make sure I had enough wood scraps, checking my spacing, making adjustments etc.
Here, each rack is 12″ long with a 3″ piece in the middle.
Next, you need to cut your dowels and make sure you have enough for each side of the rack. Mine are 4″ each, assuming that they’ll be fully inserted into the frame, it will leave enough dowel to support a plate.

I used pieces that I had painted for a previous project, so this was a no-cost project, which I love!
As you can see below , the next step is all about precision and some calculations. Based on the length of your racks, and the number of plates you’d like to hold, divy things up, ensure the holes will go down the middle, and drill!
Because each piece is 12″, I put mine 1.5″ apart, but had the first peg start 0.5″ from the front.

Before inserting dowels, make sure the racks are assembled with their middle cross bars. I used wood glue and some clamps for a few hours, to make sure everything was holding.
Before inserting the dowels, dab them in wood glue to ensure a strong hold. I then used a rubber mallet to get the pegs all the way in.

As you can see, they’re complete, but they’re not pretty. This is where BEHR® Chalk Decorative Aerosol Paint comes in. It comes in a variety of colors, but here I thought Tin White would be the appropriate colour.
As you’ll remember from last spring’s glam kitchen makeover, we painted the inside of our kitchen cabinets white.

Apply the BEHR® Chalk Decorative Aerosol Paint, much like you would any spray paint. Shake well, apply outside or in a well ventilated space, and use sweeping strokes from about 16″ away, to ensure even coverage.
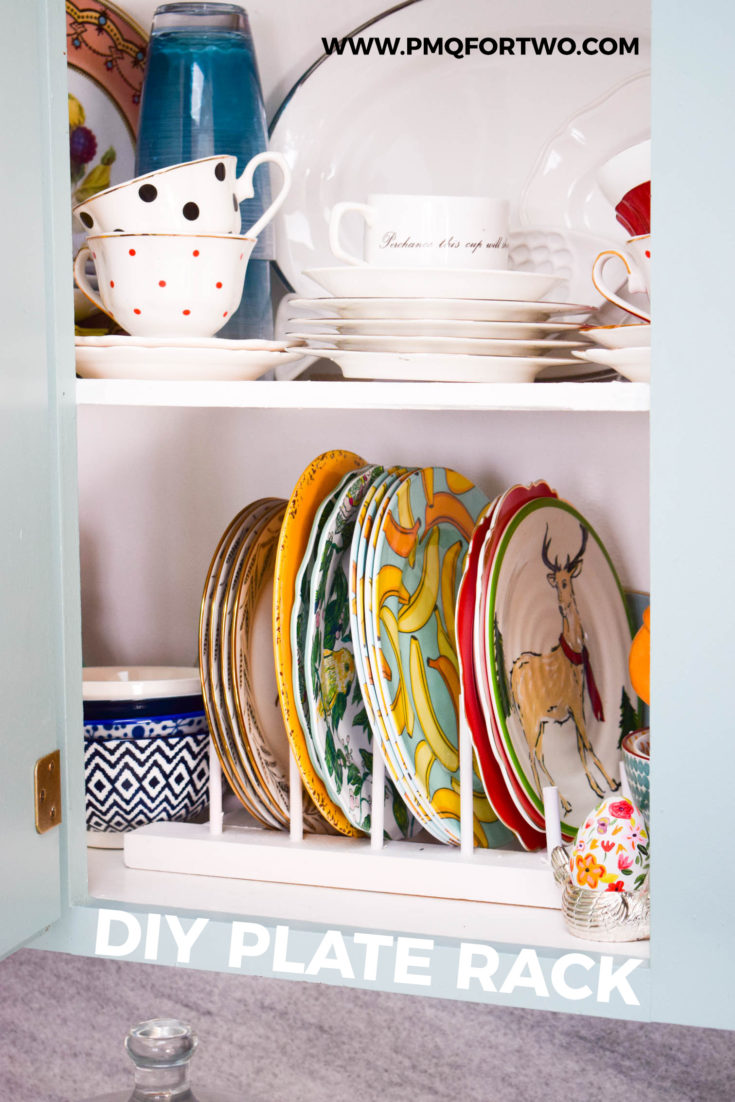
Once painted, my DIY plate racks were perfectly covered, and ready to be put into action.

DIY Plate Rack
Our fancy dish cupboard aka my prop cupboard for one-offs and random styling props, was in dire need of some organization. Last spring I organized things by colour (as seen below), but after a year, it just wasn’t working


Now, wish the dish racks in place, I can more easily see what I’ve got, access it, and I don’t risk breaking anything else in the process.


How To Make A DIY Plate Rack

Learn how to use wood scraps and dowels to make a useful DIY plate rack made to fit in your cabinet.
Materials
- Dowels 1"x 2" and 0.25"
- Wood Glue
- BEHR® Chalk Decorative Aerosol Paint
Tools
- Pencil
- Measuring tape
- Drill
- Mitre Saw
Instructions
- Lay out all your supplies to make sure you have enough wood scraps.
- Each rack is 12" long with a 3" piece in the middle.
- Cut your dowels to size. Mine are 4" each.
- Based on the length of your racks, and the number of plates, ensure the holes will go down the middle, and drill.
- Mine are 1.5" apart, with the first peg start 0.5" from the front.
- Assemble with the middle cross bars using wood glue and clamps for a few hours.
- Before inserting the dowels, dab them in wood glue then use a rubber mallet to get the pegs all the way in.
- Apply the BEHR® Chalk Decorative Aerosol Paint.
- Shake well, apply outside or in a well ventilated space.
- Use sweeping strokes from about 16" away, to ensure even coverage.

