I once saw a pin for a halloween vignette that gave me all the feels. It was every “Martha Stewart circa my childhood” halloween fantasy come to life, and best of all, it looked doable for myself. This was back before I was blogging (so like forever ago), so I filled this away for future use. My DIY Halloween Treat Bags are not only adorable, but easy to replicate for yourself. Best part is, it all starts with the fabric!
Check out my Easy to Sew Halloween Apron, my Retro Halloween Porch Decor, and my DIY Hocus Pocus Mirror
*Spoonflower sponsored this post, but all thoughts are my own. Thank you for supporting the brands that make PMQ for two possible.
** Originally published Oct 18th 2018


So far I’ve found a host of amazing pieces and patterns on Spoonflower. They’ve got such a great selection of retro inspired prints in their marketplace, so it makes shopping for inspiration at once easy, and super complicated (because I love everything).
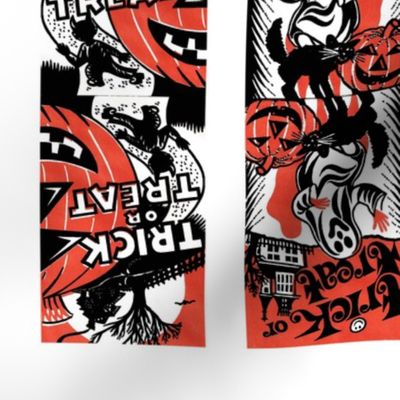
I was looking for patterns to use for giant house decals like in my retro porch decor, when I came across this print for Halloween Treat Bags. That’s when I knew I could make my Martha Stewart dreams come true.
Sewing DIY Halloween Treat Bags
To make about 24 bags, I ordered 1yrd of the Halloween Treat Bag print in Kona. For this, you’ll need a sewing machine, an iron + ironing board, and some cute little ribbon (or trim!).


Like with all sewing projects, you need to start by ironing it. It will make for smoother cutting, pinning and sewing. Trust me! Plus, my assistant Kelly told me to do it, and she’s a sewing whiz, so I’ll take her word any day.

Start by cutting out each bag pattern with a 1″ seem allowance. Fold it in half so that the two outward facing bits are facing each other. Using the iron, fold down a 1/2″ seam along the top (it will make the bags look more polished). Sew down the sides – see below.
Trim the extra seams, fold inside out, and iron.


Setting up your Halloween Treat Bag Tree
OK so now that the “hard work” is done, it’s time for the fun part! Let’s create the tree arrangement that the bags will hang from.

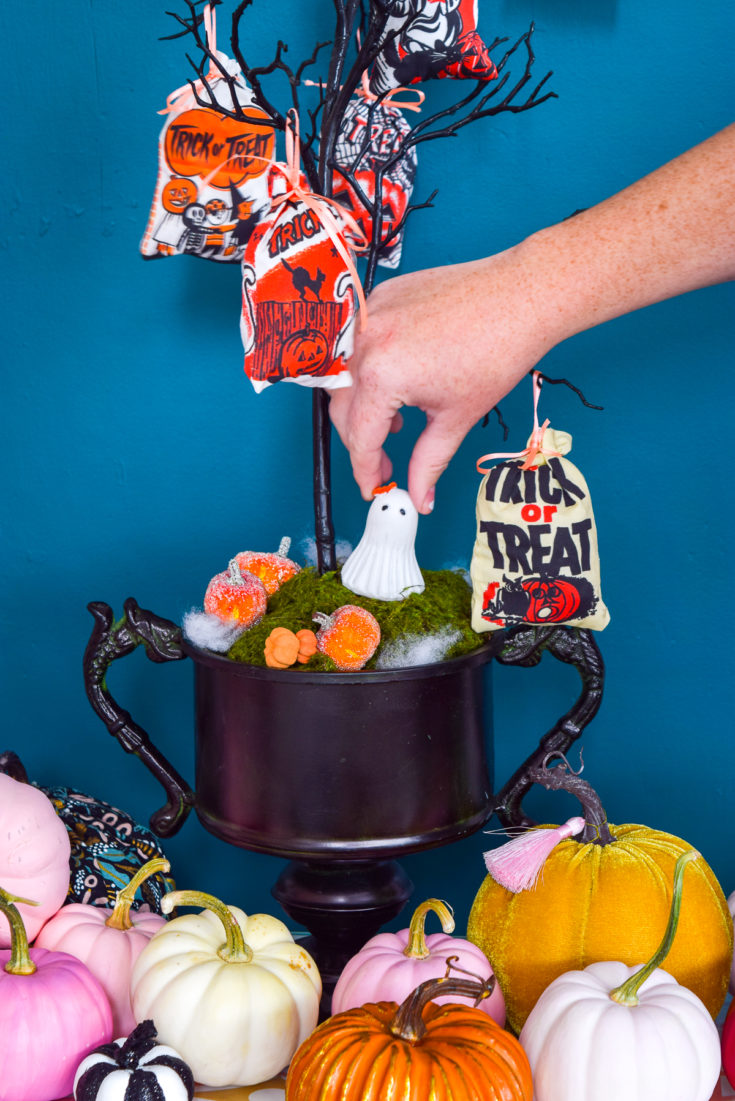
I used a beautiful black urn that I snagged on Afloral.com last fall, stuffed it floral foam, and weighed down the base using some stones I had. I then added some sheet moss, and inserted the black branch that served as the tree.

I added some batten to look like mist floating across a graveyard, some mini crafting pumpkins, and an adorable miniature ghost (with a bow!).


Once everything is in place, use a ribbon to hold the stuffed treat bags together, and then hang them from the branches on display.
This adorable DIY Halloween Treat Bag Tree would look right at home in your entryway on Halloween, or even just sitting in your living room, tempting you each evening while you watch TV.
Displaying Your DIY Halloween Treat Bag Tree
I also happen to think my DIY Halloween Treat Bag Tree looks best surrounded by dozens of pumpkins, so if you’re so inclined, get to it! As kids come to the door, you can give them the option of choosing which one they want.


DIY Halloween Treat Bags

DIY Halloween Treat Bags are not only adorable, but easy to replicate for yourself. Fill them with favorite goodies and give to friends and family.
Materials
- 1 yard Halloween Fabric
- Ribbon
Tools
- Sewing machine
- Iron + ironing board
- Scissors
Instructions
- Cut out each bag pattern with a 1″ seem allowance.
- Fold it in half so that the two outward facing bits are facing each other.
- Using an iron, fold down a 1/2″ seam along the top.
- Sew down the sides.
- Trim the extra seams.
- Fold inside out, and iron.
- Fill your bag with treats.
- Hang from a tree or decorate as you like.
Recommended Products
As an Amazon Associate and member of other affiliate programs, I earn from qualifying purchases.