While setting a tablescape for a colourful fall dinner, I created a DIY Colourful cornucopia centrepiece using spray paints, and I wanna tell you all about it.
My other projects in the TP X Krylon Series
Colourful Striped Planters & Colourful Pastel Seafood Tablescape
*Krylon sponsored this post, but all thoughts are my own. Thank you for supporting the brands that make PMQ for two possible.
*originally published Sept 12th 2018


With Canadian Thanksgiving on the horizon, I thought it might be fun to set a tablescape with some life and colour inspired by nature. The fall colours from the TP X Krylon collection are perfect for that: Cherry Red, Ballet Slipper, Surf, Seaside Green, and Ivy Leaf. You can find them all // here //
How to make a colourful cornucopia centrepiece
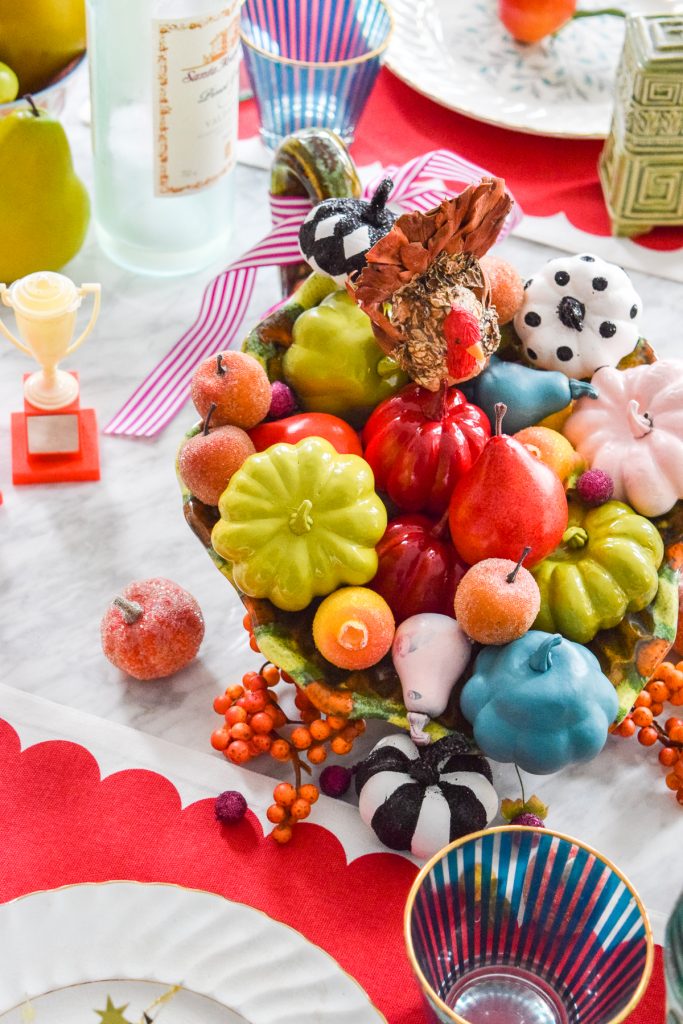
The cornucopia aka the horn of plenty. It’s a staple of fall decor, thanksgiving tablescapes, and now — my table. I’ve seen ceramic versions in the thrift stores for a while now, but I finally snagged a green one. It’s the perfect metaphor, and display, for my love of colours.
Spray Paint some gourds
*The following product links contain affiliate links. Thank you for supporting the brands that make PMQ for two possible. For my full policies click // here //
I didn’t want to fill the cornucopia with just fake fruit or flowers, so I grabbed some miniature gourds from Michael’s, and spray painted them using the fall colour collection. Since it was raining when I did it, I used my HomeRight spray shelter to do it. Worked like a charm!

Use colourful fall harvest finds
While all the gourds were drying, I took apart a small wreath I found at the thrift store. It had candied apples, berries, and pomegranates on it. I didn’t need he wreath, but I wanted those for my colourful cornucopia. I used some wire snips to remove them.
I also had some little pumpkins and pears lying around, so I grabbed them to incorporate into the display.

Assembling your colourful cornucopia
Once everything’s ready to go, start assembling your colourful centrepiece. Start by placing larger and oddly shaped items at the bottom of the cornucopia. It will quickly fill up that way, so make sure that as you do, you start layering in smaller pieces like berries, pears, and other little odds and ends.
Once it was full, I added some berry sprigs, and a ribbon around the horn.


Displaying your DIY colourful cornucopia centrepiece
Pop that sucker on your table and enjoy! Kidding, maybe you should gently place it, because otherwise a whole bunch of colourful gourds will spill out.
I’ll have my full tablescape reveal in a week, so stay tuned! and feast your eyes on these little snippits in the meantime.
Catch my last few fall tablescapes: Plaid and Eclectic Tablescape // colourful classic tablescape

Remember my Spoonflower sideboard hack? You should totally put one together before the holiday season starts in earnest.


Make sure you check out the other bloggers’ projects in the Color Splash Blog Hop! I know they’ve been bursting with creativity all summer, and have been waiting for their kids to be back in school to fully let lose and create.
Jeweled Interiors | Clayton Makes | PMQ For Two | DIY Decor Mom | Designer Trapped | Kate Decorates | Dimples and Tangles | Heathered Nest | Haneen’s Haven | At Charlotte’s House | Domicile 37